This article was co-authored by wikiHow staff writer, Nicole Levine, MFA. Nicole Levine is a Technology Writer and Editor for wikiHow. She has more than 20 years of experience creating technical documentation and leading support teams at major web hosting and software companies. Nicole also holds an MFA in Creative Writing from Portland State University and teaches composition, fiction-writing, and zine-making at various institutions.
The wikiHow Tech Team also followed the article's instructions and verified that they work.
This article has been viewed 725,513 times.
Learn more...
Are you running into trouble with your Windows dual-monitor setup? Some video conferencing and screen-sharing software prioritizes monitor numbers over your display settings, which can lead to accidentally sharing the wrong screen. While you can set either monitor as your primary display, you cannot switch the "1" and "2" labels without making a registry change. We'll walk you through modifying the Windows registry to change the monitor numbering on your PC.
Steps
Changing the Primary Display
-
1Right-click any blank space on your desktop. Right-click any part of your main desktop that doesn't have any apps, programs, or icons. This will display a menu.
- Use this method if you're using two monitors and want to rearrange them and set the secondary monitor as your primary display.
-
2Click Display settings. It's towards the bottom of the right-click menu, next to the icon of a monitor.Advertisement
-
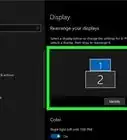
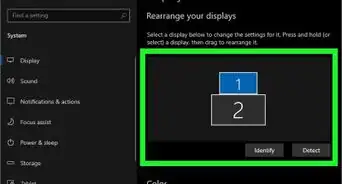
3Click and drag your displays into the desired order. Each of your monitors is represented by a number in this window. You'll usually want your displays arranged to replicate how you have your monitors positioned. For example, if display 1 is your laptop screen and your external monitor, display 2, is positioned on your desk to the left of your laptop, you'd want to drag display 2 to the left of display 1.[1]
- If you're not sure which display is which, click one of the displays, and then click the Identify button. This makes a "1" or "2" appear at the bottom-left corner of each monitor.
- If you make any changes, click Apply to save them.
-
4Click the monitor you want to set as your primary display. This selects the monitor.
-
5Scroll down and click the checkbox next to "Make this my main display" . It's just below the "Multiple displays" menu.[2]
- If the checkbox is already checked, this monitor is already your primary display.
- To change the primary display to a different monitor, click that monitor at the top, and then check the box next to "Make this my main display" once selected.
-
6Click Apply. This is the below the checkbox. This will apply the new display settings and swap the monitors.


Switching Monitor Numbers
-
1Disconnect all monitors except the primary monitor. To swap the monitor numbers on your Windows PC, you'll need to change which port each monitor is connected to. However, just plugging each monitor into a different port isn't enough—you'll have to remove the registry keys that remember the monitor numbers so Windows can properly detect the new monitor order.[3] Before opening the editor, unplug all monitors that aren't the one that's current set as the primary monitor.
- For example, if you're using a laptop plugged in to a docking station, just use your laptop monitor and unplug your external monitor(s).
-
2Open the Registry Editor. To open the Registry Editor, type regedit into the Windows search bar, and then click Registry Editor in the search results.
-
3Go to HKEY_LOCAL_MACHINE\System\CurrentControlSet\Control\GraphicsDrivers. An easy way to do this is to copy that address, paste it into the address bar at the top of the Registry Editor, and then press Enter. Another option is to navigate there using these steps:
- Double-click HKEY_LOCAL_MACHINE in the left panel.
- Double-click the System folder beneath that.
- Double-click the CurrentControlSet folder beneath that.
- Double-click the Control folder beneath that.
- Double-click the GraphicsDrivers folder beneath that.
-
4Rename the "Configuration" key to Configuration.old. The idea is to delete this key, but renaming it can help you restore it in case anything goes wrong. Here's how:
- Right-click the "Configuration" folder in the left panel.
- Click Rename.
- Type Configuration.old.
- Press Enter.
- If anything goes wrong later (it shouldn't), you can always return here and rename the new "Configuration.old" folder to "Configuration" to restore your previous settings.
-
5Rename the "Connectivity" key to Connectivity.old. Here's how:
- Right-click the Connectivity folder in the left panel.
- Click Rename.
- Type Connectivity.old.
- Press Enter.
- As with the last step, if anything goes wrong with your settings, you can return here and rename the new "Connectivity.old" folder to "Connectivity" to restore your settings.
-
6Shut down your PC. Don't restart it—you'll actually want to shut it down. To do this, just click the Windows Start menu, click the Power icon at the bottom-left, and then select Shut down. Continue to the next step once your computer is shut down.
-
7Connect only the monitor that you want to set as Monitor 1. It's important that this monitor be connected to the primary video port on your PC. If you have a multiple-port video card, plug it into the first port. If you have a monitor port built in to your motherboard, that one is usually the primary port (Monitor 1).[4]
- If you're using a laptop, the built-in monitor will always be Monitor 1.
- If you have multiple video cards, there's no surefire way to know which is the primary other than simply trying the reverse order.
- Do not plug in your second monitor yet.
-
8Power on your PC. Press the power button on your laptop or desktop tower to do so. If your monitor is turned off, turn that back on as well.
-
9Right-click the desktop and select Display settings. This opens the Display settings window.
-
10Plug in the second monitor. Windows will automatically detect the monitor and install any necessary drivers. Once the monitor is detected, you should see two monitors under "Multiple displays" in the right panel. The monitor labeled "Monitor 1" is the one that's now plugged in to the primary port. The one labeled "Monitor 2" is now the second monitor that you just plugged in. If you connect a third monitor, it will be detected as Monitor 3, and so on.
- If you don't see the second (and/or third) monitor in the Display Settings window, click the Detect button under "Multiple displays" to detect it now.
- Windows has automatically recreated the registry entries you renamed earlier, so there's no need to return to the registry.


References
- ↑ https://support.microsoft.com/en-us/windows/how-to-use-multiple-monitors-in-windows-10-329c6962-5a4d-b481-7baa-bec9671f728a
- ↑ https://www.youtube.com/watch?v=lUwGt4Qy-t8
- ↑ https://support.displaylink.com/knowledgebase/articles/736116-windows-display-properties-identify-numbers-are
- ↑ https://superuser.com/questions/1455322/windows-10-change-display-numbers-identity
About This Article

1. Right-click the desktop.
2. Click Display Settings.
3. Click the monitor you want to set as primary.
4. Check "Make this my main display".
5. Click Apply.