This article was co-authored by wikiHow staff writer, Travis Boylls. Travis Boylls is a Technology Writer and Editor for wikiHow. Travis has experience writing technology-related articles, providing software customer service, and in graphic design. He specializes in Windows, macOS, Android, iOS, and Linux platforms. He studied graphic design at Pikes Peak Community College.
This article has been viewed 79,470 times.
Learn more...
This wikiHow article teaches you how to set up a dual monitor display on PC or Mac using HDMI cables. If your computer does not have two independent HDMI ports, you can purchase an HDMI adapter that works with a USB 3.0 port.
Steps
Connecting Dual Monitors
-
1Purchase an HDMI adapter (if needed). Many PC graphics cards have two independent HDMI ports in order to support dual monitors. However, most PCs only have one HDMI port. Check your PC to see how many HDMI ports it has. If you are using a laptop, or your PC only has one HDMI port, you will need to purchase a USB-to-HDMI adapter. You can purchase these from most electronics stores.
- You can even purchase dual HDMI adapters that allow you to connect two monitors to a single USB port.
-
2Arrange your dual monitors and computer on a desk. Make sure you have enough space for both monitors. Place them next to each other and make sure they are within reach of your computer tower and power supply.Advertisement
-
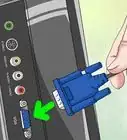
3Connect the monitors to your computer. HDMI cables have a rectangle-shaped plug with notched corners on the bottom. Locate the port that matches the shape of the HDMI cable plug and plug one end of the cable into the monitor. Then plug the other end of the cable into the computer's HDMI. Then repeat with the next monitor.
- Most computer have their HDMI ports located on the back of the computer tower. If you are using a Laptop, the HDMI can usually be found on the left or right side of the keyboard. If your laptop does not have a USB port, you will need to use a USB-to-HDMI adapter.
- If you are using a USB-to-HDMI adapter, plug the adapter into a USB 3.0 port on your computer. Then connect the HDMI cable to the other end of the adapter. Connect the other end of the HDMI cable into one of the monitors.
- If your computer has a dedicated graphics card, connect your monitors to the dedicated graphics card rather than the PC's integrated HDMI port.[1]
-
4Plug the monitors and computer tower into a power strip. Make sure you have an electrical outlet near your monitors and computer. Plug a power strip into the electrical outlet and then plug both the monitors and computer into the power strip.
-
5Power on your computer. Once everything is set up and connected, press the power button on your PC to turn it on.


Setting Up Dual Monitors on Windows
-
1Right-click any blank space on your desktop. This displays a context menu next to your mouse cursor.
-
2Click Display settings. It's in the context menu that appears when you right-click your desktop. It's next to an icon that resembles a computer monitor.
-
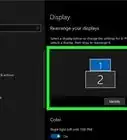
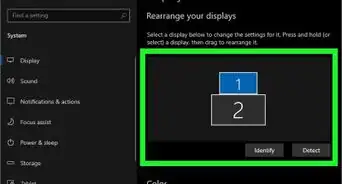
3Click and drag the monitors in the diagram to match how they are arranged. You will see two monitors in the diagram under "Display" labeled "1" and "2". Click and drag the monitors in the display to match how they are arranged on your desk. You can arrange them from left-to-right, right-to-left, top-to-bottom, or any other direction you can think of.
- If you are not sure which monitor is which, click Identity below the display. This displays the corresponding number for each monitor on the monitor itself.
- Pay careful attention to any offsets in your monitor arrangement. For example, if one monitor is slightly lower than the other, make sure it is reflected in the way you arrange the monitors in the display.
- If you don't see an image on both displays, click Detect to automatically detect the displays.
-
4Click Apply. This applies the arrangement settings as displayed in the diagram.
-
5Click a monitor you want to change the settings for (optional). This highlights the monitor in blue. Any display settings you change will be applied to the monitor that is highlighted in blue.
-
6Select the display settings for the monitor (optional). Use the drop-down menus below "Scale and Layout" to change your display settings. The drop-down menu options are as follows:
- Use the drop-down menu below "Change the size of text, apps, and other items" to change the scale of objects in your display. "100%" is normal size. Select "125%," "150%', or "175%" to make objects and text appear larger on your screen.
- Use the drop-down menu below "Display resolution" to change your monitor's screen resolution. Normally, Windows will detect what resolution your monitor supports and automatically set the resolution to the recommended resolution. The higher the resolution, the more detailed the monitor's image will be.
- Use the drop-down menu below "Display orientation" to select the monitor's orientation. "Landscape" is the standard lengthwise display. "Portrait" rotates the image 90 degrees and displays a "tall" image on your computer monitor. You can also select Landscape (flipped) or Portrait (flipped) to display an upside-down image.
-
7Select a multi-display mode. Use the drop-down menu below "Multiple Displays" to select a multi-display mode. The most common mode is "Extend these displays." This allows you to drag objects from one monitor to the other. You can also select "Duplicate these displays" to display the same image on both displays. You can disable one of the monitors by selecting "Show only 1" or "Show only 2."


Setting Up Dual Monitors on Mac
-
1
-
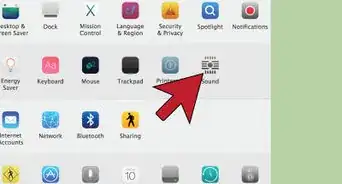
2Click System Preferences. It's the second option in the Apple menu. This displays the System Preferences menu.
-
3Click Display. It has an icon that resembles a computer monitor. Click the icon to open the Display menu.
- If your Mac doesn't automatically detect both displays, hold the Option key and click Detect in the lower-right corner of the Display menu.
-
4Set the resolution for both monitors (optional). By default, your Mac should automatically detect the resolution for both monitors. If you want to adjust the monitor resolution, click the radio option next to Scaled. Then click the resolution you want. The higher the resolution, the more detailed the monitor image will be.
-
5Use the "Rotation" drop-down menu to rotate the displays (optional). If you want to leave the monitors in the standard landscape (lengthwise) mode, leave the drop-down menu next to "Rotation" as "Standard." If you want to use the monitor in Portrait (tall) mode, use the drop-down menu below "Rotation" and select "90 degrees." You can also select "180 degrees" (upside-down), or "270 degrees" (upside-down portrait mode).
-
6Click the Arrangement tab. It's the second tab at the top of the screen.
-
7Check or uncheck the checkbox next to "Mirrored." It's in the lower-left corner. If this checkbox is checked, both monitors will display the same image. If you want to be able click and drag objects from one monitor to another, uncheck the "Mirrored" checkbox.
-
8Click and drag the monitors in the display to match how they are arranged. Click and drag the two monitors in the diagram so that they match how you have your monitors arranged on your desk. You can arrange them from left-to-right, right-to-left, top-to-bottom, or any other direction you can think of
- If you are not sure which monitor is which, click and hold the monitor on your display. This will display a red outline on the corresponding monitor.
- Pay careful attention to any offsets in your monitor arrangement. If one monitor is slightly lower than the other, make sure it is reflected in the way you arrange the monitors in the display.


References
About This Article

1. Arrange both monitors on your desk close to your computer tower and power supply.
2. Power on your computer and open the Display Settings menu.
3. Use the display settings menu to adjust your monitors' display to your liking.
4. Click and drag the two computer monitor images in the diagram to match how they are arranged on your desk.
5. Uncheck the "Mirrored" checkbox on Mac, or use the drop-down menu below "Multiple displays" to select "Extended these display on Windows."