This article was co-authored by Mia Danilowicz. Mia Danilowicz is a Master Tailor who works onset and on the red carpet in Los Angeles, California. With over a decade of experience, Mia specializes in bridal and gown couturier fittings, garment reconstruction, and custom design. Mia has worked at the Oscars, Grammys, SAG Awards, and Golden Globes. Her clients include a long list of entertainment and fashion industry headliners, major fashion magazines, luxury consumer brands, and popular media. Mia was trained at the Fashion Institute of Design and Merchandising and received her AA in Fashion Design and BS in Business Management.
This article has been viewed 113,546 times.
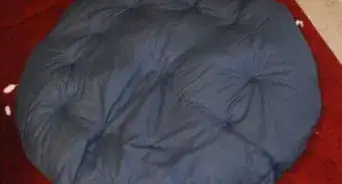
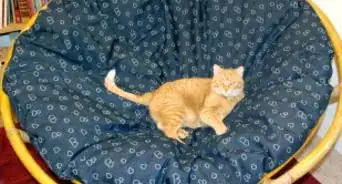
Pillows can come in all shapes and sizes. While square or rectangular pillows are the most common, round pillows are great for couches, chairs, and armchairs. They are easy to make and can bring color and texture to your bedroom, living room, or kitchen.
Steps
Sewing a Simple Pillow
-
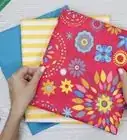
1Stack 2 sheets of fabric together, with the right sides facing in. Place a sheet of fabric on your table with the right side facing up. Cover it with another sheet of fabric, this time with the wrong side facing up. Make sure that the edges are lined up.
- Choose woven fabric without any stretch, like linen or cotton broadcloth, so your pillow holds its shape over time. You can also use fabric from clothes you no longer wear, which is a great way to repurpose and recycle your items.
- The fabric should be 1 to 2 inches (2.5 to 5.1 cm) larger than what you want your pillow to be. This will give you room for seam allowances and cutting.
- The "right side" is the front or patterned side of a piece of fabric. The "wrong side" is the back or blank side of a piece of fabric.
-
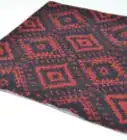
2Trace a circle onto the stacked fabric. Use white tailor's chalk on dark fabrics, and a colored dressmaker's pen on light fabrics. The circle needs to be 1 inch (2.5 cm) larger than what you want the pillow to be. You can use a large plate or a compass to trace the circle.
- If you are making a cover for an existing pillow, trace 1⁄2 inch (1.3 cm) around the pillow.[1]
Advertisement -
3Pin the fabric together, then cut the circle out. Insert sewing pins through both layers of fabric just inside the circle. Cut through both pieces of fabric using sharp fabric scissors. Make sure that you cut right along the line that you drew.
- Do not remove the pins. They will help fold the fabric together while you sew.
-
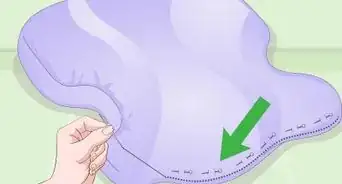
4Sew around the circle partway, using a 1⁄2 in (1.3 cm) seam allowance. Use thread color that matches your fabric, a straight stitch, and a 1⁄2 in (1.3 cm) seam allowance. Do not sew all the way around the pillow. Instead, leave a 4 to 6 in (10 to 15 cm) gap for turning the pillow right-side-out. Remove the pins as you sew so that you don't ruin your sewing machine.[2]
- A seam allowance is the how far away from the cut edge you are sewing. Most sewing machines will have a ruler just under the foot.
- Make your stitching stronger by backstitching when you start and finish sewing.
-
5Cut notches into the seam allowance. This step is very important as it will prevent the fabric from buckling. Use sharp fabric scissors to cut V-shaped notches into the seam. Make the notches about 1⁄2 in (1.3 cm) apart and as close to the stitching as possible. Be careful not to cut through the stitching, however![3]
-
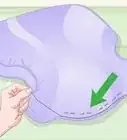
6Turn the pillow form inside out. Use your finger or a knitting needle to help push the seams out. You don't have to press the seams flat with an iron because you will be stuffing the pillow, but you can if you really want to.
-
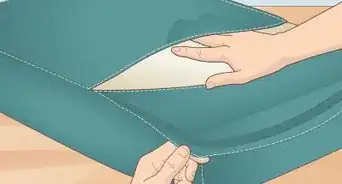
7Stuff the pillow with polyester fiberfill. This is the same material that you use to stuff teddy bears with. You can find it in fabric stores and craft stores. If you sewed your cover for an existing pillow, tuck the pillow into the cover instead.
- How much fiberfill you use is up to you. The more you stuff it, the fluffier the pillow will be.
-
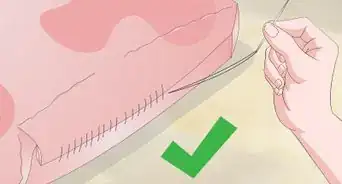
8Stitch the gap shut by hand. Fold the raw edges of the opening in so that they match up with the seams. Secure the opening with sewing pins, then stitch it shut using a whipstitch or a ladder stitch. Knot the thread securely, then trim the excess off. Remove the pins when you are done.[4]


Making a Chair Cushion
-
1Stack 2 sheets of fabric together with the wrong sides facing out. Place a sheet of fabric on top of a table with the right side facing you. Place a second sheet of fabric on top, this time with the wrong side facing you. Smooth out any wrinkles.
- Opt for woven fabric without stretch that will holds its shape. Repurpose clothing items you no longer wear or choose linen or cotton broadcloth.
- The "right side" is the front or patterned side of the fabric. The "wrong side" is the back or blank side.
-
2Trace a circle that is 1⁄2 inch (1.3 cm) larger than what you want your pillow to be. This will give you a 1⁄4 in (0.64 cm) seam allowance all around. If you are making a cover for an existing pillow, trace 1⁄2 inch (1.3 cm) around the pillow instead.[5]
- Use white tailor's chalk for dark fabrics and a colored dressmaker's pen for light fabrics.
-
3Pin and cut the circles out of the fabric, then remove the pins. Insert sewing pins just inside the circle that you drew, then cut right along the drawn line with sharp fabric scissors. Remove the sewing pins when you are done, then pull both layers of fabric apart to get identical circles.[6]
- Make sure that you are pinning and cutting through both layers of fabric.
-
4Cut a strip of fabric long enough to wrap around your circle for the sides. Decide how tall you want your pillow to be; this will be your rectangle's height. Next, measure the circumference of 1 circle, then add 1⁄2 inch (1.3 cm); this will be your rectangle's length. Cut a strip out of fabric based on these measurements. This will eventually make the sides of the pillow.[7]
- How wide the strip depends on how thick you want the pillow to be. About 3 inches (7.6 cm) would be ideal, however.
- The strip can be the same color/pattern as the circles, or it can be a coordinating one.
-
5Sew the narrow ends of the strip using a 1⁄4 in (0.64 cm) seam allowance. Fold the strip in half with the right side facing in. Pin the fabric, if needed, then sew along the narrow edge using a straight stitch, a 1⁄4 in (0.64 cm) seam allowance, and a matching thread color. Remove the pins once you finish sewing. You'll end up with a fabric ring.
- Backstitch at the start and end of your sewing to make your stitching stronger.
- Press the seam open with a hot iron to make it lay flat. This will give you a nicer finish.
- A seam allowance is the how far away you are sewing from the raw, cut edge of the fabric.
-
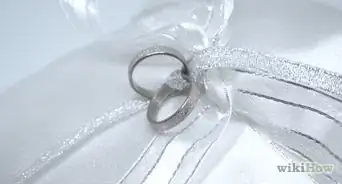
6Cut 2 24 in (61 cm) strips of bias tape for the ties, if desired. Cut the strips first. Fold the narrow ends in by 1⁄4 to 1⁄2 inch (0.64 to 1.27 cm), then them with an iron. Sew along the loose (not folded) long edges using a matching thread color on your sewing machine.[8]
- Skip this step if you don’t want to make ties.
- You can use a color that matches or coordinates with your cushion fabric.
-
7Fold and sew the ties to 1 of the circles. Fold the strips in half (widthwise), then pin them to the right side of a circle. Make sure that the folded ends of the strips are touching the outer edge of the circle, and the loose ends are pointing towards the middle. Stitch over the pinned ties using a straight stitch and a 1⁄4 in (0.64 cm) seam allowance, then remove the pins.[9]
- Skip this step if you are not making ties.
- How far apart you space the ties depends on how wide the backrest of your chair is.
-
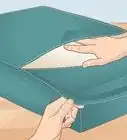
8Pin and sew the ring to 1 of the circles using a 1⁄4 in (0.64 cm) seam allowance. Make sure that the right sides of the ring and the circle are both facing in. Use a 1⁄4 in (0.64 cm) seam allowance and a matching thread color as before. Backstitch at the start and end of your sewing, and remove the pins when you are done.[10]
-
9Sew the second circle on top, but leave a gap for turning the pillow. Pin the second circle on top of the ring making sure that the right side is facing in. Sew around the circle using a 1⁄4 in (0.64 cm) seam allowance like before. This time, leave a 4 to 6 in (10 to 15 cm) gap between the start and end of your sewing for turning the pillow right-side-out.[11]
- Remember to backstitch when you start and finish sewing. This will keep the seams from unraveling when you turn the pillow right-side-out.
-
10Cut notches around the circles, as close to the stitching as you can. Work 1 circle at a time. Cut V-shaped notches right into the 1⁄4 in (0.64 cm) seams, as close to the stitching as possible. Space the notches about 1⁄2 inch (1.3 cm) apart. This will help reduce bulk when you turn the pillow right-side-out.[12]
-
11Turn the pillowcase right-side-out, stuff it, then sew the gap shut. Turn the pillow right-side-out first. Push the seams out with your finger or a knitting needle. Insert a pillow form or polyester fiberfill through the gap. Sew the gap shut using a whipstitch or a ladder stitch.[13]
- Use sewing pins to hold the gap shut if you need to, but remember to remove them when you are done!


Creating a Tufted Cushion
-
1Cut 2 rectangles based on the radius and circumference of your pillow. Decide how wide you want your pillow to be, then divide it by 2 to get the radius. Use an online calculator to figure out the circumference. Cut 2 rectangles out of fabric based on your measurements. Use the radius for the height of the rectangles, and the circumference for the length.[14]
- Select fabric that doesn't stretch, like woven linen or cotton broadcloth. You can even repurpose clothing items you don't wear anymore.
- Round the circumference up or down to the nearest whole number to make measuring easier.
- If you wish to add a trim to your pillow, cut it according to the circumference. Great trims include fringe, mini pompoms, rickrack, lace, and beads.
-
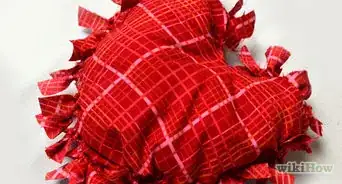
2Baste the trim to the right side of 1 fabric rectangle. Match up the edge of the trim to 1 of the long edges of your rectangle. Make sure that the trim is on the right side of the fabric, and the decorated part is facing inward. Baste the trim to the edge of the fabric.[15]
- Skip this step if you are not using a trim.
- The "right side" is the patterned or front side of your fabric. The "wrong side" is the blank or backside of your fabric.
-
3Stack the rectangles together, then sew along the trimmed edge. Pin the rectangles together with the right sides facing in. Sew along the side you added the trim to. Use a straight stitch, a 1⁄2 in (1.3 cm) seam allowance, and a matching thread color. Backstitch when you start and finish sewing, and remove the pins as you go.[16]
- Use a zipper foot if your fringe is bulky.
-
4Sew the narrow ends together with the right sides facing in. Open up your sewn rectangles like a card or a book. Bring the narrow ends together so that the right sides touch. Sew the narrow ends together using a 1⁄2 in (1.3 cm) seam allowance and a matching thread color. Remember to backstitch and remove the pins as you sew.[17]
-
5Gather the top the edge of your fabric ring by hand. Starting at the side seam, sew a running stitch along the top edge using a 1⁄2 in (1.3 cm) seam allowance. When you reach the side seam again, pull on the thread to gather the fabric into a smaller ring. Knot the thread securely, then snip the excess off.[18]
- For extra durability, use a strong, upholstery thread. Knot the ends together so that you'll be sewing with a double strand rather than a single strand.
- The longer you make your stitches, the smaller the ring will be. The exact size of the ring does not matter, as long as it's smaller than the button you'll be making.
-
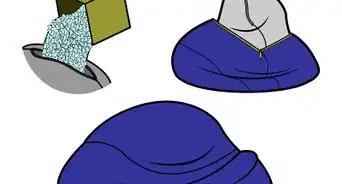
6Turn the pillow right-side-out, stuff it, then gather the other edge. Turn the pillow right-side-out first. Insert a pillow form through the un-gathered end. Close the un-gathered end using the same technique as in the previous step: sew along the edge using a running stitch, then pull on the thread to gather the fabric.[19]
- You can also stuff the pillow with polyester fiberfill instead. It is the same material used in teddy bears, and you can find it in fabric or craft stores.
-
7Create 2 large covered buttons using a kit. Purchase a cover button-making kit in the largest size that you can find from a craft store or fabric store. Cut 2 circles out of fabric larger than the buttons, then assemble them according to the kit's instructions.[20]
- You can use the same color of fabric as your pillow fabric, or you can match them to the trim instead.
-
8Sew 1 fabric-covered button onto the back of the pillow to cover the hole. Thread a long needle with strong thread. Push it through the front of your pillow and out the back, leaving an 8 in (20 cm) tail. Thread the needle through your first button, then push it back through the pillow. Tie the ends of the thread into a tight knot.[21]
- The tighter you tie the knot, the more tufted your pillow will look.
-
9Sew on the second button. Thread the second button onto the needle. Push the needle through the front of the pillow and out the back. Bring the needle through the first button. Push the needle through the back of the pillow and out the front. Bring it through the second button again, then tie it to the tail from before. Snip off the excess thread.[22]


Community Q&A
-
QuestionAfter I stuff the round pillow case, how do I finish sewing the opening so the stiches don't show?
 Community AnswerA mattress stitch is useful for closing the pillow with an invisible seam. Stand it on end with your needle through one side of your seam. Go back and forth making a stitch on either side, gently pulling the thread tight between stitches. Close with a knot and press needle into the interior of the pillow, pushing it out further down the material. Pull all the way out, press pillow flat and trim thread so the end disappears into the finished pillow.
 -
QuestionHow do I add ruffles?Community AnswerBuy or make a ruffle first. Pin it to the right side of your first circle, with the ruffled part facing in. Pin the second circle on top, right-side-down, then turn the pillow right-side-out. Stuff the pillow, the sew the gap shut using a ladder stitch.
-
QuestionWhere do I get good fabric?Community AnswerFabric stores like Joanne Fabrics and Hancock will have decent fabrics. Big box stores like Walmart and Hobby Lobby have a wide range of cheaper printed material. Also check your town for small privately owned fabric/crafting stores.
Things You'll Need
Sewing a Simple Pillow
- Fabric
- White tailor's chalk or colored dressmaker's pen
- Fabric scissors
- Thread
- Sewing pins
- Sewing needle
- Sewing machine
- Polyester fiberfill
Making a Chair Cushion
- Fabric
- White tailor's chalk or colored dressmaker's pen
- Fabric scissors
- Thread
- Sewing pins
- Sewing needle
- Sewing machine
- Polyester fiberfill
- Bias tape (optional, for ties)
Creating a Tufted Cushion
- Fabric
- White tailor's chalk or colored dressmaker's pen
- Fabric scissors
- Thread
- Sewing pins
- Sewing needle
- Sewing machine
- Polyester fiberfill
- Cover button-making kit
- Trim (optional)
References
- ↑ https://mypoppet.com.au/makes/diy-round-pillow-insert/
- ↑ https://mypoppet.com.au/makes/diy-round-pillow-insert/
- ↑ https://www.youtube.com/watch?v=0h27ZzDKAB0&feature=youtu.be&t=2m
- ↑ https://mypoppet.com.au/makes/diy-round-pillow-insert/
- ↑ https://www.createcraftlove.com/simple-round-cushion-tutorial/
- ↑ https://www.createcraftlove.com/simple-round-cushion-tutorial/
- ↑ https://www.createcraftlove.com/simple-round-cushion-tutorial/
- ↑ https://www.createcraftlove.com/simple-round-cushion-tutorial/
- ↑ https://www.createcraftlove.com/simple-round-cushion-tutorial/
- ↑ https://www.createcraftlove.com/simple-round-cushion-tutorial/
- ↑ https://www.createcraftlove.com/simple-round-cushion-tutorial/
- ↑ https://www.youtube.com/watch?v=0h27ZzDKAB0&feature=youtu.be&t=2m
- ↑ https://www.createcraftlove.com/simple-round-cushion-tutorial/
- ↑ https://www.sewcanshe.com/blog/2013/11/12/plump-tufted-pillows-tutorial-featuring-cuddle-fabric
- ↑ https://www.sewcanshe.com/blog/2013/11/12/plump-tufted-pillows-tutorial-featuring-cuddle-fabric
- ↑ https://www.sewcanshe.com/blog/2013/11/12/plump-tufted-pillows-tutorial-featuring-cuddle-fabric
- ↑ https://www.sewcanshe.com/blog/2013/11/12/plump-tufted-pillows-tutorial-featuring-cuddle-fabric
- ↑ https://www.sewcanshe.com/blog/2013/11/12/plump-tufted-pillows-tutorial-featuring-cuddle-fabric
- ↑ https://www.sewcanshe.com/blog/2013/11/12/plump-tufted-pillows-tutorial-featuring-cuddle-fabric
- ↑ https://www.sewcanshe.com/blog/2013/11/12/plump-tufted-pillows-tutorial-featuring-cuddle-fabric
- ↑ https://www.sewcanshe.com/blog/2013/11/12/plump-tufted-pillows-tutorial-featuring-cuddle-fabric
- ↑ https://www.sewcanshe.com/blog/2013/11/12/plump-tufted-pillows-tutorial-featuring-cuddle-fabric
- ↑ https://www.youtube.com/watch?v=0h27ZzDKAB0&feature=youtu.be&t=30s
About This Article

To sew a round pillow, cut 2 identical circles out of 2 pieces of fabric, and stack them on top of each other so the "wrong" side of the fabric, or the side that you don't want to show, is facing out. Pin the fabric together and sew around the circle along the pins, leaving a seam allowance of 1/2 inch. Be sure to leave a 4-6 inch gap where the circles aren't sewn together, and then cut notches around the seam allowance to prevent bunching. Finally, turn the fabric so that right side is facing out, and stuff it with filling before sewing the gap closed from the outside. For tips on making a chair cushion or tufted cushion, keep reading!