This article was co-authored by Mia Danilowicz and by wikiHow staff writer, Aly Rusciano. Mia Danilowicz is a Master Tailor who works onset and on the red carpet in Los Angeles, California. With over a decade of experience, Mia specializes in bridal and gown couturier fittings, garment reconstruction, and custom design. Mia has worked at the Oscars, Grammys, SAG Awards, and Golden Globes. Her clients include a long list of entertainment and fashion industry headliners, major fashion magazines, luxury consumer brands, and popular media. Mia was trained at the Fashion Institute of Design and Merchandising and received her AA in Fashion Design and BS in Business Management.
wikiHow marks an article as reader-approved once it receives enough positive feedback. In this case, several readers have written to tell us that this article was helpful to them, earning it our reader-approved status.
This article has been viewed 581,615 times.
A pillowcase is a great beginner's project that can help you learn the fundamentals of sewing. Making one is a piece of cake, and you only need to know a few sewing basics to start. In this article, we’ll take you step-by-step through the process of sewing and decorating a simple burrito-style pillowcase. So, grab some fabric and your sewing machine because we’ve got some stitching to do!
Things You Should Know
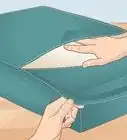
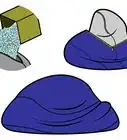
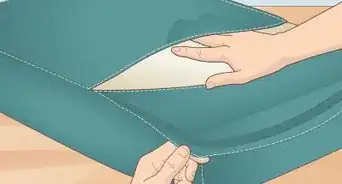
- Make a tube- or burrito-style pillowcase by folding a 44 in × 36 in (112 cm × 91 cm) piece of fabric in half to form a large rectangle.
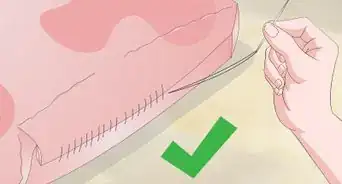
- Sew straight stitches along 1 short side and the long side opposite of the fabric's fold to create seams.
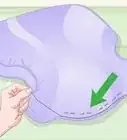
- Fold back, iron, and sew the other short side to form a hem around the pillowcase’s opening.
Steps

Expert Q&A
-
QuestionCan I make a pillow case out of old clothes?
 Mia DanilowiczMia Danilowicz is a Master Tailor who works onset and on the red carpet in Los Angeles, California. With over a decade of experience, Mia specializes in bridal and gown couturier fittings, garment reconstruction, and custom design. Mia has worked at the Oscars, Grammys, SAG Awards, and Golden Globes. Her clients include a long list of entertainment and fashion industry headliners, major fashion magazines, luxury consumer brands, and popular media. Mia was trained at the Fashion Institute of Design and Merchandising and received her AA in Fashion Design and BS in Business Management.
Master TailorYes, this is a good way to recycle old fabrics. Depending on the size and type of clothing you are using, you can cut simple squares from the garments to create a basic pillow case. -
QuestionHow do you determine what size you should cut your material?
 Community AnswerA simple way is to take the fabric and wrap it around the pillow you're making the case for, then add 2-3 inches onto it to allow for the hem.
 -
QuestionWhat fabric measurements do I need for a 13" x 18" pillow?
 Community AnswerThe seam allowance for pillows is generally 1/2". Thus, you will need a piece of fabric 13 1/2" x 18 1/2". If you use a different seam allowance, adjust accordingly.
Warnings
- Use caution when using hot or sharp tools, such as an iron, scissors, or a needle.⧼thumbs_response⧽
Things You'll Need
- Fabric
- Scissors or rotary cutter
- Sewing machine
- Needle
- Iron
- Thread
- Straight pins
- Ribbon or lace (optional)
References
- ↑ Mia Danilowicz. Master Tailor. Expert Interview. 8 January 2021.
- ↑ https://www.homedit.com/how-to-sew-a-pillowcase/
- ↑ https://www.allpeoplequilt.com/how-to-quilt/piecing/what-seam-allowance
- ↑ https://www.homedit.com/how-to-sew-a-pillowcase/
- ↑ https://www.homedit.com/how-to-sew-a-pillowcase/
- ↑ https://youtu.be/Sgj17qIKBx0?t=166
- ↑ https://www.homedit.com/how-to-sew-a-pillowcase/
- ↑ https://youtu.be/c2cfLSyOyZE?t=152
About This Article

To make a pillowcase, start by cutting out a piece of fabric that's 45 inches by 36 inches. Then, fold the fabric in half lengthwise so the back of the fabric is facing out. Next, use a sewing machine or a threaded needle to stitch the long side and one of the short sides. Finally, hem the open side of the fabric and turn the pillowcase right side out before putting a pillow inside of it. To learn how to make decorative pillowcases, scroll down!