This article was co-authored by wikiHow Staff. Our trained team of editors and researchers validate articles for accuracy and comprehensiveness. wikiHow's Content Management Team carefully monitors the work from our editorial staff to ensure that each article is backed by trusted research and meets our high quality standards.
This article has been viewed 37,109 times.
Learn more...
If your patio cushions are looking a little worn and faded, it may be time to recover them. Instead of running out to buy new covers or cushions, consider recovering your existing cushions with new fabric. While you can always sew a new cover, there are other ways to give your cushions a fresh, new look without sewing a single stitch. You can even leave the old covers on the cushions to protect the foam inside and give it extra structure.
Steps
Using Safety Pins
-
1Measure your cushion to determine how much fabric you will need. Measure the length and width of your cushion. Add the height of the cushion plus 3 to 6 inches (7.6 to 15.2 cm) to each edge (top, bottom, left, and right). This will allow you to wrap the edges of the fabric onto the back of the cushion.
- This method is not meant to be a permanent solution, but a temporary one.
-
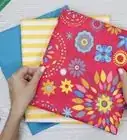
2Choose durable fabric, then cut it according to your measurements. Choose a durable fabric, such as canvas or outdoor fabric. Flip it over so that the wrong side is facing you. Draw a large square or rectangle based on your measurements. Cut the square or rectangle using a sharp pair of fabric scissors.Advertisement
-
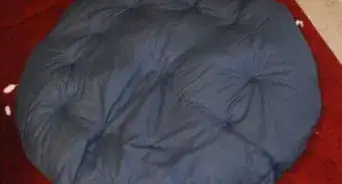
3Center the cushion on the wrong side of the fabric. Make sure that the wrong side of the fabric is facing you. Place the cushion on top, with the underside facing you. Make sure that the cushion is centered on the fabric.
- If the cushions are made out of foam, leave the existing cover on them (even if they look shabby and worn). This will make it easier to safety pin the new cover onto the cushion.
-
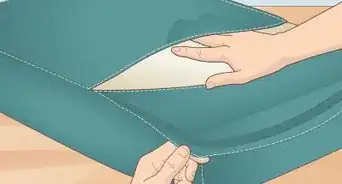
4Safety pin the top and bottom edges of the fabric to the cushion. Wrap the top edge of the fabric onto the underside of the cushion. Safety pin the edges of the fabric to the cushion. Repeat this step for the bottom edge, making sure that the fabric is pulled taut.[1]
- The fabric will not cover the entire underside of the cushion, which is fine. It does need to be pulled taut, however.
- Space the safety pins a few inches/centimeters apart. Use just enough so that the fabric doesn’t wrinkle.
-
5Fold the side edges into flaps, then pin them to the cushion. Fold the corners of the left side edge to make a trapezoidal flap. Wrap the flap over the edge of the cushion, then secure it to the back with safety pins. Repeat this step for the right side.[2]
- This technique is similar to how you would wrap a present.
- You'll need at least 1 safety pin on the diagonal edges of the flap. If your cushion is very large, you might need more safety pins along the straight edge.
-
6Use the cushion. Once you have the cushion covered to your liking, flip it back over and set it down onto your patio furniture. If you need to clean or recover the cushion, simply remove the safety pins, then wash the fabric as recommended by the manufacturer.[3]


Using Hot Glue
-
1Remove the original cover if you wish to save it. If you plan on cleaning the cover and using it again, take it off now. If you don't care about the cover, leave it on, but be aware that the hot glue will most likely damage it.
-
2Measure the cushion to determine how much fabric you need. Measure the length and width of your cushion. Add the height measurement plus 3 inches (7.6 cm) to each of the 4 edges. You will need these extra inches/centimeters in order to wrap the fabric around the sides and bottom of the cushion.[4]
-
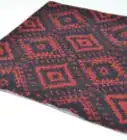
3Cut your shape out of study fabric. Draw a square or rectangle based on your measurements on the wrong side of your fabric, then cut it out. It would be best to use an outdoor fabric, which is already made to be weather-resistant. If you can't find any that you like, use a tough fabric, such as canvas.
-
4Place the cushion onto the wrong side of the fabric. Make sure that the wrong side of the fabric is facing up. Place the cushion on top of the fabric with the underside facing up. The cushion needs to be centered, with equal amounts of fabric sticking out from under each edge.[5]
-
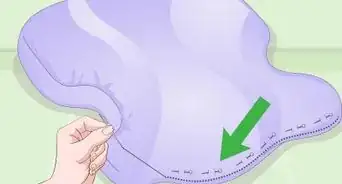
5Wrap and glue the top and bottom edges of the fabric. Fold the top edge of the fabric over the top edge of the cushion. Hot glue the edge of the fabric to the back of the cushion. Repeat this step for the bottom edge.[6]
- Hot glue sets quickly. Squeeze the glue out 1 to 2 inches (2.5 to 5.1 cm) at a time before pressing the fabric down.
- You can use fabric glue instead, but be aware that it will be permanent. It will take about 10 minutes to set.
-
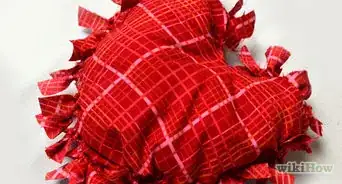
6Fold the side edges of the fabric into flaps, like wrapping a present. Go to the left side of your cushion. Fold the top and bottom edges down so that you get a triangular or trapezoidal flap. Repeat this step for the right side.[7]
- If you need to, use hot glue to help keep the flap together.
-
7Wrap the flaps over the side edges of the cushion and glue them down. Run hot glue along the straight, side edge of the flap (not the angled edges). Pull the flap up and over the side edge of the cushion, then press it down onto the back of the cushion. Repeat this step for the other flap too.[8]
-
8Remove any threads left by the hot glue before using the cushion. Hot glue tends to leave behind little threads or whiskers. This can make your work look messy and unprofessional. Take a quick look at your cushion and pull these threads off before flipping the cushion over and using it.
- If you wish to recover the cushion, simply peel the fabric off. The hot glue should stick to just the cushion part.
- If you used fabric glue, the cover will be permanent.


Sewing a New Cover
-
1Measure your cushion for the fabric. You need enough fabric to wrap around your cushion from top to bottom, plus a couple of inches/centimeters for overlap. The fabric needs to be wide enough to cover the cushion from side to side, plus another 1⁄2 inch (1.3 cm) for seam allowances.[9]
-
2Choose and cut your fabric. Outdoor fabric will work the best because it is sturdy and weather resistant. If you can't find any that you like, however, you can buy a different kind of fabric that is also durable, such as canvas.[10] Cut the fabric down with fabric scissors to match your measurements.
-
3Fold the fabric in half widthwise with the right sides facing in. Turn the fabric so that the right side is facing up, then fold it in half, so that you only see the wrong side. Make sure that you are folding the fabric so that the folded edge aligns with the top edge of your cushion. Also, make sure that all of the corners and sides match up.[11]
-
4Tuck the cushion into the folded fabric, then pin up the sides. Slip the cushion into the folded fabric so that it is sandwiched inside. Make sure that the cushion is centered, then secure the sides with sewing pins. Pin the sides tight enough so that the fit is snug. You should end up with 1⁄4 inch (0.64 cm) seam allowances, but don't worry if they are a little larger/smaller.[12]
- Make sure that the side seams run down the center of the cushion's sides.
-
5Remove the cushion and sew the sides. Once you are happy with the fit, pull the cushion out. Sew the sides on your sewing machine using a thread color that closely matches your fabric. Remember to backstitch at the start and end of your sewing, and to remove the pins as you sew.[13]
- Use a strong thread, preferably polyester. If your needle can fit a thicker thread, that would be even better.
- Use a needle specifically designed for thick fabrics. If you can't find a needle for outdoor fabrics, look for one made for denim or canvas.
-
6Reinsert the cushion and pin the corners to form flaps. Slide the cushion back into the folded fabric. You may notice that the corners are loose along the top edge. Flatten and pin the corners so that they are perpendicular to the seam you just sewed. You will end up with triangular flaps.[14]
-
7Remove the cushion and sew across the flaps. Sew right where you pinned the flaps, removing the pins as you go. Once again, backstitch at the start and end of your sewing and use a matching thread color. If you want to reduce some bulk, you can trim the triangular flaps so that you have 1⁄4 inch (0.64 cm) seams instead.[15]
-
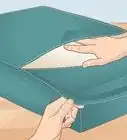
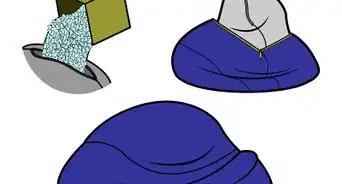
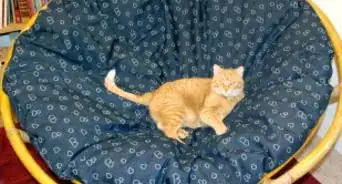
8Turn the pillowcase right-side-out and slide the cushion inside. It should fit inside like a present or a gift bag. If your cushion has a definite top and bottom, back, sure that you slide it in top-first.[16]
-
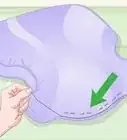
9Fold the open edge down like wrapping a present. Set the cushion down on a flat surface. Fold the top edge down to form wings on either side. Fold the wings down, so that the bottom edge turns into a trapezoid. Fold the bottom edge up to finish the wrapping.[17]
-
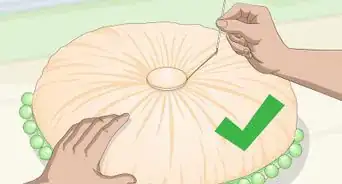
10Fold the raw edge down, then whipstitch it. Fold the raw edge down into the pillow case until it is centered. Secure it with sewing pins, if needed, then whipstitch it by hand. Remove the sewing pins when you are done.[18]
- You can also use a ladder stitch instead.


Community Q&A
-
QuestionHow can I add more thickness to an existing rocking chair cushion before recovering? I don't want anything to shift inside once it starts getting a lot of use.
 ZackTop AnswererYou may want to add a layer of quilt batting on top of the cushion before covering. Fix the batting in several places with a stitch of floss tied in a double knot. Then follow instructions to re-cover the chair cushion.
Things You'll Need
Using Safety Pins
- Cushion
- Outdoor fabric
- Fabric scissors
- Safety pins
Using Hot Glue
- Cushion
- Outdoor fabric
- Fabric scissors
- Hot glue
Sewing a New Cover
- Cushion
- Outdoor fabric
- Fabric scissors
- Sewing machine
- Sewing pins
- Thread
- Needle
References
- ↑ http://www.blueistyleblog.com/2016/06/NoSewRecoverOutdoorCushions.html
- ↑ http://www.blueistyleblog.com/2016/06/NoSewRecoverOutdoorCushions.html
- ↑ http://www.blueistyleblog.com/2016/06/NoSewRecoverOutdoorCushions.html
- ↑ http://www.thevspotblog.com/2012/05/no-sew-project-how-to-recover-your.html
- ↑ http://www.thevspotblog.com/2012/05/no-sew-project-how-to-recover-your.html
- ↑ http://www.thevspotblog.com/2012/05/no-sew-project-how-to-recover-your.html
- ↑ http://www.thevspotblog.com/2012/05/no-sew-project-how-to-recover-your.html
- ↑ http://www.thevspotblog.com/2012/05/no-sew-project-how-to-recover-your.html
- ↑ https://www.confessionsofaserialdiyer.com/sew-easy-outdoor-cushion-covers-part-1/
- ↑ https://www.confessionsofaserialdiyer.com/sew-easy-outdoor-cushion-covers-part-1/
- ↑ https://www.confessionsofaserialdiyer.com/sew-easy-outdoor-cushion-covers-part-1/
- ↑ https://www.confessionsofaserialdiyer.com/sew-easy-outdoor-cushion-covers-part-1/
- ↑ https://www.confessionsofaserialdiyer.com/sew-easy-outdoor-cushion-covers-part-1/
- ↑ https://www.confessionsofaserialdiyer.com/sew-easy-outdoor-cushion-covers-part-1/
- ↑ https://www.confessionsofaserialdiyer.com/sew-easy-outdoor-cushion-covers-part-1/
- ↑ https://www.confessionsofaserialdiyer.com/sew-easy-outdoor-cushion-covers-part-1/
- ↑ https://www.confessionsofaserialdiyer.com/sew-easy-outdoor-cushion-covers-part-1/
- ↑ https://www.confessionsofaserialdiyer.com/sew-easy-outdoor-cushion-covers-part-1/
- ↑ http://www.blueistyleblog.com/2016/06/NoSewRecoverOutdoorCushions.html
About This Article