This article was co-authored by wikiHow Staff. Our trained team of editors and researchers validate articles for accuracy and comprehensiveness. wikiHow's Content Management Team carefully monitors the work from our editorial staff to ensure that each article is backed by trusted research and meets our high quality standards.
The wikiHow Video Team also followed the article's instructions and verified that they work.
This article has been viewed 25,028 times.
Learn more...
Sweaters are great at making you feel cozy and warm when the cold weather settles in, but sometimes, they become too worn out to wear. Instead of throwing them away, why not turn them into a pillow? All you need is an old sweater, a pillow form, and a sewing machine. If you don't own a sewing machine, you can sew it by hand.
Steps
Making a Simple Sweater Pillow
-
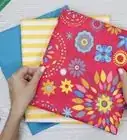
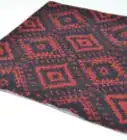
1Pick a sweater with an interesting texture or design. While a basic knit has plenty of texture to begin with, you can make your sweater pillow look even more interesting by picking out a sweater with a cable or rib pattern.[1]
-
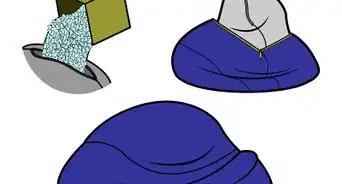
2Turn the sweater inside out and place your pillow form on top of it. Center the pillow form as best you can. If your sweater has a ribbed hem, place the pillow form just above it. If your sweater does not have a ribbed hem, place the pillow form about 1½ to 2 inches (3.81 to 5.08 centimeters) from the bottom edge.
- The size of the pillow form depends on the size of the sweater. Use a pillow form that is a few inches/centimeters-smaller than your sweater.
Advertisement -
3Cut the sweater a little larger than the pillow form. Use a dressmaker's chalk or pen to draw around the pillow. Cut around the lines that you drew, leaving a ½-inch (1.27-centimeter) seam allowance. Do not cut off the bottom hem.[2]
- Make sure that the sweater panels are big enough to wrap around the pillow form. This is especially important for tightly-knit sweaters and bulky pillows.
-
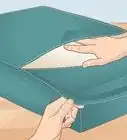
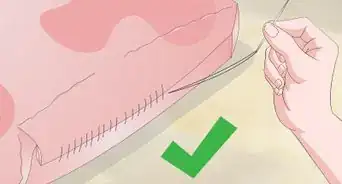
4Sew along the top and side edges of the pillow. Take the pillow off the sweater and set it aside. Pin the sweater together, if needed, then sew along the top and side edges using a ½-inch (1.27-centimeter) seam allowance. Leave the bottom hem open for now.[3]
- You can do this by hand, or you can use a sewing machine.
- If your sweater is fraying too much, serge the edges, or finish them off with a zigzag stitch.
-
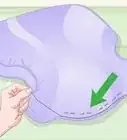
5Turn the pillowcase inside out, and insert the pillow form. If the sweater is very bulky, you may have to clip the seams on the corners first. This will help reduce the bulk.
-
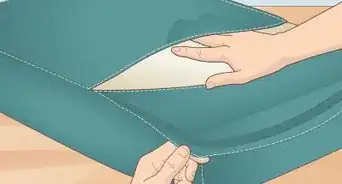
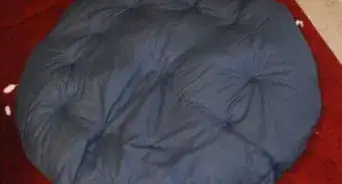
6Close the pillow case. There are two ways you can do this. You can simply tuck the bottom hem into the pillow case, and sew it shut by hand with a ladder stitch. You can also fold the hem over, and sew it shut with buttons. Here is how to do it:[4]
- Pin the hem shut, as close to the pillow as you can.
- Turn the pillow over, and sew wooden buttons to the back of the hem.
- Turn the pillow over again, and fold the hem over onto the front of the pillow so that you can see the buttons.
- Sew or glue the hem down to keep it in place.


Making a Front-Buttoned Sweater Pillow
-
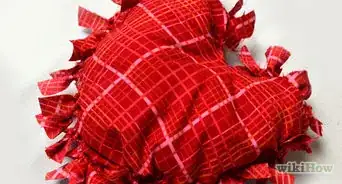
1Get a sweater that buttons up the front. If you don't like the buttons on your sweater, cut them off, and replace them with more interesting ones. Wooden buttons will lend the sweater pillow a nice, rustic charm.
- Keep the sweater buttoned shut.
- Choose a sweater with an interesting texture, such as a cable knit.
-
2Turn the sweater inside out, and place your pillow form on top. Center the pillow form as best you can. If the sweater has a ribbed hem, position the pillow form just above it. If the sweater doesn't have a ribbed hem, place it at least ½ inch (1.27 centimeters) from the bottom edge; you will need this for the seam allowance.
- The size of your pillow form depends on the size of your sweater. Use a pillow that is a few inches/centimeters smaller than your sweater so that it can fit inside.
-
3Cut the sweater down until it is a little larger than the pillow form. Use a dressmaker's chalk or pen to draw around all four sides of the pillow form. Cut the sweater, leaving behind a ½-inch (1.27-centimeter) seam allowance.
- If the sweater is very thick, cut the front out first, then use the square/rectangle as a template to cut out the back.
- Make sure that the sweater is big enough to wrap around the pillow. This is important, especially if the sweater is tightly-knit or if the pillow is bulky.
-
4Pin and sew all four edges together using a ½-inch (1.27-centimeter) seam allowance.[5] Take the pillow off the sweater and put it aside. Pin the sweater along the edges, then sew it using a ½-inch (1.27-centimeter) seam allowance. When you are done, cut the bottom hem down to ½-inch (1.27-centimeter).
-
5Unbutton the sweater from the inside, then turn it inside out. Slip your fingers into the openings between the buttons, and unbutton the sweater. You do not have to unbutton it all the way. Once you have a big enough opening, turn the pillowcase inside out.[6]
- If your sweater is very bulky, you may have to clip the corners at the seams.
-
6Insert the pillow form, then button the sweater back up.[7] If you want, you can glue or hand sew the front closure shut. On the other hand, if you leave it as is, you can take the pillow form out and wash the cover whenever necessary.


Making a Reinforced Sweater Pillow
-
1Cut two pieces of fabric that are 1 inch (2.54 centimeters) larger than your pillow form. You can use cotton or linen fabric, but the color needs to be solid, and it needs to match your sweater.[8] The extra inch will give you ½-inch (1.27-centimeter) seam allowances.
- Make sure that the fabric is big enough to wrap around your pillow form.
- Choose a pillow form that is a few inches/centimeters smaller than your sweater. This will ensure that you have enough material to cover it.
-
2Choose a sweater, then cut it along the top and sides to separate it. You can use any type of sweater you want, but one with a cable or rib pattern would look more interesting. Cut the sweater straight along the top, just below the armpits, and up the side seams. Separate the front and back panel.
- If your sweater has a ribbed hem, cut it off.
-
3Pin the fabric to the wrong side of each sweater panel. Do not cut the sweater panels down to fit the fabric squares just yet. You will do that towards the end.[9] This is because the sweater fabric may stretch past the fabric squares.
- Do not pin the front and back sweater panels together just yet.
-
4Sew around the edges of both panels using a ¼-inch (0.64-centimeter) seam allowance. Once again, do not sew the front and back sweater panels together just yet. Simply sew the fabric squares to the back of each panel, ¼ inch (0.64 centimeter) away from the edge of the fabric square.[10]
-
5Trim the sweater down to fit the fabric squares. If you want to, you can serge the edges, or stitch around them using a zigzag stitch on your sewing machine. This will keep the edges from unraveling.
-
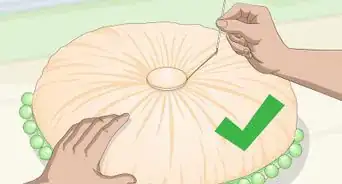
6Pin and sew the two panels together, leaving behind a gap along one edge. Pin the two panels together, with the sweater sides facing inward and the fabric sides facing outward. Use your sewing machine to sew along all four edges using a ½-inch (1.27-centimeter) seam allowance. Leave a gap along one of the edges so that you can insert your pillow.[11]
-
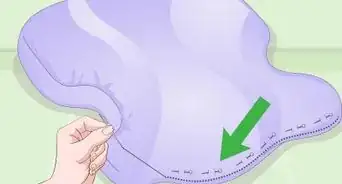
7Turn the pillowcase inside out, and insert the pillow form. If your sweater is very bulky, you may need to clip the corners first. This will help reduce the bulk.
-
8Sew the gap shut. Fold the raw edges in, then stitch the seams together using a ladder stitch. Your pillow is now complete!

Things You'll Need
Making a Simple Sweater Pillow
- Sweater
- Pillow form
- Fabric scissors
- Thread
- Needle or sewing machine
- Sewing pins
- Wooden buttons (optional)
Making a Front-Buttoned Sweater Pillow
- Button-up sweater
- Pillow form
- Fabric scissors
- Thread
- Needle or sewing machine
- Sewing pins
- Wooden buttons (optional)
Making a Reinforced Sweater Pillow
- Sweater
- Cotton or linen fabric
- Pillow form
- Fabric scissors
- Thread
- Sewing machine
- Sewing pins
References
- ↑ http://www.livefromjulieshouse.com/thrift-store-sweater-pillow-tutorial/
- ↑ http://www.stonegableblog.com/sweater-pillow-tutorial/
- ↑ http://www.livefromjulieshouse.com/thrift-store-sweater-pillow-tutorial/
- ↑ http://www.livefromjulieshouse.com/thrift-store-sweater-pillow-tutorial/
- ↑ http://www.pigandpaint.com/2012/05/pillow-power-take-two-bow-chica-bow-wow.html
- ↑ http://www.pigandpaint.com/2012/05/pillow-power-take-two-bow-chica-bow-wow.html
- ↑ http://www.pigandpaint.com/2012/05/pillow-power-take-two-bow-chica-bow-wow.html
- ↑ http://www.abeautifulmess.com/2014/10/have-.html
- ↑ http://www.abeautifulmess.com/2014/10/have-.html
- ↑ http://www.abeautifulmess.com/2014/10/have-.html
- ↑ http://www.abeautifulmess.com/2014/10/have-.html
- ↑ http://www.livefromjulieshouse.com/thrift-store-sweater-pillow-tutorial/
- ↑ http://www.livefromjulieshouse.com/thrift-store-sweater-pillow-tutorial/
- ↑ http://www.stonegableblog.com/sweater-pillow-tutorial/
- ↑ http://www.abeautifulmess.com/2014/10/have-.html
About This Article