This article was co-authored by Donna Serino and by wikiHow staff writer, Aly Rusciano. Donna Serino is a Dry Cleaning and Alterations Specialist and the Marketing Director for Hallak Cleaners, based in Manhattan, New York and Hackensack, New Jersey. She has expertise in tailoring and alterations, couture and casual wear, designer handbag cleaning, and suede, leather, and furs care. Donna and Hallak Cleaners are part of the National Cleaner’s Association, Drycleaning and Laundry Institute, and Leading Cleaners Internationale.
There are 19 references cited in this article, which can be found at the bottom of the page.
This article has been viewed 124,418 times.
DIY bench cushions are an easy project anyone can do, even beginner sewers! If you’re looking for a way to spruce up your window seat or patio bench, keep reading. We’ve put together a comprehensive guide with everything you need to know to sew bench cushions. In a matter of hours, you can have your very own homemade bench cushions—grab some fabric and scissors, and let’s get crafty!
Steps
Measuring and Prepping the Cushion
-
1Measure the length, width, and depth of the bench seat. This will help you figure out just how much fabric and foam you'll need to make your cushion. Once you have your measurements, double the length to find out how long your piece of fabric needs to be.[1]
- If you want a little wiggle room for your cushion to move around on the bench, subtract an inch from the length.[2]
-
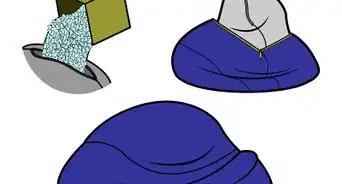
2Cut foam the size of your bench. Trace the size of your bench seat onto the foam with a marker or pen using a ruler. Next, cut the foam to size using an electric knife.[3]
- You want to use a blade with a serrated edge when cutting foam as it makes it easier to smoothly cut the foam particles.
- If you don’t have an electric knife, a serrated steak knife or turkey carver can also do the trick.
- There are many types of foams out there, ranging in density and thickness. We suggest using a 2 or 4 in (5.1 or 10.2 cm) thick foam for maximum comfort.
Advertisement -
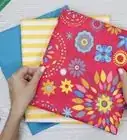
3Trace a pattern on the back of your fabric. Lay your fabric out flat on a hard surface, making sure the back of the fabric is facing up. Set your piece of foam or cushion on top of the fabric. With a marker or pen, trace around the cushion. Next, gently lift the foam onto its side, keeping the edge on the line you just made. Trace around this side the same way. Repeat this process until all sides of the cushion (except for the bottom) have been traced.[4]
- In the end, your pattern should look like an unfolded box.
- This step will help you get an exact pattern or guide.
- If patterns aren’t your thing, no worries! You can also cut out individual pieces of fabric for each side of the cushion. This works best if you’re making a cushion cover with a zipper or non-removable cover.
-
4Add a 1⁄2 inch (1.3 cm) seam allowance to the edges of the pattern. With a ruler, trace a border around your pattern that’s 1⁄2 inch (1.3 cm) thick.[5] This will be the area between the edge of your fabric and the stitching that holds everything together.
- If you’re a sewing beginner, try outlining the seam allowance in a different color than the pattern. This will help you differentiate everything while sewing.
-
5Cut out your pattern along the seam allowance line. Your bench cushion pattern is all ready to go! Just remember to keep your pattern wrong side up. In other words, your tracing lines should always be facing you.
-
6On another piece of fabric, trace the bottom of your cushion. With the fabric face down, outline the top of the foam as you did before. This will serve as the bottom piece of your cushion cover.[6]
-
7Add 3 inches (7.6 cm) to the width and length to the bottom of your outline. The cushion cover will close envelope style, meaning it will have an overlapping opening on the bottom. Because of this, the fabric has to be a bit bigger than the actual size of the foam. Use a ruler to extended the border of your outline, dragging down the lines you’ve already made by 3 inches (7.6 cm).[7]
- For example, if your foam is 11 by 7 inches (28 cm × 18 cm), the bottom piece of fabric should be 14 by 10 inches (36 cm × 25 cm).
-
8Create a 1⁄2 inch (1.3 cm) seam allowance to the bottom fabric’s pattern. As before, this will ensure that there is enough fabric for you to work with when it’s time to sew everything together. Simply use your ruler to create a 1⁄2 inch (1.3 cm) border around your outline.
-
9Cut the bottom piece of fabric following the seam allowance border. This will remove any excess fabric.
-
10Fold the fabric in half horizontally and cut along the crease you’ve made. Set these two pieces of fabric aside for later.[8]
-
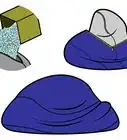
11Box in the corners of the fabric. Take the top two left corners of the fabric, pinch them together, and fold them toward the bottom right-hand corner. This will create a box corner. Pin your fold together, and repeat with the other three corners.[9]
- When all corners are pinned, the fabric should look like a box without a lid.
- If you’re using fabric with a design, pay close attention to the print. Make sure the pattern or design matches at the seams before pining or sewing everything together.[10]


Sewing the Cushion
-
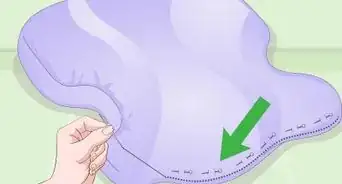
1Sew down each of your pin lines with a straight stitch. With a sewing machine, follow the pin lines on all corners to secure the box corners.[11]
- If your fabric frays, use a zig-zag stitch on the edges before starting the straight stitch.
- The stitching shouldn’t show when you're finished, but you can still use a thread color that matches your fabric just in case.
-
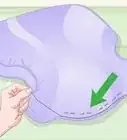
2Turn the sewed fabric inside out. And there you have it. You’ve successfully made box corners—congrats! Now’s the time to test out if your cover fits the foam before finishing everything off. Wiggle the fabric onto your cushion. If it fits snuggly, move on to the next step.
-
3
-
4Do a straight stitch along your hems. For each piece of fabric, there should be three sides hemmed, leaving one of the longer sides unhemmed.[13]
-
5Overlap the two pieces of fabric to create an envelope. Match up the seam allowance of the fabrics with the long hemmed side in the middle. Place your foam piece on top of the fabric to ensure the cushion sits in the space between the seam allowance lines.[14]
- If the foam doesn’t match up with the fabric, no worries! Create a smaller envelope with the fabric by pulling the pieces farther apart until the foam matches up.
-
6Pin the sides of the fabric pieces together. Bring these pieces back to the sewing machine to join the two outward edges together with a straight stitch.[15]
-
7Connect the box corner and envelope pieces. Flip the box corner piece you made before inside out, so the seams and stitching are visible. Turn the envelope over with the right side facing up—the stitching should be face down. Place the box on top of the envelope and pin the corners together.[16]
- If you’re using a patterned fabric, double-check that the design is or is close to matching up.[17]
-
8Sew the pinned pieces together with a straight stitch. Use a sewing machine and follow the pin line.[18]
-
9Turn the fabric right side out and slide the foam in. You did it! You’ve made a removable bench cushion with box corners and envelope opening. Now, all that’s left to do is sit back and enjoy the comfort and practicality of your latest craft.


Expert Q&A
-
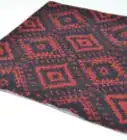
QuestionWhat type of fabric is used for bench cushions?
 Mia DanilowiczMia Danilowicz is a Master Tailor who works onset and on the red carpet in Los Angeles, California. With over a decade of experience, Mia specializes in bridal and gown couturier fittings, garment reconstruction, and custom design. Mia has worked at the Oscars, Grammys, SAG Awards, and Golden Globes. Her clients include a long list of entertainment and fashion industry headliners, major fashion magazines, luxury consumer brands, and popular media. Mia was trained at the Fashion Institute of Design and Merchandising and received her AA in Fashion Design and BS in Business Management.
Master TailorThe most common types of material used to make pillows and cushions are fabrics that do not have a stretch. If you choose a material with stretch or lycra in it, the fabric can stretch out with time and look saggy. -
QuestionHow do I glue pieces of upholstery foam?
 T. ChinsenTop AnswererA spray adhesive is the most effective way to glue foam. It is difficult to apply an even coating of any glue using a brush or roller due to the structure of the foam. Hot glue is not recommended, as it can melt the foam; it is also not as flexible as the foam.
 -
QuestionFor other sizes of cushions, how do I calculate the amount of material?
 Community AnswerFirst, measure the cushion. Then, do some math. Remember finding the perimeter of rectangles in school? You do just that but using the measurements you took. If you are forgetting how there are probably examples of how to find that online. You find the perimeter of each rectangle and use those measurements when cutting.
Things You’ll Need
- Measuring tape
- Marker/Pen
- Foam
- Electric knife
- Ruler
- Scissors
- Fabric
- Sewing pins
- Sewing thread
- Sewing machine
- Zipper (optional)
References
- ↑ Donna Serino. Dry Cleaning & Alterations Specialist. Expert Interview. 31 August 2021.
- ↑ https://heartfilledspaces.com/diy-bench-seat-cushion/
- ↑ https://youtu.be/F28zzE2MGAo?t=181
- ↑ https://youtu.be/F28zzE2MGAo?t=325
- ↑ https://youtu.be/F28zzE2MGAo?t=400
- ↑ https://youtu.be/F28zzE2MGAo?t=944
- ↑ https://youtu.be/F28zzE2MGAo?t=1020
- ↑ https://youtu.be/F28zzE2MGAo?t=1110
- ↑ https://youtu.be/F28zzE2MGAo?t=486
- ↑ Donna Serino. Dry Cleaning & Alterations Specialist. Expert Interview. 31 August 2021.
- ↑ https://youtu.be/F28zzE2MGAo?t=668
- ↑ https://youtu.be/F28zzE2MGAo?t=1156
- ↑ https://youtu.be/F28zzE2MGAo?t=1240
- ↑ https://youtu.be/F28zzE2MGAo?t=1281
- ↑ https://youtu.be/F28zzE2MGAo?t=1330
- ↑ https://youtu.be/F28zzE2MGAo?t=1385
- ↑ https://sewingmachinebuffs.com/how-to-sew-a-bench-cushion-cover-with-zipper/
- ↑ https://youtu.be/F28zzE2MGAo?t=1591
- ↑ https://homedecorbliss.com/keep-cushions-on-outdoor-furniture/
- ↑ https://homedecorbliss.com/keep-cushions-on-outdoor-furniture/
- ↑ https://sewguide.com/cleaning-pillows-cushions/
About This Article