This article was co-authored by Mia Danilowicz. Mia Danilowicz is a Master Tailor who works onset and on the red carpet in Los Angeles, California. With over a decade of experience, Mia specializes in bridal and gown couturier fittings, garment reconstruction, and custom design. Mia has worked at the Oscars, Grammys, SAG Awards, and Golden Globes. Her clients include a long list of entertainment and fashion industry headliners, major fashion magazines, luxury consumer brands, and popular media. Mia was trained at the Fashion Institute of Design and Merchandising and received her AA in Fashion Design and BS in Business Management.
This article has been viewed 112,569 times.
Making your own cushions is a great way to personalize your home and save money. While you can always buy cushions from the store, they may not always fit your seats or personal style. If you make your own cushions, however, you will get complete control over the size, colors, and patterns. The process is easy, whether you are making a box cushion for a bench or throw cushions to toss onto a couch.
Steps
Creating a Box Cushion
-
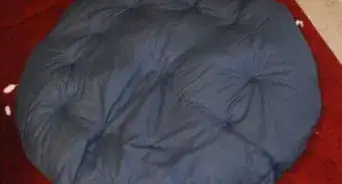
1Cut 4 in (10 cm) thick upholstery foam to the size of your seat. Measure the length and width of your chair or bench seat first, then cut the resulting square or rectangle out of thick, upholstery foam. Use a hand saw or serrated knife to do this; do not use scissors.[1]
- You can find these foam inserts in the foam and pillow filling section of a craft store.
- You can reuse an old chair cushion, as long as it is box-shaped with a defined height. Don't use a plain, old pillow for this.
-
2Cut 2 panels out of canvas twill fabric for the top and bottom pieces. Measure the length and width of your seat first, then add 1 inch (2.5 cm) for the seam allowances. Draw the resulting squares or rectangles on a sheet of canvas twill fabric, then cut them out.[2]
- For example, if your seat was 24 by 14 inches (61 by 36 cm) your final shape would be 25 by 15 inches (64 by 38 cm).
- Make the corners of your top and bottom panels rounded, if desired. You don't have to do this, but it will make the panels easier to assemble.
- If you want to use a different fabric, choose anything woven that doesn't have stretch, like linen or cotton broadcloth. Otherwise, it will stretch out and look saggy over time.[3]
Advertisement -
3Cut a strip out of canvas twill fabric for the side panel. Measure the length and width of your seat. Add the numbers together, then multiply the answer by 2. Add 1 inch (2.5 cm) to your final answer to get the length of the strip. For the width, simply measure the height of your foam cushion, then add 1 inch (2.5 cm). For example, if your seat measured 24 by 14 inches (61 by 36 cm):[4]
- 24 + 14 = 38 inches (97 cm)
- 38 * 2 = 76 inches (190 cm)
- 76 + 1 = 77 inches (200 cm) final length
-
4Sew the ends of the side panel with a 1⁄2 in (1.3 cm) seam allowance. Take your skinny side panel and fold it in half so that the narrow edges match up. Make sure that the wrong side of the fabric is facing out, then sew across the narrow edge on your sewing machine using a straight stitch and a 1⁄2 in (1.3 cm) seam allowance.
- Backstitch when you start and finish sewing to make your stitching stronger. This is simply where you reverse the sewing machine for 2 to 3 stitches.
- Match the thread color as closely as possible to the fabric.
- For a nicer finish, press the seam open with an iron. Use a heat setting that's appropriate for the fabric that you are using. This will typically be "cotton."
-
5Pin the edges of the top panel to the edges of your loop. After you sew your skinny panel together, you will end up with a loop. This loop needs to go around the side edges of your top panel. Place the loop on top of the panel, then begin to insert pins around the circumference of the panel to hold them together.[5]
- Make sure that the right sides of both fabric pieces are facing each other.
- Place the seam on the loop in the middle of 1 of the top panel's straight edges.
- If you rounded the corners of the top panel, cut 1⁄2 in (1.3 cm) V-shaped notches into them. This will reduce buckling.
-
6Sew around the top panel using a 1⁄2 in (1.3 cm) seam allowance. Begin and finish sewing at the loop's side seam. When you get to a corner, pause the sewing machine, turn the piece, and continue sewing. Do not sew straight across the piece, cut the thread, and begin sewing anew.[6]
- Remember to backstitch when you start and finish sewing, and be sure to remove the pins as you go.
- If you rounded the corners of the panel, don't pause and turn the panels, or the corners will be too sharp. Instead, sew slowly, following the curve as best as you can.
-
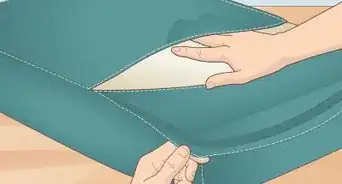
7Repeat the process for the bottom panel, but leave room for a zipper. Pin the bottom panel to the bottom edge of the side panel. Make sure that the wrong sides are facing out, then sew around the panel. Leave a wide gap along the edge with the loop's side seam for your zipper.[7]
- If you cut V-shaped notches into the corners for the top panel, you should cut them here as well.
- The width of the gap depends on the size of your cushion and zipper. Plan on using a zipper that is 3 to 4 inches (7.6 to 10.2 cm) shorter than your cushion.
-
8Sew a zipper into the gap using a zipper foot. Slide the zipper into the gap so that the zipper tape aligns with the edges of the bottom and side panels. Make sure that the zipper is facing into the pillow, then sew the zipper in place using the zipper foot on your sewing machine.[8]
- Be sure to backstitch and to remove the pins.
- For a nicer finish, sew the zipper deeper into the case, so that the teeth are 1⁄2 inch (1.3 cm) from the edges of the panels.
-
9Turn the cushion right-side-out, then insert the cushion. If you need to, use a knitting needle or chopstick to push out the corners first. Next, slide the cushion into the case, then zip it shut.[9]

Sewing a Zippered Cushion
-
1Buy a pillow insert in your desired size. Do not buy a foam pillow insert that has a height dimension as well. You want something that looks like the pillow you'd put on your bed or couch. A 16 or 18 in (41 or 46 cm) pillow will work the best, but you can use any size you want.[10]
- This method may work for round pillow shapes as well.
-
2Cut 2 pieces of fabric to the same size as your pillow insert. Measure the length and width of your pillow insert first, then draw the resulting squares or rectangles on a piece of fabric. Cut both pieces out with fabric scissors.[11]
- Be sure to measure across the front of your pillow, from seam-to-seam.
- This will give you a nice, snug fit. If you prefer a looser pillowcase, add 1 inch (2.5 cm) to each measurement first.
- Choose a fabric suitable for the purpose. Canvas twill will work great for an outdoor cushion. Home décor fabric will work better for an indoor cushion.
-
3Mark the length of your zipper along the bottom edge of your panel. Take 1 of your panels, and turn it so that the right side is facing up. Take a zipper that is 3 to 4 inches (7.6 to 10.2 cm) shorter than the panel, and place it face-down on top of the fabric. Mark the ends of the zipper with a fabric pen or sewing pins, then set the zipper aside.[12]
- Do not pin the zipper in. You need to sew and press the seams between the panels first.
- An invisible garment zipper will work the best, but you can use a non-separating garment zipper too.
-
4Sew the panels along the bottom with a 1⁄2 in (1.3 cm) seam allowance. Begin sewing at the left corner, and finish sewing at the first mark. Cut the thread, then continue sewing at the second mark, and finish sewing at the right corner. You will be left with a gap that's the same length as your zipper.[13]
- Backstitch whenever you start and finish sewing. This is where you reverse the sewing machine for a few stitches.
- If you want to, use a basting stitch between the 2 marks. This will make pressing the seam open easier; you will remove this stitch later.
-
5Press the seams open, then pin the zipper face-down on top. Spread open the 2 panels to make a longer rectangle. Turn the rectangle so that the wrong side of the fabric is facing you. Press the seam open with an iron, then set your zipper face-down on top of the pressed-open seam, right between the 2 marks. Secure the zipper with pins.[14]
- Be sure to press open the seam between the 2 marks as well.
- Use a heat setting that is suitable for the fabric that you are working with. Most irons will have labels, such as "cotton" or "linen."
- If you are using an invisible zipper, the zipper head will be facing you. The zipper pull/tag will be against the fabric.
-
6Sew the zipper using a zipper foot and a straight stitch. Do 1 side of the zipper first, then the other. When you get to the zipper head, stop sewing, lift the foot, and move the zipper head to the other side. Set the foot down again and finish sewing. Remove the pins as you sew and remember to backstitch.[15]
- There is no seam allowance when you use a zipper foot, since the foot will do it for you.
- A zipper foot looks like a regular foot, except with 1 side missing. This “missing” side should be against the zipper teeth.
- If you sewed a basting stitch earlier, use a seam ripper to take it out after you finish sewing.
-
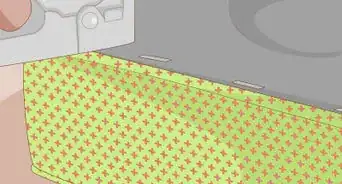
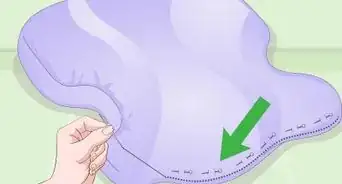
7Open the zipper and sew the pillow with 1⁄2 in (1.3 cm) seams. Place your panels back together with the right sides facing in. Sew around the remaining 3 sides of the pillow using a straight stitch and a 1⁄2 in (1.3 cm) seam allowance. Backstitch when you start and finish sewing, and remember to remove the pins.[16]
- When you reach a corner, pause the sewing machine, lift the foot, and turn the panel. Set the foot down again and continue sewing.
- Do not sew straight across an edge, cut the thread, and start sewing again. You want to turn the fabric and sew in a continuous line.
- For a more durable finish, sew the edges of the panels with a zigzag stitch. This is especially important if you plan on washing the cushion covers later.
-
8Snip the corners, then turn the cushion cover right-side-out. Cut the corners of your panels off as close to the stitching as you can. Next, turn the fabric right-side-out through the open zipper.[17]
- Use a knitting needle or a chopstick to push the corners out further, if needed.
-
9Insert the pillow and close the zipper. If you cut the panels to the exact dimensions as the pillow, be prepared for a snug fit. Once you have the pillow all the way in, zip the zipper shut.[18]


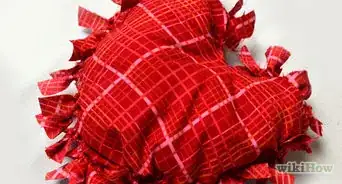
Making an Envelope Cushion
-
1Purchase a pillow insert. You can get any size you want, but something around 16 or 18 inches (41 or 46 cm) would work the best for most home décor purposes. When measuring the pillow, be sure to measure across the front, from seam-to-seam.
- This method works the best for plain pillow inserts, like that you'd toss onto a couch. It is not suitable for box-type cushions that have a height dimension as well.
-
2Measure the length and width of your pillow, then create your pattern. Measure the height of your pillow first, then add 1 inch (2.5 cm) for the seam allowances. Next, measure the width of your pillow. Multiply that by 2, then add 6 inches (15 cm) for the overlap.
- When measuring your pillow, be sure to measure across the front, from seam-to-seam.
-
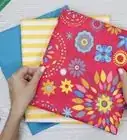
3Cut your pattern from your desired fabric. You can use just about any type of fabric for this. Home décor fabric is a great option if you will be using the pillows indoors. Canvas twill fabric would be a better option if you’ll be keeping them outside.
- Use fabric scissors to cut the material. You only need 1 piece to make the entire cushion.
-
4Fold and press the narrow edges twice to make clean hems. Turn the fabric so that the wrong side is facing you. Fold both of the narrow edges down by 1⁄4 inch (0.64 cm), then press them with an iron. Fold them by another 3⁄4 inch (1.9 cm), and press them with an iron again.
- Use a heat setting on your iron that is suitable for the fabric that you are using.
- Alternatively, you can fold and press the narrow edges by 1⁄2 inch (1.3 cm) twice. This will give you narrower hems.
-
5Sew the hems using a straight stitch. Try to sew as close as possible to the inside folded edge of the hem. You can match the thread color to the fabric, or use a contrasting color for a bit of design.
- You shouldn't have to use sewing pins for this step, because the pressing caused by the iron will keep the hems down.
-
6Fold the side edges to the middle, overlapping them by 4 inches (10 cm). Turn the fabric so that the right side is facing up. Fold the left and right narrow edges towards the middle. Overlap the hems by about 4 inches (10 cm). Secure the edges with sewing pins.
- The fabric should now be about the same width as your pillowcase. If you need to, overlap the narrow edges more or less in order to ensure a good fit.
-
7Sew the top and bottom edges using a 1⁄2 in (1.3 cm) seam allowance. Secure the top and bottom raw edges of the fabric with sewing pins. Sew across both edges using a straight stitch and a 1⁄2 in (1.3 cm) seam allowance. Backstitch when you start and finish sewing each side.
- Remove the pins so that you don't ruin your sewing machine's needle.
- If the fabric frays a lot, go over the raw edges once more with a zigzag stitch.
- A backstitch is where you reverse the sewing machine for a few stitches. It makes your stitching stronger and prevents unraveling.
-
8Snip the corners, then turn the cushion cover right-side-out. Cut the corners off as close to the stitching as you can. Next, turn the cushion cover right-side-out through the overlapping edges.
- If you need to, use a chopstick or knitting needle to poke the corners out further after you turn the cover right-side-out.
-
9Insert the pillow through the overlap. Place the pillow on top of the cover. Pull the left overlapping edge over the left side of the pillow, and the right overlapping edge over the right side. Smooth the edges down in the back of the pillow so that they overlap nicely.


Expert Q&A
Did you know you can get expert answers for this article?
Unlock expert answers by supporting wikiHow
-
QuestionWhat is the best fabric to use for cushions?
 Mia DanilowiczMia Danilowicz is a Master Tailor who works onset and on the red carpet in Los Angeles, California. With over a decade of experience, Mia specializes in bridal and gown couturier fittings, garment reconstruction, and custom design. Mia has worked at the Oscars, Grammys, SAG Awards, and Golden Globes. Her clients include a long list of entertainment and fashion industry headliners, major fashion magazines, luxury consumer brands, and popular media. Mia was trained at the Fashion Institute of Design and Merchandising and received her AA in Fashion Design and BS in Business Management.
Master TailorThe most common types of material used to make pillows and cushions are fabrics that do not have a stretch. Ideally, pick a woven material that will retain its shape over time, like linen or cotton broadcloth. If you choose to use a material with stretch or lycra in it, the fabric will stretch out and look saggy over time.
Support wikiHow by unlocking this expert answer.
-
QuestionAre there any other methods?
 Community AnswerYou could skip the zipper and make it more permanent by sewing the remaining edge.
Things You’ll Need
Creating a Box Cushion
- Canvas twill fabric
- 4 in (10 cm) thick foam cushion
- Sewing machine
- Sewing pins
- Zipper
- Zipper foot
- Fabric scissors
- Thread
- Saw or serrated knife
Sewing a Zippered Cushion
- Pillow insert
- Fabric
- Sewing machine
- Sewing pins
- Zipper
- Zipper foot
- Fabric scissors
- Thread
Making an Envelope Cushion
- Pillow insert
- Fabric
- Sewing machine
- Sewing pins
- Fabric scissors
- Thread
References
- ↑ https://abeautifulmess.com/2014/07/make-your-own-outdoor-cushions.html
- ↑ https://abeautifulmess.com/2014/07/make-your-own-outdoor-cushions.html
- ↑ Mia Danilowicz. Master Tailor. Expert Interview. 8 January 2021.
- ↑ https://abeautifulmess.com/2014/07/make-your-own-outdoor-cushions.html
- ↑ https://abeautifulmess.com/2014/07/make-your-own-outdoor-cushions.html
- ↑ https://abeautifulmess.com/2014/07/make-your-own-outdoor-cushions.html
- ↑ https://abeautifulmess.com/2014/07/make-your-own-outdoor-cushions.html
- ↑ https://abeautifulmess.com/2014/07/make-your-own-outdoor-cushions.html
- ↑ https://abeautifulmess.com/2014/07/make-your-own-outdoor-cushions.html
- ↑ https://www.heytherehome.com/how-to-make-a-zippered-pillow-cover/
- ↑ https://www.heytherehome.com/how-to-make-a-zippered-pillow-cover/
- ↑ https://www.heytherehome.com/how-to-make-a-zippered-pillow-cover/
- ↑ https://www.heytherehome.com/how-to-make-a-zippered-pillow-cover/
- ↑ https://www.heytherehome.com/how-to-make-a-zippered-pillow-cover/
- ↑ https://www.heytherehome.com/how-to-make-a-zippered-pillow-cover/
- ↑ https://www.heytherehome.com/how-to-make-a-zippered-pillow-cover/
- ↑ https://www.heytherehome.com/how-to-make-a-zippered-pillow-cover/
- ↑ https://www.heytherehome.com/how-to-make-a-zippered-pillow-cover/
- ↑ https://www.property24.com/articles/make-your-own-scatter-cushions/14673
About This Article

To make cushions, start by cutting 4 inch thick upholstery foam to the size of the seat. Then, cut 2 panels of fabric for the top and bottom pieces, with about 1 inch of extra fabric for the seam. Measure the length and width of the panel and add these numbers together, multiplying by 2 to get the perimeter of the cushion. Cut a long strip of fabric to this length, and sew the panels together with a 1/2 inch seam allowance, attaching a zipper to one of the sides. Insert the foam through the zipper and place your new cushion! For tips on how to make an envelope cushion, read on!