This article was co-authored by wikiHow staff writer, Nicole Levine, MFA. Nicole Levine is a Technology Writer and Editor for wikiHow. She has more than 20 years of experience creating technical documentation and leading support teams at major web hosting and software companies. Nicole also holds an MFA in Creative Writing from Portland State University and teaches composition, fiction-writing, and zine-making at various institutions.
The wikiHow Tech Team also followed the article's instructions and verified that they work.
This article has been viewed 1,472,747 times.
Learn more...
FFmpeg is an open-source media tool you can use to convert any video format into the one you need. The tool is command-line only, which means it doesn't have a graphical, clickable interface. If you're used to installing regular graphical Windows programs, installing FFmpeg may seem complicated at first—but don't worry, it's actually pretty easy! This wikiHow teaches you the simplest way to install FFmpeg on your Windows PC.
Steps
-
1Go to https://ffmpeg.org/download.html. This brings you to a page containing the latest FFmpeg install packages and binary files.
-
2Click the Windows logo. It's the blue square with a white window inside.Advertisement
-
3Click Windows builds from gyan.dev. This takes you to a page that contains FFmpeg builds specifically for Windows that contains all of the hardware libraries you could possibly need.
- If you prefer, you could click Windows builds by BtbN instead, which is another Windows build of FFmpeg. There are a variety of builds available from different websites—the official FFmpeg website may add more as they become available.
-
4Scroll down to the "git" section. It's about halfway down the page between the set of green boxes and the "release" sections.
-
5Click the link to download ffmpeg-git-full.7z. The full text of the link is https://www.gyan.dev/ffmpeg/builds/ffmpeg-git-full.7z. This link downloads the latest FFmpeg files to your PC in a compressed format.
-
6Extract the downloaded file. Here's how:
- Right-click the Windows/Start button and select File Explorer.
- Click the Downloads folder in the left panel (you may have to click This PC first to find it).
- Right-click ffmpeg-*-git-*full_build.7z (the file name will vary depending on the current release).
- Select Extract Here and wait for the files to extract. This creates a new folder with the same name as the .7z file.
-
7Rename the extracted folder to FFmpeg. To do this, just right-click the folder, type FFmpeg, and press the Enter key.
-
8Click the FFmpeg folder once and press Control+X. This "cuts" the folder from the Downloads folder so you can paste it into the root of your hard drive.
-
9Click This PC in File Explorer. It's the computer icon in the left panel.
-
10Double-click your hard drive. It's usually called "Windows (C:)" or "Local Disk (C:)" but the name and drive letter may vary.
-
11Right-click a blank area of the right panel and select Paste. This moves the folder to the root of your hard drive.
-
12Open the system environment variables control panel. Here's how:
- Press Windows key + S to open the search bar.
- Type system variables into the search bar.
- Click Edit the system environment variables in the search results.
- Click the Environment variables button in the bottom-right area of the window.
-
13Select the Path variable under "User variables for (your name)" and click Edit. A list of paths will appear.
-
14Add the FFmpeg binary directory to the path. This will allow you to easily run FFmpeg commands at the command prompt without having to type out the full path to FFmpeg. Here's how:
- Click the New button to open a new blank line below the bottom-most path.
- Type C:\ffmpeg\bin. Or, if you placed the FFmpeg folder on a different drive or in a different folder, replace this path with that location instead (remember to leave \bin at the end).
- Click OK. Now you'll see the FFmpeg path and the end of the "Path" variable in the upper portion of the window.
-
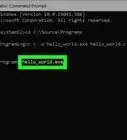
15Click OK to save your changes. You've now installed FFmpeg and set the proper environment variables. To confirm that FFmpeg is working, open the command prompt and run this command to see the version number: ffmpeg -version


Community Q&A
-
QuestionHow can I watch HEVC videos?
 Community AnswerThe newest version of VLC can play HEVC. FFplay, which comes with FFmpeg, can also play them.
 -
QuestionWhat versions of Windows does FFmpeg work with?
 Community AnswerWindows 7 or above, MacOS 10.x.x.x or above.
 -
QuestionWhy is 'ffmpeg-version' not recognized as an internal or external command, operable program or batch file?Community AnswerInsert a space between "ffmpeg" and "-version"; -version is a switch on the ffmpeg command/program.
Warnings
- FFmpeg is a command line-only program, which means that you can only use it in Command Prompt. This may prove difficult for users who aren't familiar with Command Prompt.⧼thumbs_response⧽
- You must be on an administrator account in order to install FFmpeg.⧼thumbs_response⧽


About This Article

1. Download FFmpeg from https://www.gyan.dev/ffmpeg/builds/ffmpeg-git-full.7z.
2. Extract the file.
3. Rename the extracted folder to "FFmpeg."
4. Move the "FFmpeg" folder to the root of your hard drive.
5. Right-click the Start menu and select Command prompt (Admin).
6. Run this command: setx /m PATH "C:\FFmpeg\bin;%PATH%"