Quickly open compressed .7z files with this user-friendly guide
This article was co-authored by wikiHow staff writer, Kyle Smith. Kyle Smith is a wikiHow Technology Writer, learning and sharing information about the latest technology. He has presented his research at multiple engineering conferences and is the writer and editor of hundreds of online electronics repair guides. Kyle received a BS in Industrial Engineering from Cal Poly, San Luis Obispo.
This article has been viewed 445,197 times.
Learn more...
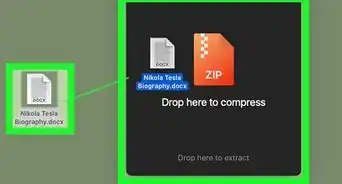
If you’ve come across a file that ends in “.7z”, you’re probably wondering why you can’t open it. These files, known as “7z” or “7-Zip” files, are archives of one or more files in one compressed package. On Windows, you'll need to install an app that can extract 7z files—a free option is 7-Zip, but you can also use WinZip. On a Mac or Chromebook, there's no need to install anything, as both platforms can open 7z files automatically. You can also install iZip on your Android, iPhone, or iPad to open 7z files on your mobile phone or tablet. This wikiHow article will teach you the easiest way to open 7z files on any computer, phone, or tablet.
Things You Should Know
- 7-Zip is a free Windows program that makes it easy to open .7z files.
- You can open .7z files on a Mac without installing any special software.
- On an Android, iPhone, or iPad, install iZip from the App Store or Play Store.
- On a Chromebook, use the Files app to unpack 7z files.
Steps
Using 7-Zip for Windows
-
1Download the 7-Zip installer from https://www.7-zip.org. Because 7z files are compressed archives, you can’t view their contents until the files are extracted with an unzipping program. 7-Zip can extract the contents of 7z archives at no cost to Windows users.
- To download 7-Zip, click the Download link next to the version that matches your Windows PC's architecture (e.g., 32-bit or 64-bit). If you're not sure which version to choose:
- Press ⊞ Win+S to launch search
- Type “system” and click “System” in the search results
- Look next to “System Type”.[1]
- 7-Zip is also great for highly compressing files.
- To download 7-Zip, click the Download link next to the version that matches your Windows PC's architecture (e.g., 32-bit or 64-bit). If you're not sure which version to choose:
-
2Double-click the 7-Zip .exe and follow the on-screen instructions. This will walk you through the 7-Zip installation.
- When the installation is complete, click Finish.
Advertisement -
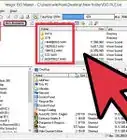
3Double-click the 7z file you want to open. The contents of the archive will display in the 7-Zip window.
-
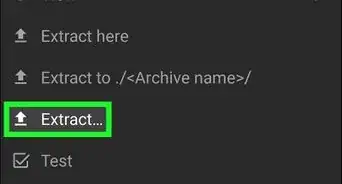
4Click Extract. It's the blue minus sign in the toolbar.
-
5Click the … button to choose a folder to store the files. The folder you select is where the files inside of the 7z archive will be extracted.
- The default selection is a new folder in the current directory, named after the 7z file.
- For example, if the file is called Blue.7z and located on the desktop, the default new folder will be created on the desktop with the name “Blue”.
-
6Click “OK” to extract the files to the folder. You’ll see a progress bar for the duration of the extraction process. When the files are extracted, the progress bar will disappear. At that point, you can double-click the new folder to access the files.


Using Mac Archive Utility
-
1Right-click the 7z file. Archive Utility is Mac’s built-in archive file app. It can compress files and unzip 7z folders just like ZIP files.
-
2Select Open With on the menu. A list of menu options will appear.
-
3Select Archive Utility. This option is in the file’s right-click menu. This extracts the folder from the 7z file to the current location.
- You can now double-click the new folder to view the 7z file’s contents.
Using iZip for Mobile
-
1Install iZip from the App Store (iPhone/iPad) or Play Store (Android). iZip is recommended across the web for being able to extract 7z files on Android, iPhone, and iPad.[2]
- If you need help installing apps on your phone or tablet, check out our handy guide.
-
2Tap the iZip icon to launch the app. Once iZip is installed, you'll find it in your app list.
-
3Tap Files to locate the 7z file.[3] If the 7z file is in the cloud, choose “iCloud Drive” or “Google Drive” instead.
-
4Long-press the name of the 7z file. Hold your finger down on the file until you see a box that says “Would you like to unzip all files?”
-
5Tap OK. The contents of the 7z file will be extracted to a folder of the same name.
- When the progress bar disappears, you can open the files by tapping them right inside of iZip, or by navigating to the folder which contains them.


Using a Chromebook
-
1Open the Files app. It’s the light blue folder on a darker blue background.
-
2Locate and double-click the 7z file. This will show you the files inside of the 7z file.
-
3Right-click the file you want to extract. This will open a right-click options menu.
-
4Click Copy. This will copy the file to your clipboard.
-
5Go to a location outside of the 7z file. This is where you’ll paste the copied file.
-
6Right-click anywhere in the new location. This will open an options menu.
-
7Select Paste. This will paste a copy of the file into the new location. Repeat this process for the remaining files in the 7z folder to fully extract its contents.
Using WinZip (Windows & Mac)
-
1Download WinZip from https://www.winzip.com. WinZip is a premium program (with a free trial) that makes it easy to open 7z files on your PC or Mac. To download a trial, click the TRY IT FREE button to download the installer.
-
2Double-click the WinZip installer and follow the instructions. This will walk you through the installation process.
-
3Double-click the 7z file. This opens the contents of the file in WinZip.
- If prompted to choose an application, select WinZip.
- If the 7z file opens in a different application, right-click the 7z file instead and select Open with > WinZip.
-
4Click Unzip to. You'll see this on the right side of the screen.[4]
-
5Choose a location. The location you select is where the extracted files and folders from the 7z file will appear once unpacked.
-
6Click Unzip. This extracts all files and folders from the 7z file to the selected location.

Using Unarchiver for Mac
-
1Install Unarchiver from the App Store. You can use this handy free app to unpack all sorts of compressed files, including 7z files.
- Once you've opened the App Store, search for "unarchiver" and then click GET.
- Follow the on-screen instructions to install.
- Mac's built-in Archive Utility can also open 7z files. If you'd rather not install software, you can use that feature instead.
-
2Select the 7z file in finder. Just click the file once to select it.
-
3Click the File menu and select Get Info. A window will expand.
-
4Select The Unarchiver next to "Open With." This tells your Mac to use Unarchiver to extract 7z files in the future.[5]
-
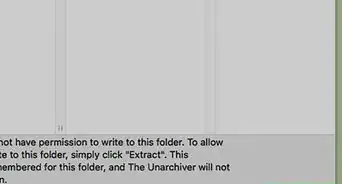
5Click Change all. Now that Unarchiver is associated with 7z files, all you'll need to do to extract them is double-click the file.
-
6Double-click the 7z file to extract it. This extracts the file's contents to the current directory.

Community Q&A
-
QuestionIs there a way to unzip them with terminal/homebrew?
 ArroganceTop AnswererYes. Install p7zip with 𝗯𝗿𝗲𝘄 𝗶𝗻𝘀𝘁𝗮𝗹𝗹 𝗽𝟳𝘇𝗶𝗽. Then extract using 𝟳𝘇 𝗲 .


References
- ↑ https://support.microsoft.com/en-us/products/windows?os=windows-10
- ↑ https://gizmodo.com/how-to-open-zip-files-on-ios-and-android-1723069413
- ↑ http://www.gizmodo.com.au/2015/08/how-to-open-zip-files-on-ios-and-android/
- ↑ https://www.winzip.com/en/learn/file-formats/7z/
- ↑ https://theunarchiver.com/
About This Article