This article was co-authored by wikiHow staff writer, Nicole Levine, MFA. Nicole Levine is a Technology Writer and Editor for wikiHow. She has more than 20 years of experience creating technical documentation and leading support teams at major web hosting and software companies. Nicole also holds an MFA in Creative Writing from Portland State University and teaches composition, fiction-writing, and zine-making at various institutions.
This article has been viewed 245,203 times.
Learn more...
Do you need to convert an XML file to the XLSX or CSV format? Converting XML data files to Excel is super easy—you'll just need to import the data into a workbook and save the file. As long as you're using a recent version of Excel (2016 & later for Windows, or 2019 & later for Mac), you can also use Power Query to transform your XML data before making a conversion. This wikiHow will teach you two simple ways to convert any XML file in Excel, including a quick trick you can use if you don't have Microsoft Excel on your computer.
Things You Should Know
- You can use Excel's Power Query tool to transform XML data before saving the file in the XLSX format.
- If you're using Windows, you can import XML files from the web in addition to files already on your computer.
- If Microsoft Excel isn't installed on your PC or Mac, you can copy and paste the contents of an XML file from a text editor into a web-based converter.
Steps
Using Microsoft Excel
-
1Open a new blank workbook in Microsoft Excel. You'll find Excel in your Windows Start menu or your Mac's Applications. Click Blank workbook on the welcome screen to start fresh.
-
2Click the Data tab. You'll see it at the top of Excel.Advertisement
-
3Click Get Data. This icon is on the left side of the toolbar at the top of Excel for Windows.
-
4Select From File (Windows) or Text/CSV (Mac). Choosing this option allows you to select an XML file from your computer or any connected network and cloud drives.
- If you're using Windows, you can import an XML file from the web instead. Instead of choosing From File, select From Other Sources > From Web, enter the direct URL to the XML file, and then click OK. Then, skip to Step 7.
- If you're using a Mac, make sure the XML file you want to convert is already saved to your computer. Unlike in Windows, you won't be able to open XML files from the web in Excel.
-
5Select From XML (Windows only). This opens your file browser.
-
6Select the XML file and click Import (Windows) or Next (Mac). The Navigator window will expand.
-
7Select the XML table name click Load. Choose the file name that has a table icon to its left—you'll see a preview of the data from that table. When you click Load, the data from the XML file will appear in a brand new sheet in your workbook.
- Windows: If you want to modify anything about the data first, such as column headers, you can click Transform Data instead. Then, make your changes in the Power Query window and click Close & Load at the top-left corner to add the data to a new worksheet.
- Mac: If you want to modify anything about the XML data, click Load first, then launch Power Query by clicking the down-arrow next to the "Get Data" icon in the toolbar and selecting Launch Power Query Editor…. Make changes to your data, then click Close & Load on the Home tab.
-
8Save the file. You can save the file as an XLSX (Excel Workbook), CSV, or other format. Here's how:
- Click the File menu and choose Save As.
- Click Browse (Windows) or On My Mac (Mac), then choose a folder.[1]
- Type a name for your workbook.
- If you want to save the file as an Excel XLSX file, choose Excel Workbook from the "Save as type" or "File Format" menu. You can choose any of the formats in the list, including CSV (Comma Delimited).
- Click Save to save the file.


Using an Online Converter
-
1Go to https://wtools.io/convert-xml-to-excel in a web browser. This free tool makes it easy to convert XML files to the Excel XLSX format even if you don't have Microsoft Excel installed.
-
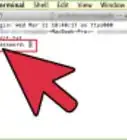
2Open the contents of your XML file in a text editor. To use the online converter, you'll need to copy the data from the XML file into the form in your browser. Double-clicking the XML file will open it in your default web browser, but the info may not copy correctly this way. To open the file in a text editor, right-click the file, select Open With, then choose a text editor like Notepad (Windows) or TextEdit (Mac).
-
3Copy the contents of the XML file. To do this, click anywhere in the text editor, then press Control + A (PC) or Command + A (Mac) to highlight everything in the file. Then, press Control + C (PC) or Command + C (Mac) to copy.
-
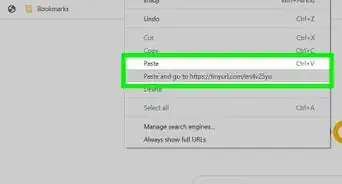
4Paste the copied data into the web form. You can do this easily by right-clicking the form and selecting Paste.
-
5Click the CONVERT & DOWNLOAD button below the form. This creates an XLSX file and downloads the file to your computer.
- Depending on your settings, you might have to select a save location and click Save or OK to start the download.


Our Most Loved Articles & Quizzes


References
About This Article

1. Open the file in Excel.
2. Click File.
3. Click Save As.
4. Change the file type to .CSV.
5. Click Save.