This article was written by Luigi Oppido and by wikiHow staff writer, Travis Boylls. Luigi Oppido is the Owner and Operator of Pleasure Point Computers in Santa Cruz, California. Luigi has over 25 years of experience in general computer repair, data recovery, virus removal, and upgrades. He is also the host of the Computer Man Show! broadcasted on KSQD covering central California for over two years.
This article has been viewed 240,216 times.
Sooner or later, you are bound to start experiencing technical problems. This may include slow shutdown, frequent reboots, blue screen errors, and boot failure amongst others problems. These are often as a result of incomplete software installation and uninstalls, virus infection, improper PC shut down, and software crashes. Once you've exhausted all other troubleshooting steps, it may be time to reinstall Windows. This wikiHow teaches you how to reformat your computer and reinstall Windows.
Steps
Using the Windows 10 Settings Menu
-
1Click the Windows Start menu . It's the icon with the Windows logo. It's typically in the lower-right corner. If you are still able to log in to Windows, you can reinstall and reset your computer using the Windows Start menu.
- Warning: This will erase all data on your hard drive. Be sure to back up your computer before you reformat your computer.
-
2Click the Settings icon . It's next to an icon that resembles a gear. It's generally in the lower-left corner of the Windows Start menu.Advertisement
-
3
-
4Click Recovery. It's in the menu panel to the left.
-
5Click Get started. It's the first button below "Reset this PC".
-
6Click Remove Everything. It's the second option in the menu. This will reformat your computer and reinstall Windows.
- Alternatively, if you don't want to erase all data on your computer, click Keep my files instead. This will reinstall Windows without deleting all your files.
-
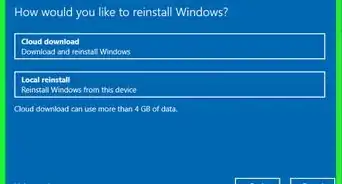
7Click Cloud Download or Local Reinstall. "Cloud Download" will download a fresh new version of Windows from the internet and install it. "Local Reinstall" reinstalls Windows from data stored on your computer. Installing a fresh version from online is usually a better option than installing Windows from your local computer.
-
8Review the Settings and click Next. Look over the settings you have chosen and click Next to proceed.
- If you decide you do not want to reinstall Windows, click the Back or Cancel button.
-
9Review the settings and click Confirm. If want to download Windows from the internet, make sure the toggle switch below "Download Windows?" is turned on. If you want to reformat your hard drive and erase all your data, make sure the toggle switch below "Clean data?" is turned on.
-
10Click Next. Windows once again displays the settings you have selected and informs you that you need 4 GB of hard drive space to reinstall Windows. Click Next to continue.
-
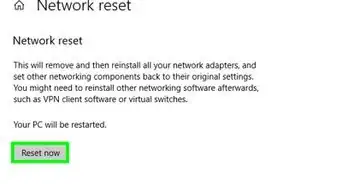
11Click Reset. It's in the lower-right corner. This will begin the process of downloading Windows and resetting your computer. This may take several minutes and your computer may restart several times during the process. Once your computer is finished reinstalling Windows, you will need to go through the initial setup process again.[1]


Using a USB Installation Disk
-
1Get or create a Windows installation disk. If you ordered your copy of Windows, it may have come with a USB installation drive. If you do not have one you can make one. You will need a Windows PC in order to do this and a USB drive with at least 8 GB of space on it. If your Windows computer cannot load Windows, you'll need to use a separate computer. Use the following steps to create a Windows install disk:
- Go to one of the following download websites:
- Click "Download tool now' below "Create Windows 10/11 Installation Media."
- Open the MediaCreateTool.exe file in your web browser or Downloads folder.
- Click Yes.
- Click Accept.
- Insert a USB drive into a USB port.
- Click the radio option next to "Create installation media" and click Next.
- Select your language.
- Select which Windows edition you want to install.
- Select which architecture your computer has (32-bit or 64-bit).
- Click Next.
- Click the radio option next to "USB flash drive" and click Next.
- Click your USB drive and click Next.
-
2Boot your computer from the USB drive. Make sure the Windows installation media disk is inserted before you boot up your computer. Some newer computers have a button you can press to open a boot menu during boot-up process. This is usually "F11" or "F12". Press that button during the startup process and select the option to boot from your USB drive.
- Some computers enter the boot menu automatically when a USB boot disk is inserted.
- On some computers, you will need to boot into the BIOS menu and then change the boot order so that it boots from the USB drive first. The way you do this is different on each computer make and model.
-
3Select your language, time and currency format, and keyboard format and click Next. Once you boot from the Windows installation media, it will ask you to select your language, time and currency format, and keyboard format. Use the drop-down menu to select the correct language, time, and currency, and keyboard format. Then click Next.
-
4Click Install Now. It's in the center of the screen. This starts the installation process.
-
5Enter your activation key and click Next. Your activation key is needed to register your copy of Windows. If you purchased Windows online, it was most likely emailed to you. If you purchased a physical copy of Windows, it came in the box that Windows came in.
- If you do not have an activation, key, click I don't have a product key at the bottom. This allows you to skip this step for now, but you will need to purchase an activation key once you finish installing Windows.
-
6Click the Windows edition you want to install. You'll need to check your Windows receipt or activation key to see which Windows edition you purchased. If you are reinstalling Windows, be sure to click the same version of Windows you had before. Click the correct Windows edition and click Next.
-
7Agree to the license terms and click Next. You can read the license terms on-screen. When you are finished, click the checkbox next to "I agree to the license terms" and then click Next.
-
8Click Custom: Install Windows only (advanced). If you want to reformat your computer and install a fresh version of Windows, click the option to do a custom install.
- Warning: This will erase all data on your hard drive. Be sure to back up your computer before you reformat your computer.
- Alternatively, if you want to try to keep all your files, you can select the option to "Upgrade: Install Windows and keep files, settings, and applications."
-
9Click a drive you want to install Windows on and click Next. If you have multiple drives on your computer, click the drive you want to install Windows on and click Next. You can usually tell which drive is which by how much hard drive space they have on them. This will install Windows on the drive you selected. This may take several minutes. Once Windows is finished installing, you will need to go through the initial setup process.
- If you have a drive that has multiple partitions, you can delete the partitions. To do so, click a portion and then click Delete Warning: Any data on the drive before it was deleted will be erased and cannot be recovered.
- If your computer keeps booting into the boot menu after Windows is installed, remove the USB drive so that it boots into Windows.[2]


Community Q&A
-
QuestionHow do I increase space in local drive C:, D:, and E:?
 Community AnswerYou can either buy a new drive (expensive option) and transfer the data over, or buy an external hard drive if you want to directly increase the space. Before you do that I would suggest running a quick sweep through your computer. If you find an app you don't want, uninstall it, a video, delete it, etc.


References
About This Article

1. Click the Windows Start menu.
2. Click the Settings icon.
3. Click Update & Security.
4. Click Recovery in the menu panel to the left.
5. Click Get started below "Reset this PC."
6. Click Remove everything.
7. Click Cloud download or Local reinstall.
8. Review the settings and click Next.
9. Ensure the proper settings are turned on and click Confirm.
10. Review the settings you selected and click Next.
11. Click Reset.