This article was co-authored by wikiHow staff writer, Jack Lloyd. Jack Lloyd is a Technology Writer and Editor for wikiHow. He has over two years of experience writing and editing technology-related articles. He is technology enthusiast and an English teacher.
The wikiHow Tech Team also followed the article's instructions and verified that they work.
This article has been viewed 1,236,773 times.
Learn more...
This wikiHow teaches you how to change the settings of a proxy network to which you're currently connected. You can do this on the desktop version of most browsers, including Chrome, Firefox, Edge, Internet Explorer, and Safari, as well as in your iPhone or Android settings. You can usually find the information that you need to connect to your selected proxy on the proxy's information page.
Steps
Google Chrome
-
1Open Google Chrome. It's a red, yellow, green, and blue sphere icon.
-
2Click ⋮. This icon is in the top-right corner of the page. A drop-down menu will appear.Advertisement
-
3Click Settings. It's near the bottom of the drop-down menu.
-
4Scroll down and click Advanced. You'll find it at the bottom of the page.
-
5Scroll down and click Open proxy settings. This option is in the "System" group of settings that's near the bottom of the page.
-
6Edit your proxy settings. Depending on your operating system, this step will vary:
- Windows - Click LAN settings, then edit the URL in the Address section and/or change the port used to connect in the Port section.
- Mac - Select the proxy you want to edit on the left side of the page, then change the URL in the Address field, the username and/or password in the Username and Password fields, and the bypassed sites in the Bypass field.
-
7Click OK, then click Apply. Both are at the bottom of the respective windows. Doing so will save your updated proxy settings.


Firefox
-
1Open Firefox. It's a blue, globe-shaped icon with an orange fox on it.
-
2Click ☰. This option is in the top-right side of the window. A drop-down menu will appear.
-
3Click Options. It's a gear-shaped icon in the drop-down menu.
- On a Mac, click Preferences here instead.
-
4Click Advanced. It's the bottom tab on the left side of the Firefox window.
- If you're on a Mac, the Advanced tab is at the top of the Preferences window.
-
5Click the Network tab. You'll see it at the top of the Advanced page.
-
6Click Settings…. It's to the right of the "Connection" heading. Doing so will open your current proxy's settings.
-
7Edit your proxy settings. Change the following fields as needed:
- HTTP Proxy - Type in a new proxy address, or change the existing one to be accurate.
- No Proxy for - Enter addresses that you don't want to use the proxy for.
-
8Click OK. Doing so will save your proxy settings and exit the proxy menu.


Microsoft Edge
-
1
-
2
-
3
-
4Click the Proxy tab. It's at the bottom of the column of options on the left side of the Network & Internet window.
- You may have to scroll down on the left-hand column to see this tab.
-
5Scroll down to the "Manual proxy setup" section. It's at the bottom of the page.
-
6Edit your proxy's information. Change the following fields as needed:
- Address - Replace or edit the proxy address here.
- Port - Change the port that the proxy uses to connect through your Firewall.
- Exceptions - Add sites that you don't want to use your proxy for (e.g., Facebook).
-
7Click Save. It's at the bottom of the page. Doing so will save your proxy settings.


Internet Explorer
-
1Open Internet Explorer. It's a blue "e" with a yellow band on it.
-
2
-
3Click Internet options. It's near the bottom of the drop-down menu.
-
4Click the Connections tab. This is at the top of the Internet Options window.
-
5Click LAN settings. This button is under the "Local Area Network (LAN) settings" heading near the bottom of the page.
-
6Check the "Use a proxy server for your LAN" box. It's below the "Proxy server" heading.
-
7Edit your proxy's information. Change the following fields as needed:
- Address - Edit the proxy's URL.
- Port - Change the port that the proxy uses to connect through your Firewall.
-
8Click Apply. Doing so saves your changes.
- These settings will also apply to Google Chrome.


Safari
-
1
-
2Click System Preferences. This option is near the top of the drop-down menu.
-
3Click the Network icon. It resembles a globe in the System Preferences menu.
-
4Click Advanced. It's in the middle of the Network page.
-
5Click the Proxies tab. You'll see it at the top of the window.
- You may first have to click the lock icon and enter your administrator name and password.
-
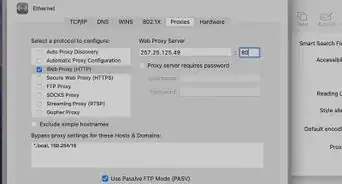
6Edit your proxy's information. Change the following fields as needed:
- Web Proxy Server - Edit or replace the proxy's URL.
- Username - Change the username you use to log in with the proxy (only do this if you changed the username on the proxy's site first).
- Password - Update the password you use to log in.
- Bypass - Enter the addresses of any sites that you don't want to use the proxy for.
-
7Click Apply. It's a blue button at the bottom of the page. This will save your settings.


iPhone
-
1
-
2Tap Wi-Fi. It's near the top of the Settings page. This will open the Wi-Fi menu.
-
3Select a network. Tap the network to which you want to connect with a proxy.
- Skip this step if you're already connected to the network that you want to use.
- You may need to enter the network's password before continuing.
-
4Tap ⓘ. It's to the right of the network. This will open the network's settings.
-
5Scroll down to the "HTTP PROXY" section. You'll find this near the bottom of the page.
-
6Tap Manual. It's a tab at the bottom of the page.
-
7Edit your proxy settings. Change the following fields as needed:
- Server - Edit or replace the address for the current proxy.
- Port - Change the port that the proxy uses to connect through your firewall.
- Authentication - Tap this switch to enable the Username and Password information fields.
- Username - Edit the username you use to connect to the proxy.
- Password - Edit the password you use to connect to the proxy.
-
8Tap < Wi-Fi. It's in the top-left corner of the screen. This will save your proxy settings.


Android
-
1
-
2Tap Wi-Fi. You'll find this option near the top of the Settings screen.
-
3Select a network. Tap the network to which you want to connect via proxy.
- Skip this step if you're already connected to the network.
- You'll need to enter the password for the network if it isn't one you've connected to before.
-
4Tap and hold the Wi-Fi network name. This will open a pop-up menu.
-
5Tap Modify network. It's near the bottom of the pop-up menu.
-
6Tap Advanced options. This drop-down box is in the middle of the page.
-
7Tap Manual. Doing so will allow you to change your proxy's settings manually.
-
8Change your proxy's settings. Edit the following fields as needed:
- Proxy hostname - Edit or replace the address of the proxy.
- Proxy port - Change the port through which the proxy connects.
- Bypass proxy for - Add addresses that you don't want to use the proxy for. Addresses should be typed with commas, but no spaces, separating them.
-
9Tap Save. It's at the bottom of the screen. This will save your settings and exit the proxy menu.


Community Q&A
-
QuestionCan I use Google Chrome to change proxy settings?
 Community AnswerYou can change it with some plug-ins, but not within the regular version of Google Chrome. If you are running Windows, just change it from Network Settings.
 -
QuestionDoes it work the same on TOR?
 Community AnswerI don't think you would need to change the proxy on TOR because it is already a secure browser. You probably CAN do it though if someone has caught on to your TOR activity. Just do the same type of algorithm you would in Firefox because TOR is similar to that.
Warnings
- Inputting the wrong address, username, password, or port can result in your proxy not working.⧼thumbs_response⧽


About This Article
1. Open Chrome.
2. Click the three-dot menu.
3. Click Settings.
4. Click Advanced.
5. Click Open proxy settings.
6. Click LAN settings (PC only).
7. Edit your proxy settings as needed.