This article was co-authored by wikiHow staff writer, Megaera Lorenz, PhD. Megaera Lorenz is an Egyptologist and Writer with over 20 years of experience in public education. In 2017, she graduated with her PhD in Egyptology from The University of Chicago, where she served for several years as a content advisor and program facilitator for the Oriental Institute Museum’s Public Education office. She has also developed and taught Egyptology courses at The University of Chicago and Loyola University Chicago.
There are 29 references cited in this article, which can be found at the bottom of the page.
This article has been viewed 3,003 times.
Learn more...
The Shortcuts app for iPhone and iPad is incredibly useful for customizing your iOS experience. Unfortunately, using certain kinds of shortcuts can trigger annoying notification banners that are surprisingly hard to turn off. Depending on which version of iOS you’re running, there are a few different workarounds you can use to switch those notifications off. We’ll talk you through how to turn off banners that pop up when you trigger an automation or use a custom app icon, as well as how to switch off the permission window that pops up when you run automations.
Things You Should Know
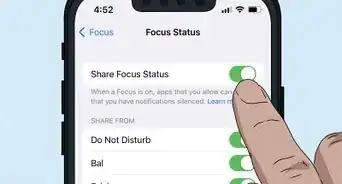
- To turn off notifications for Shortcuts automations in iOS 15 and later, open the automation in Shortcuts and toggle off Notify When Run.
- You can also enable most automations to run without permission in the Automations menu.
- The process for turning off banner notifications when you use custom app icons varies depending on which version of iOS you’re using.
Steps
Turning Off Notify When Run (iOS 15 and Later)
-
1Open the Shortcuts app. By default, the Shortcuts app will show a notification whenever an automation is triggered on your iPhone or iPad. Fortunately, it’s easy to toggle off this option if you’re running iOS 15.4 or later. To get started, launch the Shortcuts app.[1]
- Note that this solution is only for the banners that pop up with automations. It doesn’t affect other types of shortcuts.
-
2Navigate to the Automations tab. Tap the button that looks like a clock in the bottom center of the Shortcuts screen. This will open the Automations menu.[2]Advertisement
-
3Select one of your automations. Tap an automation to open an Edit Automation menu.[3]
-
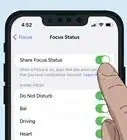
4Toggle off Notify When Run. At the bottom of the menu, locate the Notify When Run button. Tap the button to toggle it off.[4]
- When you’re finished editing your automation, tap Done. You should no longer see a notification banner every time the automation runs.
- You’ll need to do this with each automation separately. Unfortunately, there’s no simple way to turn off notifications for all automations at once.


Enabling Automations to Run Without Asking
-
1Open the Shortcuts app. Some types of Shortcuts automations can be set to run automatically, without asking for your permission every time. To turn off the permission request notifications, you’ll need to open the Shortcuts app and edit the automation.[5]
- Not all automations can be set to run automatically. Automations that cannot run without your permission include:
- Arrive
- Leave
- Before I Commute
- Message
- Wi-Fi
- Bluetooth
- Not all automations can be set to run automatically. Automations that cannot run without your permission include:
-
2Tap the Automations tab. In the Shortcuts app, tap the icon that looks like a clock in the bottom center of the screen. This will take you to your list of automations.[6]
-
3Select the automation you want to run automatically. Tap one of the automations in the list to open an Edit Automation window.[7]
-
4Toggle off Ask Before Running. At the bottom of the screen, tap the button next to Ask Before Running to toggle it off.[8]
-
5Select Don’t Ask to confirm. A dialog box will pop up asking you to confirm your choice. Tap Don’t Ask.[9]
-
6Tap Done. Back in the Edit Automation screen, tap Done in the upper right corner. Your automation should now run automatically, without asking your permission each time.[10]
- You may have to do this individually with each automation you want to run automatically.


Disabling Banners for Custom Apps (iOS 16)
-
1Open the Shortcuts app. One of the most frustrating features of Shortcuts is that it pops up a notification banner every time you launch an app using a custom app icon. The good news is that you can turn these notifications off, although the process is a little complicated. Start by launching the Shortcuts app.[11]
- This process is a little different in iOS 16 from the way it was in iOS 15. If you haven’t upgraded to iOS 16 yet, check out the iOS 15 method below.
-
2Tap + to create a new shortcut action. Although it seems a little counterintuitive, you’ll need to add a Show Notification action to your shortcuts in order to get them to stop showing notifications. In the All Shortcuts menu screen, tap the + button to create a new action.[12]
-
3Search for show notification and select the result. After you select the Show Notification action, tap Done.[13]
-
4Open a shortcut you’d like to hide the banner for. Back in the All Shortcuts menu, tap the ••• button in the top right corner of one of your shortcuts. This will open the edit page for that shortcut.[14]
-
5Search for run shortcut and select the result. Type run shortcut into the Search for apps and actions field at the bottom of the screen. Tap the Run Shortcut result to add it to the actions for your shortcut.[15]
-
6Tap the Run Shortcut action and select Show Notification. Touch the word Shortcut on the new action and select Show Notification from the list of shortcut actions that pops up.[16]
-
7Drag the Show Notification action above the Open App action. Tap and hold the Run Show Notification action that you just created, then drag it above the original Open [App] action.[17]
- When you’re finished, tap Done in the top right corner of the screen.
- You’ll have to repeat this process individually for every shortcut you want to turn off notifications for.
-
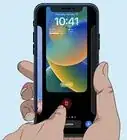
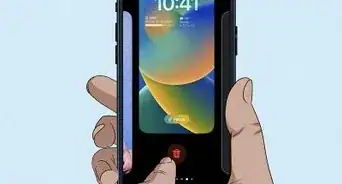
8Tap a custom app icon and select Allow on the popup. To turn off notifications, you’ll need to trigger them first. Go back to your Home Screen and tap one of your custom app icons to launch the shortcut. First, you’ll see the typical notification banner that you get when you use an app shortcut. Then, a banner will pop up asking your permission to allow the app to run another shortcut. Tap Allow.[18]
-
9Open Settings and select Screen Time. Next, go to your iPhone or iPad’s Settings app. This is where you’ll actually turn off the notifications. Tap Screen Time, which is located near the top of the main Settings menu.[19]
-
10Tap See All Activity. This link is located under the snapshot of your weekly activity at the top of the Screen Time menu.[20]
-
11Scroll down to the Notifications section and find Shortcuts. At the bottom of the next screen, you’ll find a Notifications header. Look for Shortcuts in the list of apps under the day’s activity snapshot.[21]
- Even if you see the app listed, you may not be able to tap it yet.
-
12Touch any of the bars showing a previous day’s activity. In the activity snapshot at the top of the Notifications section, tap one of the bars for a previous day. Keep doing this until you find a day where the Shortcuts app is visible.[22]
-
13Tap on the Shortcuts app icon. Now you should be able to tap the icon and open up a settings screen for the Shortcuts app.[23]
- If the Shortcuts app still isn’t showing up in the list of apps under Notifications, try the following workaround:
- Open up several of your app shortcuts and return to the Settings app.
- Go to Settings > General > Date & Time and disable Set Automatically, then set the date to a future day.
- Return to the Notifications section under Screen Time and tap one of the new bars in the activity snapshot. You should now be able to see and tap on the Shortcuts icon.
- If the Shortcuts app still isn’t showing up in the list of apps under Notifications, try the following workaround:
-
14Toggle off Allow Notifications. When you tap the Shortcuts icon, a new screen will open. Tap the button next to Allow Notifications to change it to the off position.[24]
- You should now be able to launch your custom app icon shortcuts without getting a notification. However, be aware that sometimes your Screen Time settings can reset after you restart your phone, so you may need to switch off notifications again at some point.


Disabling Banners for Custom Apps (iOS 15)
-
1Open Settings and select Screen Time. When you launch apps from custom icons using Shortcuts, a banner will pop up. Fortunately, there’s a way to turn off these annoying notifications. If you’re still running iOS 15, this works a little differently from the way it does in iOS 16. Open your iPhone or iPad’s Settings app and select Screen Time in the main Settings menu to get started.[25]
-
2Select See All Activity. You’ll find this link under your weekly activity snapshot at the top of the Screen Time screen.[26]
-
3Scroll down to the Notifications section and tap Shortcuts. Go down to the bottom of the All Activity screen to find the Notifications header. If you’ve launched any app shortcuts recently, you should see Shortcuts in the list of apps under the Notifications section.[27]
- It might not show up yet if you created your custom icons very recently. Go back to your home screen and use a few of your custom app icons, then check back to see if Shortcuts is showing up.
-
4Toggle off Allow Notifications. In the settings screen for the Shortcuts app, tap the button to switch it to the off position.[28]
- Unfortunately, getting rid of those annoying banners isn’t as simple as switching off notifications for the app. There are still a few more steps you’ll need to take.
-
5Open Shortcuts and select Automation. Go back to your home screen and tap on the Shortcuts app. Then, tap the Automation tab. It’s the icon that looks like a clock at the bottom center of the main Shortcuts screen.[29]
-
6Select Create Personal Automation. This will bring up a New Automation menu.[30]
-
7Tap App. Scroll down and select App from the list of automation options. This will allow you to create an automation that runs in the background whenever a certain app is opened or closed.[31]
-
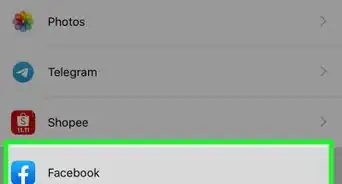
8Select Choose and select an app from the list. Pick any app to link to the automation that you’re creating.[32]
- Once you’ve chosen your app, tap Done in the upper right corner to go back to the New Automation screen.
-
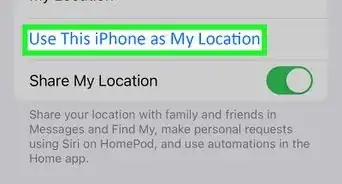
9Make sure Is Opened is selected and tap Next. This option should be selected by default. It means that the automation will be run whenever you open the app you selected.[33]
- When you’re done, tap Next in the top right corner of the New Automation screen.
-
10Select Add Action. In this step, you’ll create the automation that runs whenever you launch the selected app.[34]
-
11Choose an action that will run in the background. You’ll want something unobtrusive that doesn’t really make much difference to how the app works. For example:[35]
- In the Add Action menu, search for calculator, select the Calculator app, and select Number from the list of options. Leave the default settings and tap Next to add the Number action to your automation.
-
12Toggle off Ask Before Running, then tap Done. When you get back to the New Automation screen, tap the button next to Ask Before Running to turn it off. Tap Don’t Ask in the dialog box that pops up to confirm your choice.[36]
- Tap Done in the upper right corner of the screen to save your new automation settings. You should now be able to use your custom app icons without seeing a notification banner.
- You may need to reset the Screen Time setting whenever you reboot your phone.


References
- ↑ https://www.theverge.com/2022/2/7/22921682/ios-15-4-beta-shortcut-automations-annoying-notifications-disable
- ↑ https://www.theverge.com/2022/2/7/22921682/ios-15-4-beta-shortcut-automations-annoying-notifications-disable
- ↑ https://www.theverge.com/2022/2/7/22921682/ios-15-4-beta-shortcut-automations-annoying-notifications-disable
- ↑ https://www.theverge.com/2022/2/7/22921682/ios-15-4-besta-shortcut-automations-annoying-notifications-disable
- ↑ https://support.apple.com/guide/shortcuts/enable-or-disable-a-personal-automation-apd602971e63/6.0/ios/16.0
- ↑ https://support.apple.com/guide/shortcuts/enable-or-disable-a-personal-automation-apd602971e63/6.0/ios/16.0
- ↑ https://support.apple.com/guide/shortcuts/enable-or-disable-a-personal-automation-apd602971e63/6.0/ios/16.0
- ↑ https://support.apple.com/guide/shortcuts/enable-or-disable-a-personal-automation-apd602971e63/6.0/ios/16.0
- ↑ https://support.apple.com/guide/shortcuts/enable-or-disable-a-personal-automation-apd602971e63/6.0/ios/16.0
- ↑ https://support.apple.com/guide/shortcuts/enable-or-disable-a-personal-automation-apd602971e63/6.0/ios/16.0
- ↑ https://youtu.be/eLQEnVC54DY?t=83
- ↑ https://youtu.be/eLQEnVC54DY?t=93
- ↑ https://youtu.be/eLQEnVC54DY?t=94
- ↑ https://youtu.be/eLQEnVC54DY?t=102
- ↑ https://youtu.be/eLQEnVC54DY?t=110
- ↑ https://youtu.be/eLQEnVC54DY?t=115
- ↑ https://youtu.be/eLQEnVC54DY?t=119
- ↑ https://youtu.be/eLQEnVC54DY?t=129
- ↑ https://youtu.be/eLQEnVC54DY?t=137
- ↑ https://youtu.be/eLQEnVC54DY?t=140
- ↑ https://youtu.be/eLQEnVC54DY?t=143
- ↑ https://youtu.be/eLQEnVC54DY?t=145
- ↑ https://youtu.be/eLQEnVC54DY?t=156
- ↑ https://youtu.be/eLQEnVC54DY?t=202
- ↑ https://youtu.be/rhUBRQaQTaQ?t=53
- ↑ https://youtu.be/rhUBRQaQTaQ?t=60
- ↑ https://youtu.be/rhUBRQaQTaQ?t=61
- ↑ https://youtu.be/rhUBRQaQTaQ?t=83
- ↑ https://youtu.be/rhUBRQaQTaQ?t=101
- ↑ https://youtu.be/rhUBRQaQTaQ?t=107
- ↑ https://youtu.be/rhUBRQaQTaQ?t=109
- ↑ https://youtu.be/rhUBRQaQTaQ?t=110
- ↑ https://youtu.be/rhUBRQaQTaQ?t=119
- ↑ https://youtu.be/rhUBRQaQTaQ?t=124
- ↑ https://youtu.be/rhUBRQaQTaQ?t=126
- ↑ https://youtu.be/rhUBRQaQTaQ?t=146
About This Article