X
This article was co-authored by Luigi Oppido. Luigi Oppido is the Owner and Operator of Pleasure Point Computers in Santa Cruz, California. Luigi has over 25 years of experience in general computer repair, data recovery, virus removal, and upgrades. He is also the host of the Computer Man Show! broadcasted on KSQD covering central California for over two years.
This article has been viewed 72,370 times.
Putting your Mac in Sleep mode will save power while allowing you to quickly resume your work. You can set your Mac to enter Sleep mode automatically after a set amount of inactivity. You can also set a schedule for Sleep mode.
Steps
-
1Click the Apple menu.
-
2Select "System Preferences."[1]Advertisement
-
3Click the "Energy Saver" option. If you don't see this, click the "Show All" button at the top of the menu.[2]
-
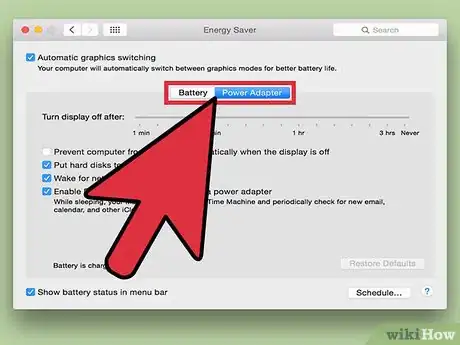
4Click the mode you want to change the options for. If you're using a laptop, you'll see "Battery" and "Power Adapter" modes. Each of these can have individual settings.[3]
- Desktop users will not have multiple options because the computer will always be plugged into a power source. Instead, you will see both sliders on one screen.
-
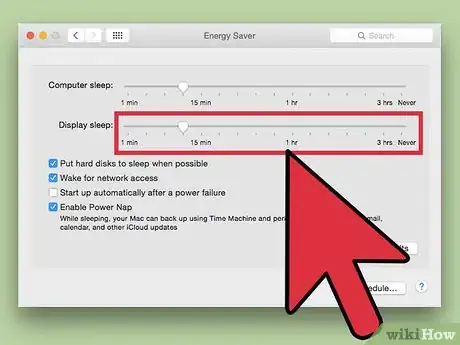
5Use the "Computer sleep" slider to set the sleep time, if you have the option. This will depend on what Mac and what version of the OS you're using.[4] . If you're given the option, your computer will put itself into sleep mode after being inactive for this amount of time.
-
6Use the "Display sleep" slider to set your monitor sleep time. This will turn your display off once the display is inactive for the time you set.[5]
- You cannot set the "Display sleep" slider for longer than the "Computer sleep" slider.
- When your computer goes to sleep, your display will go to sleep as well.
-
7Check the "Put hard disks to sleep when possible" box. This will put your hard disks to sleep if they're not in use, which can save you more power and increase their lifespan.
-
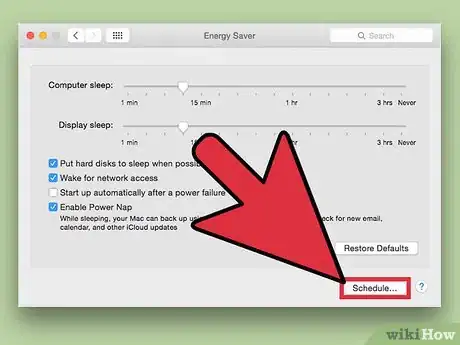
8Click the "Schedule" button. This will allow you to set times when your Mac automatically goes to sleep or wakes up.
-
9Check the "Start up or wake" box. This will enable you to set a time for your computer to wake itself up.
- You can click the "Every Day" menu to set specific days for this to occur.
- Set a time that you want this to occur on the specified days.
-
10Check the second box to set a sleep or shut down time. This will allow you to set a time that your computer will put itself to sleep or shut down on specified days.
- Click the "Sleep" menu to switch to "Shut Down" or "Restart."
- Click the "Every Day" menu to select which days you want this to occur.
- Set the time that you want to shut down or put the computer to sleep on the specified days.
-
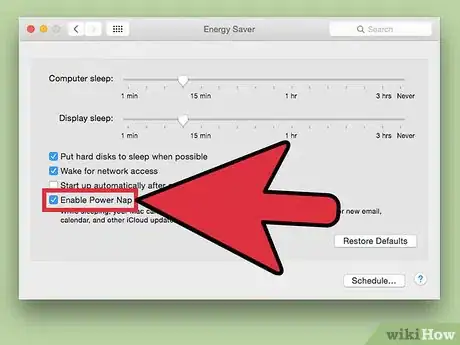
11Decide if you want to enable Power Nap. Power Nap allows your Mac to check for email, calendar, and iCloud updates while in Sleep mode. You can enable this separately for battery and power adapter use.
Advertisement
References
- ↑ Luigi Oppido. Computer & Tech Specialist. Expert Interview. 24 February 2021.
- ↑ Luigi Oppido. Computer & Tech Specialist. Expert Interview. 24 February 2021.
- ↑ Luigi Oppido. Computer & Tech Specialist. Expert Interview. 24 February 2021.
- ↑ http://apple.stackexchange.com/questions/188682/sleep-timeout-missing-from-the-energy-saver-preferences
- ↑ Luigi Oppido. Computer & Tech Specialist. Expert Interview. 24 February 2021.
About This Article
Advertisement
