This article was co-authored by wikiHow Staff. Our trained team of editors and researchers validate articles for accuracy and comprehensiveness. wikiHow's Content Management Team carefully monitors the work from our editorial staff to ensure that each article is backed by trusted research and meets our high quality standards.
There are 17 references cited in this article, which can be found at the bottom of the page.
The wikiHow Video Team also followed the article's instructions and verified that they work.
This article has been viewed 65,759 times.
Learn more...
Turning a shirt into a pillow is a unique way to preserve a favorite shirt, upcycle a shirt from a thrift store, or just get crafty with a shirt that you no longer wear! You can use a t-shirt or a button-down shirt to create your pillow. Sew a pillow if you have a sewing machine and know how to sew, or try turning your t-shirt into a no-sew knotted pillow for a quick and easy craft that anyone can do! No matter which option you choose, this craft will only take around 1 hour.
Steps
Using a T-Shirt
-
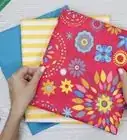
1Trace the outline of the image on the shirt onto wax paper. Place a piece of wax paper over the image on the shirt. Then, draw a line onto the wax paper going around the outside of the image. Make sure to draw a line that is 0.5 in (1.3 cm) or more past the edges of the image. This will help to ensure that you do not cut through the image.[1]
- Skip this if you plan to use a solid-colored shirt to make the pillow.
-
2Draw the desired pillow shape around the tracing on the wax paper. The tracing may be an irregular shape. If it is, draw a shape around it on the wax paper in the desired shape of your pillow.[2]
- For example, you could draw a square, circle, triangle, star, hexagon, or other shape that encloses the tracing on the wax paper.
Advertisement -
3Cut the sleeves and side seam of the shirt to create 2 separate pieces. Don’t worry about cutting out your desired shape yet. Use a sharp pair of scissors to cut the sleeves off of the shirt. Then, cut along the side seam and shoulders. This will leave you with 1 front and 1 back piece.[3]
-
4Iron the fusible fleece onto the front and back pieces of the t-shirt. Lay the t-shirt pieces so that their right (print or outer) sides are facing down. Then, place a piece of fusible fleece interfacing over each of the pieces. Iron across the surface of the fusible fleece to attach it to the backside of each t-shirt piece.[4]
- Do not worry if the shirt pieces and fusible fleece are different sizes.
- Make sure to follow the manufacturer’s instructions for how long to hold the iron in place and what settings to use.
-
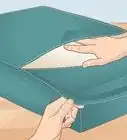
5Cut out the t-shirt material and fusible fleece interfacing. Next, turn the t-shirt with fusible fleece backings over so that the shirt sides are facing up. Place the wax pattern piece you created over the front side of your t-shirt. Pin the edges of the wax pattern to make it stay put. Then, cut the t-shirt and fleece along the edges of the pattern piece.[5]
- Repeat for the other t-shirt and fusible fleece piece.
-
6Stack the pieces so the right (print) sides are facing each other. Make sure the edges are lined up all the way around. Insert a pin every 2 to 3 in (5.1 to 7.6 cm) along the edges of the pillow.[6]
- Insert the pins so that they are perpendicular to the edges of the fabric. This will make it easier to remove them as you sew.[7]
-
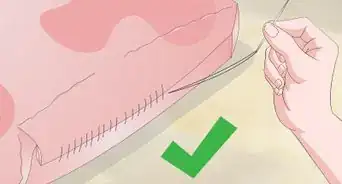
7Sew along the outer edges leaving a 4 in (10 cm) opening. Set your sewing machine to the straight stitch setting. Then, sew a straight stitch 0.5 in (1.3 cm) from the raw edges of the 2 pieces. Leave a 4 in (10 cm) section open so that you can invert the pillowcase and insert the stuffing in through this opening.[8]
- Make sure to remove the pins as you sew. Do not sew over them or you may damage your sewing machine!
Tip: Change your sewing machine needle before you start sewing. This will help to ensure that your needle is sharp enough to sew through all of the fabric layers with ease.
-
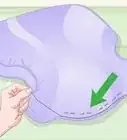
8Invert the pillow and stuff it with polyester filling. Push the fabric through the opening you left so that it is turned right-side out and the raw edges of the fabric are hidden. Then, push enough stuffing into the opening to fill out the pillow.[9]
- Be sure to push the stuffing into all corners and edges of the pillow form. This will help to ensure that it is nice and plump!
-
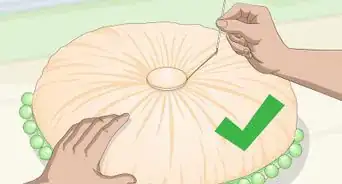
9Fold over the raw edges and sew the opening closed. Once your pillow is stuffed, fold over the 0.5 in (1.3 cm) of fabric along the opening of the pillow form. Tuck the fabric inside of the pillow to hide the raw edges. Place a few pins through both sides of the folded over edges to keep them together and temporarily close the opening. Then, sew a straight stitch 0.25 in (0.64 cm) from the pinned edge to secure it.[10]
- Make sure to remove the pins as you sew or you may damage your sewing machine.
Using a Button-Down Shirt
-
1Cut off the sleeves and side seams to create a rectangle of fabric. Lay the shirt out flat with the front facing up and the sleeves out to the sides. Cut straight down 1 side of the shirt starting where the sleeve meets the shoulder. Keep cutting down all the way to the bottom of the shirt to remove the sleeve and side seam. Then, repeat on the other side to remove the other sleeve and side seam.[11]
- If the fabric looks uneven on the sides, trim another 1 to 2 in (2.5 to 5.1 cm) off to straighten the edges out.[12]
-
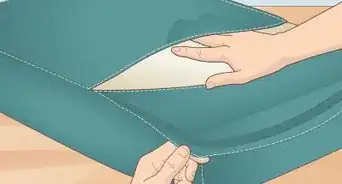
2Fold and pin the shoulder seam and collar so they overlap. Lift the shirt up and open up the fabric so that the front and back of the shirt are flat out in 1 long piece with the shoulder seam and collar at the center. Then, pinch the shirt at the shoulder seam and lift the fabric up by about 3 in (7.6 cm). Fold the shoulder seam and collar back so that they overlap with the back portion of the shirt just below the shoulder seam.[13]
- Make sure that the collar is positioned so that there will be fabric behind it. Otherwise, you will have an opening in the pillow where the collar is.
- Place a pin going perpendicular to the shoulder seam about every 2 to 3 in (5.1 to 7.6 cm).[14]
-
3Sew across the shoulders and around the collar. Next, take the shirt to your sewing machine and set it to the straight stitch setting. Sew 0.5 in (1.3 cm) from the shoulder seam and around the bottom of the collar to keep the shirt in this folded position.[15]
Warning: Do not sew across the pins! Remove them before you sew over each section or you may damage your sewing machine.
-
4Cut off the bottom 3 in (7.6 cm) of fabric on both sides. Leave the shirt open so that the layers are separated. Then, cut a straight line across the bottom of the shirt’s back to remove about 3 in (7.6 cm) of fabric.[16]
- Repeat this on the front piece to remove the same amount of fabric.
-
5Sew a straight stitch along the sides and bottom edges. Bring the top and bottom edges of the shirt together so that the right sides are facing each other. Make sure that the raw edges are lined up on the sides of the shirt as well. Then, insert a few pins through the layers to keep the edges lined up. Sew a straight stitch 0.5 in (1.3 cm) from the raw edges on the sides and bottom of the shirt.[17]
-
6Unbutton the shirt and turn it right-side out. After you have finished sewing the edges together, unbutton the shirt and turn the fabric so that the right sides are facing out. Then, press into the corners to push out the fabric and prevent it from bunching up inside the shirt pillowcase.[18]
-
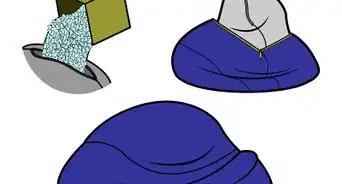
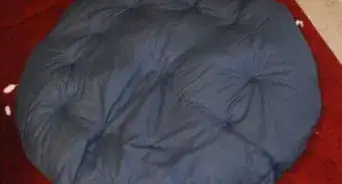
7Stuff the shirt with polyester filling or a pre-made pillow. You may stuff the shirt with polyester filling or simply place an equally-sized pillow into the shirt opening and button it up. For a plump pillow, make sure to use enough stuffing or insert a pillow that is well-stuffed.[19]
- After you stuff the shirt pillowcase, your pillow is complete!
Making a No-Sew Shirt Pillow
-
1Cut an 18 in (46 cm) square out of the center of the t-shirt. Smooth out the shirt so that there are no lumps or bumps and make the sure that the edges of the shirt are even. Then, use a ruler and chalk to measure and mark an 18 in (46 cm) square at the center of the shirt.[20] Cut along the lines going through both layers of fabric to create 2 square pieces out of the t-shirt.
- Use very sharp fabric scissors for best results.
Tip: If there is an image on the shirt that you want to preserve, make sure that the square fully encloses the image and that there is at least a 3 in (7.6 cm) border all the way around the image.
-
2Measure and cut out 1 by 3 in (2.5 by 7.6 cm) fringe on all 4 sides. Use the ruler and chalk to trace 1 in (2.5 cm) wide and 1 in (2.5 cm) long strips of fringe going all the way around the square except for at the corners. There will be a 3 by 3 in (7.6 by 7.6 cm) square of unusable fabric at each corner. Cut this out and throw it away as you cut out the fringe.
- Cut carefully and slowly to ensure that there are no jagged or uneven edges.
- Make sure to cut through both layers of fabric and keep the edges of the squares aligned as you cut out the fringe.
-
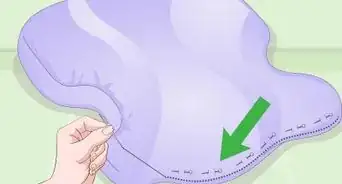
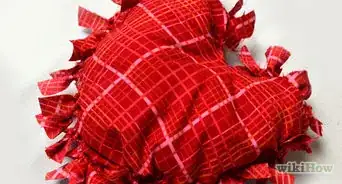
3Tie the top and bottom layers of fringe together on 3 sides. Start at 1 end of the square and tie together the top and bottom end pieces 2 times to form a knot. Continue to tie the top and bottom layers of fringe together in this way all the way to the end of the row. Then, repeat this for the next 2 sides of the square.
- There should be 1 side left untied when you are finished.
-
4Stuff the pillow and tie the remaining side of fringe. Fill the t-shirt pillowcase with polyester filling. Continue to fill the case until you are happy with its plumpness, Then, tie up the fringe on the open end to complete the pillow.
- Make sure to tuck in the filling as you tie the final side to prevent it from escaping.
Things You’ll Need
Using a T-Shirt
- T-shirt
- Pen
- Wax paper
- Scissors
- Iron
- Fusible fleece
- Sewing machine
- Matching thread
- Polyester filling
Using a Button-Down Shirt
- Button-down shirt
- Chalk or fabric marker
- Ruler
- Scissors
- Iron
- Sewing machine
- Matching thread
- Polyester filling
Making a No-Sew Pillow
- T-shirt
- Ruler
- Chalk
- Scissors
- Polyester filling
References
- ↑ https://www.youtube.com/watch?v=YeE4kVL35gE&feature=youtu.be&t=45
- ↑ https://www.youtube.com/watch?v=YeE4kVL35gE&feature=youtu.be&t=60
- ↑ https://www.youtube.com/watch?v=YeE4kVL35gE&feature=youtu.be&t=70
- ↑ https://www.youtube.com/watch?v=YeE4kVL35gE&feature=youtu.be&t=125
- ↑ https://www.youtube.com/watch?v=YeE4kVL35gE&feature=youtu.be&t=140
- ↑ https://www.youtube.com/watch?v=YeE4kVL35gE&feature=youtu.be&t=150
- ↑ https://www.threadsmagazine.com/2012/01/30/how-to-use-pins-the-right-way
- ↑ https://www.youtube.com/watch?v=YeE4kVL35gE&feature=youtu.be&t=159
- ↑ https://www.youtube.com/watch?v=YeE4kVL35gE&feature=youtu.be&t=168
- ↑ https://www.youtube.com/watch?v=YeE4kVL35gE&feature=youtu.be&t=195
- ↑ https://www.youtube.com/watch?v=WsJOZ-fIPZQ&feature=youtu.be&t=15
- ↑ https://www.youtube.com/watch?v=WsJOZ-fIPZQ&feature=youtu.be&t=295
- ↑ https://www.youtube.com/watch?v=WsJOZ-fIPZQ&feature=youtu.be&t=45
- ↑ https://www.threadsmagazine.com/2012/01/30/how-to-use-pins-the-right-way
- ↑ https://www.youtube.com/watch?v=WsJOZ-fIPZQ&feature=youtu.be&t=110
- ↑ https://www.youtube.com/watch?v=WsJOZ-fIPZQ&feature=youtu.be&t=245
- ↑ https://www.youtube.com/watch?v=WsJOZ-fIPZQ&feature=youtu.be&t=253
- ↑ https://www.youtube.com/watch?v=WsJOZ-fIPZQ&feature=youtu.be&t=295
- ↑ https://www.youtube.com/watch?v=WsJOZ-fIPZQ&feature=youtu.be&t=295
- ↑ https://www.youtube.com/watch?v=E1EZPhRpCMA&feature=youtu.be&t=95
About This Article

To make a pillow out of a T-shirt, first make a wax paper template. Trace around any images on the shirt so you don’t accidentally cut through them. When that’s done, cut off the sleeves and cut through the seams on each side to make 2 pieces of material. After cutting the shirt apart, iron some fusible fleece onto the back of each piece. Once the fleece is in place, turn the pieces over so the fleece side is down and cut each one into the shape of your wax paper template. Stack the cut pieces so the print sides are facing each other, then pin them together and sew along the edges, leaving one small opening. Finish your pillow by turning it right-side-out and stuffing it with filling, then sew the opening shut. To learn how to make a pillow out of a button-down shirt, read on!