This article was co-authored by wikiHow Staff. Our trained team of editors and researchers validate articles for accuracy and comprehensiveness. wikiHow's Content Management Team carefully monitors the work from our editorial staff to ensure that each article is backed by trusted research and meets our high quality standards.
The wikiHow Video Team also followed the article's instructions and verified that they work.
This article has been viewed 23,445 times.
Learn more...
Knot pillows are a great way to add a unique touch to your home. There are lots of different types of knot pillows, from simple fleece tied ones to more complex woven ones. Whichever one you end up making, you are bound to end up with something truly unique!
Steps
Making a Woven Knot Pillow
-
1Cut two strips of jersey fabric. Each strip needs to be 6 inches (15.24 centimeters) wide and 36 inches (91.44 centimeters) long. Make sure that the fabric you are using is stretchy, such as jersey or t-shirt.
-
2Fold the strips in half, then stitch them into tubes. Fold both strips in half, lengthwise, with the right sides facing in. Sew along the long edge and one of the short ones using a ½-inch (1.27-centimeter) seam allowance. Do this for both strips of fabric.Advertisement
-
3Turn the fabric tubes inside out. Clip the corners between both of the sewn edges first. Next, turn the tube inside out. You can do this by scrunching it up into a disk, placing the sewn end over a dowel, and then rolling it back down--sort of like putting on a pair of tights.
-
4Stuff the tubes with polyester stuffing. Use a dowel to push the stuffing into each tube. Try to get the stuffing as even as possible, or your tube will end up lumpy. When you are done, tie a rubber band around the open ends.
- If your tubes are too lumpy, roll them across a table with your palms from end to end.
- You will eventually remove the rubber bands. They are there simply to keep the stuffing in place while you work.
-
5Fold both tubes into an overhand loop. Set both tubes down side-by-side, vertically. Loop both ends towards the left to form a "4" shape at the bottom. The tubes sticking out on the right side should be much longer than the ones sticking out at the bottom.
- You will treat both tubes as a single tube.
- Keep the tubes flat and side-by-side.
-
6Make a second, reversed overhand loop. Pull the tubes back up. Bring them over the top of first loop, then pull them back down. They should be to the left of first, vertical strands. You should now have all four strands sticking out of the bottom.
-
7Cross the ends. You should now have all four strands sticking out of the bottom. Pull the bottom (short) ends over the top (long) ends.
-
8Weave the long ends back through the loops. Bring both of the long ends up. Point them to the left, towards the loops. Weave them through the loops: over and under, over and under, until they come out on the other side.
-
9Tighten the knot. Pull the ends downward, and give them a gently tug. This should tighten the knot. If you need to, give the other two ends (the shorter ones) a tug as well. This ends the semi-Turk's Head knot.
- The real Turk's Head knot is a bit more complex. This is a simplified one.
-
10Tuck the ends inside one another. Remove the rubber bands first, then fold the ends of the tubes until they touch each other. Tuck the sewn other tube into the open outer tube. Repeat with the inner tubes.
-
11Secure the tubes. Fold the cut edges of the open tubes in by ½ inch (1.27 centimeters) first. Sew around the seam with a needle and a matching thread color. You can also secure the seams using fabric glue or hot glue instead.
- If you are using fabric glue, use safety pins to hold the tubes together until the glue dries. This should only take about 15 minutes or so.

Making a Center Knot Pillow
-
1Cut your fabric. You can use just about any type of fabric for this project. It should be about three times the height and width of your pillow.[1]
-
2Place your pillow on top of the fabric. Lay the fabric down, wrong side up, on a flat surface. Set your pillow on top of the fabric. Make sure that it is centered.
-
3Fold the top and bottom edges of the fabric over the pillow. Fold the top edge of the fabric over the pillow and smooth it down. Repeat with the bottom edge. Make sure that the fabric to either side of the pillow is smooth.[2]
-
4Fold the left side of the fabric into a point. Smooth the fabric to the left side of the pillow down first. Fold the top edge down at an angle towards the center, then fold the bottom edge up to meet it. When you are done, you should have a "<" shape.[3]
-
5Fold the right side of the fabric to a point. Do the same thing you just did for the left side. Fold the top edge down at an angle, then the bottom edge. When you are done, you should have a ">" shape.[4]
-
6Wrap the sides of the fabric over the front of the pillow. Fold the left side down first, then the right. Make sure that they are still folded into points.[5]
-
7Tie the ends of the fabric into a square knot. A square knot is essentially a double-knot.[6] Use the same knot as when starting to tie your shoes. Instead of doing the same knot twice, you reverse them: right-over-left, then left-over-right.
- Keep the fabric folded into points.
-
8Tuck the ends of the fabrics under the knot. If you need to, tuck then inside the knot for extra security.[7]


Making a Knotted Fleece Pillow
-
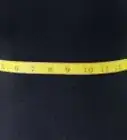
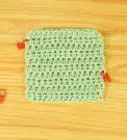
1Cut two pieces of fleece larger than your pillow. Measure your pillow first, then add 4 inches (10.16 centimeters) to each side. This will create a nice, snug pillowcase. You can use matching pieces of fleece, or contrasting ones. You can even use a solid color for one piece, and a pattern for the other.[8]
-
2Stack the two pieces of fleece together. Make sure that the right sides are facing out. You will not be turning this pillowcase inside-out.
-
3Cut a 4-inch (10.16-centimeter) square from each corner. Mark the squares out using a pen and ruler first, then cut them out using a sharp pair of fabric scissors. Try to cut through both layers of fleece at the same time so that the square match up.[9]
-
4Cut 1-inch (2.54-centimete) wide, 4-inch (10.16-centimeter) long slits along all four edges. Lay down a strip of masking tape along the bottom of your fleece, 4 inches (10.16 centimeters) away from the edge. Cut 1-inch (2.54-centimeter) wide slits along the edge of the fleece, all the way up to the tape. Remove the tape when you are done, then repeat for the remaining three sides.[10]
- Again, try to cut through both layers at the same time. This ensures that they match up.
-
5Knot the first strips together. Take the first strip from both the top and bottom pieces of fleece. Holding them together, wrap them to form a loop, then push the ends through the loop. Slide the knot towards the top.[11]
- You can also make a simple double-knot instead.
-
6Repeat the process for the bottom and side edges. Do not knot the strips along the top edge of the pillowcase just yet.
-
7Insert the pillow. The fit will be a little snug, but the fleece should stretch over the pillow. It will be very "puffy."
-
8Knot the strips along the top edge of the pillow case. This will close the pillow, and hold everything together. Your knotted pillow is now complete!


Things You'll Need
Making a Woven Knot Pillow
- Jersey fabric
- Scissors
- Sewing machine
- Thread
- Needle, hot glue, or fabric glue
- Rubber bands (or hair ties)
- Wooden dowel (or stick)
- Polyester stuffing
Making a Center Knot Pillow
- Pillow
- Fabric
Making a Knotted Fleece Pillow
- Pillow, preferably square
- Fleece
- Scissors
- Ruler or measuring tape
- Pen (optional)
- Masking tape (optional)


References
- ↑ http://www.homestolove.com.au/how-to-make-your-own-knot-cushion-3364
- ↑ http://organizeyourstuffnow.com/the-easiest-pillow-cover-ever
- ↑ http://www.homestolove.com.au/how-to-make-your-own-knot-cushion-3364
- ↑ http://www.homestolove.com.au/how-to-make-your-own-knot-cushion-3364
- ↑ http://organizeyourstuffnow.com/the-easiest-pillow-cover-ever
- ↑ http://organizeyourstuffnow.com/the-easiest-pillow-cover-ever
- ↑ http://www.homestolove.com.au/how-to-make-your-own-knot-cushion-3364
- ↑ https://www.onlinefabricstore.net/makersmill/how-to-make-a-no-sew-fleece-pillow/
- ↑ https://www.onlinefabricstore.net/makersmill/how-to-make-a-no-sew-fleece-pillow/
About This Article