This article was co-authored by wikiHow Staff. Our trained team of editors and researchers validate articles for accuracy and comprehensiveness. wikiHow's Content Management Team carefully monitors the work from our editorial staff to ensure that each article is backed by trusted research and meets our high quality standards.
There are 10 references cited in this article, which can be found at the bottom of the page.
The wikiHow Video Team also followed the article's instructions and verified that they work.
This article has been viewed 19,306 times.
Learn more...
Crocheting is a great way to create lots of different types of items out of yarn, like blankets, bags, clothing, or hats. As you're crocheting, it's helpful to know which row you're on, especially if you're following a pattern. There are several different ways to count your rows, whether you're creating a square piece or a round one. Choose a method that works best for you and start counting!
Steps
Adding up Crochet Rows Manually
-
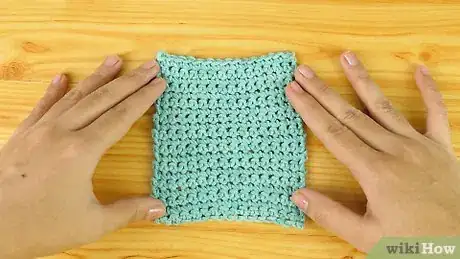
1Place your work on a flat surface so the ridges are horizontal. Set your crochet work down on a clean table or other surface so you can see it clearly. Arrange the piece so that the ridges that protrude slightly from your work are all situated in horizontal rows. This makes it easier to count.[1]
- The ridges are the rows of crochet work that stick out slightly from the piece.
-
2Stretch your stitches out slightly to count rows using the holes. Spread your work out a little bit so you can easily see the holes where your hook went through. Whenever you see a horizontal line of holes, count this as one row. Start from the bottom of the work and count your way up to the top.[2]
- The holes should be easy to spot and will be lined up beside one another uniformly.
Advertisement -
3Count each row of ridges starting at the bottom if you can spot them clearly. Your crochet work has horizontal lines of ridges that protrude slightly (the back of your work) and horizontal dashes that create an even line (the front of your work). Start at the bottom of the piece for the most accurate tally and count each row of ridges.[3]
- There's no need to count the foundation row.
- Some people find it easier to see the ridges while others can spot the dashes more easily. Decide which ones are easiest for you to see and count these.
-
4Double the number of ridges that you tallied for the correct count. Since you only counted the rows of ridges, this means you only counted the back stitches. The front stitches, which look like horizontal dashes, are rows too. To find the total number of rows, double however many ridges you counted. For example, if you counted 8 rows of ridges, the total number of rows would be 16.[4]
- If you were to count the rows of dashes instead, you would double this number for the total too.
- If the last row you finished ended on the left side (which is where you started), add 1 for an accurate row count.
Counting Rows Using Stitch Markers
-
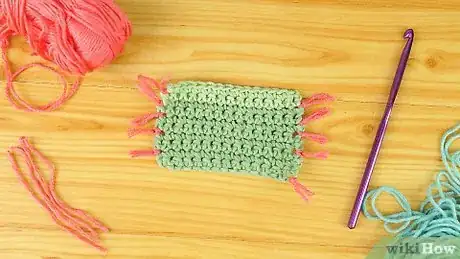
1Tie a piece of yarn at the end of every row to mark each one. This method takes a little more time but is great if you’re learning how to crochet. After you finish crocheting a row, tie a piece of yarn in a different color onto the end of the row loosely. Do this after every single row that you finish so you can easily count them once you’re done.[5]
- Simply loop a short piece of yarn onto the end of the row to create a marker.
- Since you crochet going back and forth along each row, you’ll have pieces of yarn on both sides.
-
2Use a stitch marker to mark a set number of rows. While you can always tie a piece of yarn onto your work to mark 5, 10, or however many rows you'd like, you can also purchase stitch markers. Decide what number of rows the stitch marker will represent and slide it onto the end of that number of rows either while you crochet or once you're finished.[6]
- For example, you might loop a round stitch marker onto the end of every fifth row.
- If you'd rather mark the rows as you crochet, you can slide the stitch marker onto your hook after the first stitch of a row so that you see it as you crochet.
-
3Count the yarn or markers once you're finished for the number of rows. Once you're all finished crocheting, use your yarn or marker system to tally up the final number of rows. If you marked every row, count each piece of yarn on both sides to tell you the total number. If you used a marker to indicate a set number of rows, multiply the number of the markers by the number of rows they represented for your final number of rows.[7]
- For example, if you marked every 10 rows with a stitch marker and you have 5 stitch markers in your work, you would have 50 total rows.
- Once you’re done counting you can remove the pieces of yarn or stitch markers.
Counting Round Crochet Rows
-
1Start in the center of the circle to count the rows of holes. In your piece of crochet work, there are lots of holes where the hook goes through which represent rows. Begin at the center of your piece and count each hole moving straight outwards until you come to the edge.[8]
- You're only counting the radius of the circle.
- If you're having trouble seeing the holes, spread the piece of crochet work out a bit.
-
2Count each circle starting in the center to focus on the rings. Put your finger on the center of your work where the circle is the smallest. Starting in the middle, count each ring going outwards to find out how many rows there are.[9]
- The rings will get bigger and bigger until you come to the one at the outer edge.
-
3Add up each ridge for a quick row count. Hold your work horizontally for the easiest count and start at one end. Count each ridge or bump that you see, going across the piece horizontally to be sure you count all of them. The number of bumps you come across in a straight horizontal line is how many rows you have.[10]
References
- ↑ https://www.acrochetedsimplicity.com/crochet-tip-1-simple-method-to-counting-rows-left-right-handed-tutorial/
- ↑ https://www.youtube.com/watch?v=0oiRCIQHNDM&list=PL026690B6617DFDA4&index=6&t=0s&app=desktop#t=1m57s
- ↑ https://www.youtube.com/watch?v=JWEPOjFwgmM#t=27s
- ↑ https://www.youtube.com/watch?v=JWEPOjFwgmM#t=30s
- ↑ https://www.youtube.com/watch?v=0oiRCIQHNDM&list=PL026690B6617DFDA4&index=6&t=0s&app=desktop#t=15s
- ↑ https://www.youtube.com/watch?v=ikZGcQEPQcg#t=11m
- ↑ https://www.youtube.com/watch?v=0oiRCIQHNDM&list=PL026690B6617DFDA4&index=6&t=0s&app=desktop#t=48s
- ↑ https://www.youtube.com/watch?v=_vYvfvvLqXg#t=1m21s
- ↑ https://www.youtube.com/watch?v=_vYvfvvLqXg#t=1m5s


