This article was co-authored by wikiHow Staff. Our trained team of editors and researchers validate articles for accuracy and comprehensiveness. wikiHow's Content Management Team carefully monitors the work from our editorial staff to ensure that each article is backed by trusted research and meets our high quality standards.
There are 21 references cited in this article, which can be found at the bottom of the page.
The wikiHow Video Team also followed the article's instructions and verified that they work.
This article has been viewed 25,578 times.
Learn more...
Sock gnomes are a fun, easy way to spruce up your party decor—especially for the holiday season. You can even make one for a friend as a funky gift. You probably already have most of the materials you need, but the other supplies are easy to find at most craft stores or discount shops. The best part is that there’s no sewing involved!
Steps
Making the Gnome's Body
-
1Cut a tube sock in half at the ankle curve. Use scissors to slice a tube sock in half, positioning the blades of the scissors right at the center of the ankle curve. Save the top piece for another sock gnome or craft project.[1]
- Make sure the sock doesn’t have any holes in it or weak spots because the material will need to be stretched pretty thin.
- You can also use an ankle sock if you have one, you’ll just need to snip off the extra material.
- It doesn’t matter what color the tube sock is because you’ll be covering it with another one later on. Plain white ones are usually the cheapest.
-
2Fill the sock with 1 cup (180 g) of rice. The easiest way to fill it is to pour the rice into a measuring cup. Put the opening of the sock over the rim of the cup and flip it over to fill it with rice.[2]
- Do this over a tray so you can easily clean up any rice granules that don't make it into the sock.
- You can also use poly-pellets stuffing beads, which you can find at most craft shops or sewing supply stores.
Tip: Freeze the rice for about a week beforehand to kill off any weevils or eggs.
Advertisement -
3Pour in a second cup of rice a little at a time until the sock is fully stuffed. Mash the first cup of rice deep down into the toe of the sock so there's room for the next cup. Then fill the same measuring cup with another cup of rice and pour it into the sock in small increments. Stop and pack down the rice after each fill.[3]
- You want the sock to be stuffed with as much rice as possible so your gnome is nice and chubby.
-
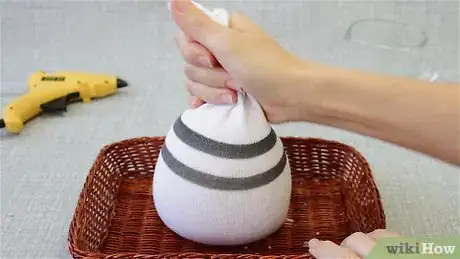
4Squeeze the sock to shape it into an oblong circle. Hold the top edge of the sock and squish the rice down with your hands. Squeeze the sides of the sock to shape the rice into an egg shape to make the gnome's body.[4]
- Make sure the body is able to stand up on its own so your gnome won't fall over.
-
5Tie the top of the sock together with a small rubber band. Loop a rubber band around the top of the sock about 3 times to close it. That way, the body will hold its shape and you won't be finding rice granules wherever you put your gnome![5]
- If you're using a large rubber band or hair tie, you may need to loop it around 5 or 6 times so it's nice and tight.
- Trim down the extra material at the top of the sock if you like. You don't have to, but it might make it easier to attach accessories later on.
Creating the Nose
-
1Push your thumbs into the sock to make the rice protrude and tie it off. Push your thumbs into a section of the body 1 inch (2.5 cm) down from the top. Push it far enough in to isolate a round section of rice that you can grab and tie off. Wrap a clear rubber band around it 3 to 4 times to hold it in place.[6]
- Don't shy away from a cartoonishly large nose—the bigger the nose, the more gnomish the gnome!
- Be sure to use a clear rubber band so it's not visible on the gnome's face.
Tip: Shape the nose with your fingers to make the gnome's nose more realistic. Use your thumbs to make two big indentions on the bottom of the bulging rice nose and use your index and middle finger to create a rounded triangular shape on top.
-
2Secure the rubber bands around the nose and at the top with embroidery floss. Cut off 2 strips of embroidery floss and tie knots around the top rubber band around the top of the sock and the clear band around the nose. This will reinforce the bands in case they were to break over time.[7]
- Snip off the extra floss when you're done.
- You don't have to do this, but it's a good idea if you're giving it to a child as a play toy or if you’re putting your gnome in a relatively chilly place (cold temperatures can cause rubber bands to snap).
-
3Brush pink or orange blush onto the nose if you desire. Use a flat makeup or paintbrush to brush some blush onto the top of the nose. Avoid putting too much on the front or at the base of the nose—the idea is that your gnome looks sun-kissed![8]
- It doesn't matter what kind of blush you use. However, you may want to wash off the brush if you use it to apply your own makeup.
- You don't have to do this, but it adds a little character to the gnome's face.
-
4Cut any colored sock along the heel and put the gnome's body into it. Snip a sock in half just like you did at the beginning. Choose the color you want to be the gnome's body. Snip off the extra at the top once you shimmy the gnome into the sock.[9]
- Go for a solid color, stripes, zig-zags, polka dots—any design or color will make your gnome look more festive!
-
5Glue the top edge of the colored sock under the gnome's nose to hold it in place. Position the top edge of the sock just under the gnome's nose so the nose peeks out from the sock. Peel back the top edge and deposit a small line of hot glue under the nose. Tuck the colored sock in place under the nose and on top of the glue so it sticks.[10]
- The nose should look like it's poking out of the sock.
-
6Put glue into the crevice just above the nose and fold the colored sock over it. Deposit 2 small strips of hot glue onto the top of the nose. Pull the top edge of the colored sock over it and hold it in place for 10 seconds.[11]
- If the top edge of the sock bunches up, cut a small V-shape along the top edge so it wraps cleanly around the nose.
-
7Glue the backside of the colored sock to the top of the gnome's body. Turn the gnome around and put a line of glue around the top of its body just under the embroidery floss. Stick the colored sock onto the glue and hold it for 10 seconds so it stays in place.[12]
- This is for extra security so your gnome’s body stays together.
Adding the Beard
-
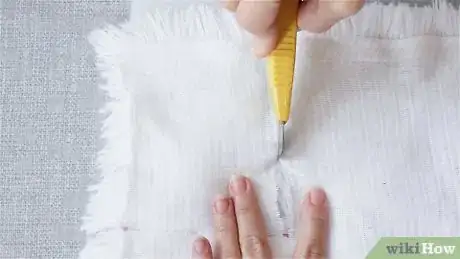
1Use an X-ACTO knife to cut a 4–5 in (10–13 cm) square of faux fur fabric. Choose a faux fur with long strands of thick hair coming off of it (like sheepskin). Lay the faux fur material face down. Gently insert an X-ACTO knife into the backing of the material to cut out a square that’s 4–5 inches (10–13 cm) long on each side. Use short, small strokes so you're only cutting through the back layer.[13]
- Don't push the knife all the way down because you don't want to trim the hair-like beard on the front of the fabric.
- If you want the beard to go all the way around the gnome's body, make the square at least 6 inches (15 cm) long on each side. You can always snip off the extra later on.
- You can also use a swatch of sherpa, felt, or faux-fur yarn for the beard.
-
2Cut a “V” shape or half circle at the top of the beard to go around the nose. Use your trusty X-ACTO knife to cut a little notch for the nose so it pokes through the beard. Make sure to cut this at the top of the beard so the hair falls downward.[14]
- Shake out some of the loose hairs from the faux fur swatch after you cut it, if necessary.
-
3Glue the top of the beard around the nose. Apply a line of glue around the nose from one side to the other (in a full circle). Press the beard around the nose, starting from the bottom of the “V” and at the base of the nose and wrapping it up and around. Hold it in place for 10 seconds so it sticks on.[15]
- The beard should now be enveloping the nose all the way around.
-
4Secure the beard with more glue around the edges. If you're worried about the beard falling off, add more glue around the top of the gnome's head (near where the embroidery floss is holding it closed). Stick the loose edges of the beard to the side sections at the top so it holds in place.[16]
- You don't have to do this, but it’ll look more professional if the full beard is stuck in place without any dangling edges.
Attaching the Hat
-
1Hollow out the base of a styrofoam cone with a knife. Use an X-ACTO knife to cut a square out of the base. Then cut an "X" shape through the square so you can pop out the pieces with ease.[17]
- Use a styrofoam cone that’s about the same height (or longer) than your gnome’s body. You can buy styrofoam cones at most craft stores.
- Feel free to cut the base at an angle so it leans back a little on your gnome’s head.
- You can also use a small paper cup for the hat—the top may not be as pointy but the sock will flop off of it to the side (which is kind of cute!).
-
2Glue the styrofoam to the top of the gnome. Add a strip of hot glue around the top of the gnome's head, running the tip of your glue gun around the top of the beard or colored sock material just below where you tied off the first sock. Stick the cone in place and press it down for 10 seconds so it’s secure.[18]
- If the base of the cone doesn’t align with the top of your gnome, recut the base of the cone so it fits better. This may take some trial and error.
-
3Cover the styrofoam with a furry or decorative tube sock. Use a decorative winter sock or any festive sock made from plush material to give your gnome a little character. Bunch it up and put it on top of the cone.[19]
- If you want the hat to have a little slack at the end (like a nightcap), don't bunch it up and let the toe of the sock flop over to one side.
-
4Glue the sock in place just above the nose and around the back of the gnome. Once you have the decorative sock where you want it, apply a strip of glue onto the styrofoam just under the edge of the sock. Do this on the front, back and sides so it’s secure.[20]
- If you want to be able to change your gnome’s hat, skip this step.
- The idea is that the gnome’s face is almost entirely concealed except for the nose poking out.
-
5Glue on any accessories to the cap if you desire. Use small decorative pine cones, flowers, feathers, pins, or anything you like to spruce up your gnome's hat. Get creative so your gnome has its own festive style![21]
- For a holiday gnome, consider wrapping sparkly tinsel, jingle bells, ribbon, beads, or holly around the top of the hat in a spiral shape.
- Write your own messages on the hat by using a fabric pen or glitter glue.
- Use small stencils and spray paint to make your own design on the hat. Just be sure to protect the body and beard of the gnome with plastic wrap or scrap paper before you start spraying.
Warnings
- Be careful not to touch the hot nozzle of the glue gun because it can burn your skin.[22]⧼thumbs_response⧽
Things You'll Need
- 2 tube socks (of any color)
- Scissors
- 2 cups (450 g) of rice
- Measuring cup
- 2 small rubber bands (1 clear, 1 of any color)
- Embroidery floss
- Blush (makeup, pink or orange)
- Makeup or paint brush
- Colored tube sock (any color)
- Hot glue gun
- X-ACTO knife
- Faux fur fabric
- Styrofoam cone
- Furry decorative tube sock (for the hat)
- Hat accessories (optional)
References
- ↑ https://youtu.be/hQuiQGBRw4w?t=76
- ↑ https://youtu.be/hQuiQGBRw4w?t=169
- ↑ https://youtu.be/hQuiQGBRw4w?t=208
- ↑ https://youtu.be/hQuiQGBRw4w?t=280
- ↑ https://youtu.be/hQuiQGBRw4w?t=345
- ↑ https://youtu.be/hQuiQGBRw4w?t=376
- ↑ https://youtu.be/hQuiQGBRw4w?t=418
- ↑ https://youtu.be/hQuiQGBRw4w?t=538
- ↑ https://youtu.be/hQuiQGBRw4w?t=626
- ↑ https://youtu.be/hQuiQGBRw4w?t=675
- ↑ https://youtu.be/hQuiQGBRw4w?t=726
- ↑ https://youtu.be/hQuiQGBRw4w?t=757
- ↑ https://youtu.be/KDAkfwyYqss?t=138
- ↑ https://youtu.be/KDAkfwyYqss?t=264
- ↑ https://youtu.be/KDAkfwyYqss?t=351
- ↑ https://youtu.be/KDAkfwyYqss?t=416
- ↑ https://youtu.be/hQuiQGBRw4w?t=1144
- ↑ https://youtu.be/hQuiQGBRw4w?t=1253
- ↑ https://youtu.be/hQuiQGBRw4w?t=1253
- ↑ https://youtu.be/hQuiQGBRw4w?t=1488
- ↑ https://youtu.be/hQuiQGBRw4w?t=1556
- ↑ http://safety.ucanr.edu/files/3260.pdf


