This article was co-authored by Victoria Sprung and by wikiHow staff writer, Janice Tieperman. Victoria Sprung is a Professional Photographer and the Founder of Sprung Photo, a wedding photography studio based in Chicago, Illinois. She has over 13 years of professional photography experience and has photographed over 550 weddings. She has been chosen for Wedding Wire's "Couple’s Choice" Award eight years in a row and The Knot's "Best of Weddings" award five years in a row. Her work has been featured in People Magazine, Time Out Chicago, Chicago Magazine, the Chicago Reader, Rangefinder, The Chicago Sun-Times, and Pop Sugar.
There are 10 references cited in this article, which can be found at the bottom of the page.
This article has been viewed 14,128 times.
Cameras are meant to capture the fun, exciting, and memorable moments of your daily life—but this can be difficult to accomplish in a dark room or setting. Thankfully, there are plenty of ways to work past low lighting issues so you can take pictures at any time of the night! Before taking any pictures, try altering the settings on your cell phone or manual camera to achieve better results in your photos. Keep experimenting until you start noticing a change!
Steps
Using a Cell Phone
-
1Keep your phone steady while you photograph. Hold your phone with a firm grip when you go to take a picture. If your camera is wiggling too much, you won’t be able to get a clear shot, which will make your images look blurry. Instead, try to keep your phone at a steady, consistent angle whenever you’re photographing in the dark.[1]
- Take several pictures at a time to reduce your chances of only capturing blurry pictures.
-
2Try to take pictures near any kind of light source. Look around to see if there are any lights nearby, like street lamps or city skylines. If you’re indoors, try and turn on a lamp or nearby light to eliminate some of the darkness and shadows in your pictures.[2]
- Portable sources of light can also work well for photos. If you’re near a busy road, car headlights can be a great source of light in a pinch.
Advertisement -
3Avoid zooming in to get a closer shot. Take steps forwards whenever you try to get a clearer shot. When you only use the phone lens to zoom in, then you’ll end up degrading the quality of the photo. If you’re trying to get a landscape shot, try moving to higher ground, so you can capture more in a single picture.[3]
- If you’re trying to take a selfie with a group of friends, have your tallest friend hold the phone camera.
-
4Place a napkin over your phone’s flashlight for close-up shots. Go to your phone’s settings and switch on the flashlight. To reduce the light coming from your phone, place a paper napkin over the light source. Now that there’s a muted light shining in the immediate vicinity of your camera lens, try taking a picture of something close by.[4]
- Make sure that the napkin doesn’t end up in the picture.
- If you’re taking pictures with a friend, ask if they can shine a napkin-filtered light on a nearby object with their phone. This way, you can focus solely on taking the picture with your own camera!
-
5Lower the exposure setting in the camera application. Adjust your phone’s camera exposure settings manually to allow more light into your photos. If you have an iPhone, tap the screen to center and focus your camera lens, then swipe down from the top of the screen to lower the exposure level.[5] If you have an Android phone, tap on the “Manual Camera” button in the camera application to access the exposure settings.[6]
- Take a few practice shots after adjusting your settings to see if the altered exposure increased your photo quality in the dark.
-
6Increase the ISO settings on your phone’s camera. If you’re using an Android phone, set your camera to “Manual Mode” and tap on the ISO label to adjust the settings.[7] Iphones don’t let you manually adjust your ISO settings, so you’ll need to download an adjustment app, like Camera+ 2. [8]
- ISO settings control how sensitive your camera is to nearby light sources. The higher your ISO settings are, the brighter your pictures will end up!
-
7Download editing apps that help make your pictures less grainy. Look in your phone’s app store for editing software that can help improve your dimly lit photos. If you have an iPhone, use apps like PS Express and Filterstorm Neue to sharpen your images and get rid of any extra noise and grain.[9] If you’re an Android user, search for apps like Procapture and JPEG Optimizer.[10]
- There are also camera apps designed for taking pictures at night. Check the app store to see if there are any well-reviewed apps that might be worth trying out!


Operating a Manual Camera
-
1Lower your shutter speed to let in more light. Switch your camera settings to shutter priority mode, which lets you adjust your shutter speed depending on your environment.[11] When shooting active movement (e.g., an animal, a person running) in dark areas, aim to keep your shutter speed at a 1/200 second setting or higher (e.g., 1/500). If you’re shooting stationary objects, feel free to lower the shutter speed even more (e.g., 1/100).[12]
- Try not to use automatic settings when taking pictures in the dark.
- Shutter speed determines how much light enters a photograph. If your camera has a long exposure time setting, then more light will be able to get into the picture.[13]
-
2Place your camera on a tripod to prevent shakiness. Avoid blurriness in your photos by keeping your camera on a steady, consistent surface. Set up your tripod in an area with a clear view of your surroundings, and attach your camera to it. Don’t start taking pictures until your camera is fully secured to the tripod.[14]
- Low shutter speed photos are best taken on a tripod, and not from a handheld camera.
-
3Raise the ISO setting manually on your camera. Increase the ISO setting on your camera to make your equipment more sensitive to sources of light. Test out different settings to ensure that your pictures aren’t too noisy or grainy at a higher ISO setting. If you’re comfortable with editing out noisy photographs, feel free to increase your ISO level even more.[15]
- Look at your sample photos on a computer to get a better idea of how noisy and grainy your pictures look.
- ISO settings refer to your camera’s light sensitivity. If you increase the ISO setting, your camera is more likely to capture more light.
-
4Invest in a lens with a wider aperture. Try switching to a wider lens, so your pictures automatically include more light. If possible, see if you can use a lens that has a F/1.8 aperture setting or lower. Test out different lenses and see if you can detect an improvement in your photos![16]
- The “F” fraction indicates how wide the camera lens is. If the lens is labeled with “F/32,” then the lens is narrow and not allowing in much light. If the lens is labeled with “F/2,” then it’s letting in a lot of light.
-
5Use unexpected sources of light to your advantage. Examine your surroundings for glow sticks, strings of light, and anything else that could be used as a possible light source. Try to square your shots around these spots to improve the visibility of your photos.[17]
- For example, if you’re taking landscape shots at night, try and use the stars, moon, and planets to provide some illumination to your pictures.


Expert Q&A
-
QuestionHow do you take pictures in a dark room without flash?
 Victoria SprungVictoria Sprung is a Professional Photographer and the Founder of Sprung Photo, a wedding photography studio based in Chicago, Illinois. She has over 13 years of professional photography experience and has photographed over 550 weddings. She has been chosen for Wedding Wire's "Couple’s Choice" Award eight years in a row and The Knot's "Best of Weddings" award five years in a row. Her work has been featured in People Magazine, Time Out Chicago, Chicago Magazine, the Chicago Reader, Rangefinder, The Chicago Sun-Times, and Pop Sugar.
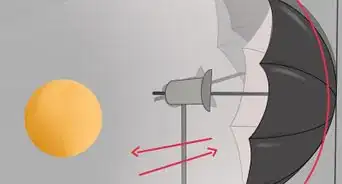
Professional PhotographerIf you don't have any light sources at all, you can lower your shutter speed to get a longer exposure. If you do this, you may get a blurry image. Using a tripod can help with this, since the camera will be completely stable. If you don't have a tripod and you want to maintain a lower shutter speed, you can use an alternative light source, like a softbox.


References
- ↑ https://thenextweb.com/creativity/2017/06/21/13-tips-for-shooting-low-light-photos-on-your-phone-like-a-pro/
- ↑ https://iphonephotographyschool.com/shoot-at-night/
- ↑ https://thenextweb.com/creativity/2017/06/21/13-tips-for-shooting-low-light-photos-on-your-phone-like-a-pro/
- ↑ https://maphappy.org/2019/04/how-to-take-killer-food-photos-in-a-dark-restaurant/
- ↑ https://iphonephotographyschool.com/shoot-at-night/
- ↑ https://www.xda-developers.com/using-manual-camera-controls-improving-the-quality-and-versatility-of-your-photography/
- ↑ https://thenextweb.com/creativity/2017/06/21/13-tips-for-shooting-low-light-photos-on-your-phone-like-a-pro/
- ↑ https://iphonephotographyschool.com/shoot-at-night/
- ↑ https://iphonephotographyschool.com/shoot-at-night/
- ↑ https://supportz.com/android-apps-for-taking-photos-in-low-light-conditions/
- ↑ Victoria Sprung. Professional Photographer. Expert Interview. 14 April 2020.
- ↑ https://www.creativelive.com/blog/low-light-photography-dslr-tips-for-making-the-most-of-dark-scenes/
- ↑ https://www.slrlounge.com/what-is-shutter-speed-the-ultimate-reference-creative-guide/
- ↑ https://www.slrlounge.com/how-to-use-a-tripod/
- ↑ Victoria Sprung. Professional Photographer. Expert Interview. 14 April 2020.
- ↑ https://www.slrlounge.com/what-is-aperture-definition/
- ↑ Victoria Sprung. Professional Photographer. Expert Interview. 14 April 2020.
About This Article