wikiHow is a “wiki,” similar to Wikipedia, which means that many of our articles are co-written by multiple authors. To create this article, volunteer authors worked to edit and improve it over time.
This article has been viewed 85,703 times.
Learn more...
A great song is much more than a great instrumental and good lyrics; the sound quality plays a major part. This article will help you improve both aspects of sound quality so that your music will be more marketable and listenable to your audience. You'll learn how to mix and master a vocal with an instrumental using FL Studio 12, or earlier, with principles that can be applied in pretty much any DAW. This process starts from a simple recording and importing the beat or instrumental and continues through mastering.
Steps
Importing the Instrumental
-
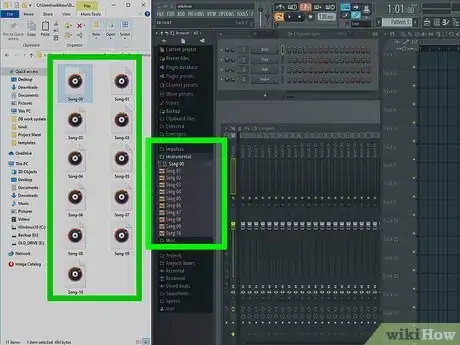
1Import instrumental. Before you can record the first thing you need to do is find and import an instrumental. There are a few ways to go about doing this.
- The easiest way is to click and drag the the instrumental over the program's icon and then drop it into the Playlist.
- The more difficult way is to click and drag the file from the folder it is in to the computer disk (C: Drive), Program Files,Image-Line then, FL Studio 12, Data, Patches, and Sliced Beats where you can release it.
-
2Add it to your playlist. Once the file is successfully moved you can then access it from the Browser menu by clicking the icon and scrolling to the Sliced Beats folder. From here, drag and drop the file into the desired Playlist track.
Recording Vocals
-
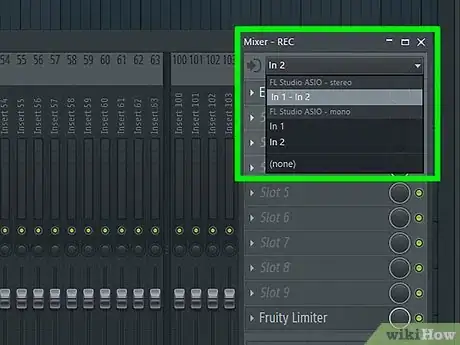
1Select devices. To begin recording, first you will need to be sure that both your mic and headphones are connected and working properly (even if you are only using a built-in microphone. On the IN and OUT slots of the selected Mixer "Insert" (not the Master which has the word Master or an "M" on it) select each device that you want to use for this recording.
-
2Open Edison. On the first empty "Slot" available select Edison from the drop down menu.
-
3Set up Edison. In the Edison plug-in select "On Play", and highlight the "Slave to Playback" option by clicking on the chain icon.
-
4Select the recording space. Open the Playlist by clicking on its icon. From here you should highlight a section of space that you want to record on by double clicking and dragging on the numbered bar at the top of the Playlist over a section a bit longer than what you want to record, being sure to leave space either before or after the recording where there will be silence to be leveraged later.
-
5Record. After highlighting the section, open the Edison again and press the record button it comes with. At this point nothing will happen. To record, press the play button at the top of the program and record your vocals to the instrumental.
Placing and Editing
-
1Place the vocals. With the song playing, adjust the beginning of the highlighted section in the Playlist by right-clicking and dragging until the vocal is on beat precisely if needed (Zoom in and out by clicking on the side edge of the scrolling bar and moving left or right).
-
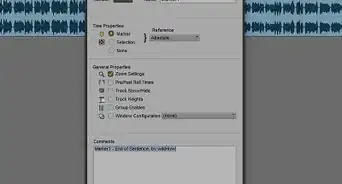
2Select the space. Pause the song. Begin mixing by double clicking and dragging to highlight a region of empty space in the Edison.
-
3Acquire your profile. Open the de-noiser tool by pressing Ctrl+U. Once the tool opens choose "Acquire noise profile".
-
4De-Noise the Vocal. Press Ctrl+A. Enter the Ctrl+U command again and observe the green line on the box when the box reappears. Place your cursor over the highest point on the green line and read the "EQ" number in the upper left hand corner with the letters dB next to it; adjust the threshold knob on the box as closely to this number as possible.
-
5Adjust the amount. Set the "Amount" knob to 40 (all numbers show in the left hand corner of the program window). Click "Accept".
-
6Normalize the vocal. Once the de-noising is finished, press Ctrl+N.
-
7Send the vocal. Next, send the vocal to the playlist by pressing the "Send to Playlist" button to the far right of the set of buttons near the top of the Edison. This will send it to the highlighted region of the Playlist.
-
8Align the track and insert the number. In the Playlist Double click on the new audio clip to get the properties box for it. In the box, adjust the setting in the upper right corner above the word "Track" by clicking and scrolling to where the number in it matches the Mixer Insert selected in the earlier steps that has the recording on it.
Adjusting the Mix
-
1Apply compression. On the Mixer, use the effects slots under the one assigned to Edison to add effects to the vocal starting with Fruity Limiter. Using this plug-in switch it from Limit to Comp. Play the song and lower the Threshold (denoted as THRESH) in the "Loudness" section of the Fruity Limiter until the blue line is about to the point where the bulk of troughs (dips) in the waveform stop.
-
2Compress. Move the ratio to 2.0:1.
-
3Add make-up gain. Use the "Gain" knob under "Loudness" to restore the lost volume.
-
4Apply EQ. Use the next effect "slot" to load a Fruity Parametric EQ 2. This will allow you to adjust the frequencies by adjusting sliders 1-7. This will let you tweak the sound how you like it. Once you do, you can adjust the main "Insert" volume slider until the sounds are balanced how you want.
Mastering the Recording
-
1Set up Maximus. On the Master Insert open the Maximus plug-in in the first effect slot. In the upper left corner of the Maximus open the dropdown menu and go to "Presets" then "Default".
-
2Apply Solo channels. Click the Solo button to activate the function.
-
3Change view. Click the word "Bands" under the waveform and then the circle to the left of the word "Monitor," which is located to the left of "Bands".
-
4Set the low band. With the song playing, begin by selecting the Low band on the left and adjusting the Low knob on the right until you can barely hear any mid range sounds like snares in the instrumental.
-
5Set the mid/high bands. Next select the Mid band and adjusting the High knob so that you can barely hear any high pitched sounds like hi-hats. Click the word "Monitor".
-
6Find the compression range. Go to each band starting with Low and hover your mouse over the part of the waveform where barely any parts go lower (as you did with the Limiter). Observe the number in dB on the right half of the bar in the upper left corner and adjust the bent line on the left side of the Maximus by right-clicking on the slanted part at the point that displays a number that is closest to the one observed.
-
7Compress the bands. Move the corner down until the sound is reduced but still does not sound weird for each band.
-
8Add post gain. Next adjust the Post Gain knobs of each band until the sound is as desired when clicking on the Master band to observe the change in the overall sound.
-
9Turn up the volume. Finally, click the I under the waveform in the Maximus to turn off the input signal and raise the Post Gain on the Master band until no peaks cross the blue line but some are very close.
Community Q&A
-
QuestionI record my vocals with a phone and when I mix it on the mixer, my vocal gets deleted in the middle. Why does this happen to me, what's the problem?
 KutlwanoCommunity AnswerAfter recording your vocals, the audio file will come out as a m4a file. One problem about an m4a file is that Fl does not support that type of audio file; rather, it supports a way file and mp3 file etc. So, after recording vocals with your phone, make sure to convert that m4a audio file into an MP3 audio file using software like Switch Sound cCnverter and other similar ones.
