wikiHow is a “wiki,” similar to Wikipedia, which means that many of our articles are co-written by multiple authors. To create this article, 64 people, some anonymous, worked to edit and improve it over time.
The wikiHow Video Team also followed the article's instructions and verified that they work.
This article has been viewed 1,208,521 times.
Learn more...
Did you lose your stylus? Or are you just looking for more accuracy when drawing on your tablet or touch screen? Before you go out and spend money on a new stylus, check out this handy guide that will teach you how to create your own DIY stylus pen for just about any type of screen, including your Android, iPad, and Nintendo 3DS!
Steps
Know Your Touch Screen
-
1Find out which type of touch screen your device uses. There are several different types of touch screens and your homemade stylus may not work with all of them.[1]
- iPhones, iPads, Androids, Kindles, and many other smartphones and tablets have a capacitive touch screen, which needs an electrical conductor (like the human body) to register where contact is made.
- Nintendo DS, The 3Ds, the Nook, and some other phones and e-readers use resistive or infrared touch screens, which only require pressure to register contact. You can use just about anything as a makeshift stylus--just be careful not to scratch the screen.
-
2Test your screen if you're not sure. Touch the screen with the tip of a pen cap. If the device responds, it is has a resistive or infrared touch screen. If nothing happens, the screen is inactive.

Making a Stylus with a Sponge (Capacitive Screen)
-
1Gather your materials. Find a clean dish sponge (not a scour pad) and a ballpoint pen with a removable tip.
- A cheap, plastic pen works best, as long as you can easily pull off the plastic tip and remove the ink.
- A slightly see-through pen can make it easier for you to see what you are doing.
-
2Cut off a piece of the sponge about the width of the pen. You can approximate this measurement by holding the pen against the sponge and marking the measurement with a marker, or you can just eyeball it.
-
3If the sponge has an abrasive side for scouring (like a Scotch-Brite sponge), cut or tear it off. Anything abrasive can scratch and damage your screen. You only want the actual sponge part.
-
4Wash and dry the sponge. Some sponges come with soap already added, so to be safe rinse the sponge in warm water. Squeeze out all of the water and let the sponge dry.
-
5Remove the plastic tip and the interior of the pen--the ballpoint tip, the ink reservoir, and spring if it is a click pen. You should be left with the empty base of the pen.
- You should be able to pull the tip off with just your hand. If you have difficulty, try using a pair of needle-nose pliers.
-
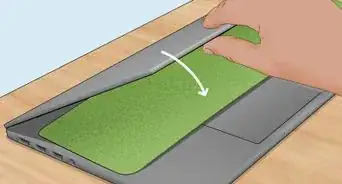
6Insert the sponge into the pen. Pinch the sponge to make it smaller and push it into the base of the
-
7Leave about 1/4-1/8 of an inch of the sponge sticking out of the pen. Use your finger to feather and break up the fibers of the sponge.
-
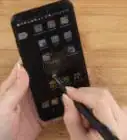
8Hold your stylus near the tip for it to work. Your fingers need to be touching the base of the pen that is in contact with the sponge. If you hold the hollow part of the pen, the electromagnetic current won't pass through the sponge and the touch screen won't register the touch of the stylus.


Making a Stylus with Aluminum Foil (Capacitive Screen)
-
1Gather your materials. You'll need about a foot of aluminum foil, tape of any kind, and an unsharpened pencil. You may also need a sharp knife to whittle your pencil.[2]
- If you don't have a pencil, you can substitute a pen, a chopstick, a dowel--anything pen-shaped. Pencils or other wooden objects work best, however, as you may want to cut your stylus to have an angled tip.
-
2Use a sharp knife to whittle tip of the pencil to a slight, flat angle.[3] You are not sharpening the pencil tip as though you are going to write with it. The angled tip should still have a surface area of at least four millimeters, about the size of a pencil eraser or the very tip of your finger. Many capacitive touch screens will not register the touch of anything smaller.[4]
- The stylus will work without this step, but you will have to hold it straight up and down. This will make it more comfortable to hold.
- Always be careful when handling a knife--remember to cut away from your body. Never pull the knife toward yourself.
-
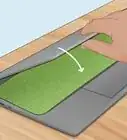
3Wrap the entire pencil with at least two layers of aluminum foil. Fold the aluminum foil neatly over the tips.
- If you are using a pen, keep the cap on the pen when you wrap it.
-
4Smooth the aluminum foil over the angled tip of your pencil. It should be smooth and flat on the tip. You don't want any crinkles or bumps.[5]
- If your tip is not flat, your stylus may not work.
-
5Wrap a piece of tape around the center of the pencil. This will keep the foil in place.
-
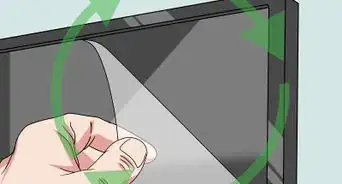
6Wrap the tip of the stylus with scotch tape. This will protect your screen from getting scratched by the aluminum foil.
-
7Try your stylus to see if it works. If it isn't working, try to flatten your tip even more. Remember that you want the tip to be at least the size of an eraser or else it may not be acknowledged by your touch screen.


Making a Stylus out of a Wooden Chopstick (Resistive or Infrared Screen)
-
1Gather your materials. You'll need a single chopstick, sandpaper, and something to sharpen the wood. A hand-operated pencil sharpener is the easiest way, but you could also whittle the tip with a sharp knife if you don't have a pencil sharpener.[6]
- Try not to use an electric pencil sharpener--it may break.
-
2Sharpen the tip (the narrow tip that touches the food) of the chopstick with the pencil sharpener. Sharpen it less than you would a pencil--you want it to look more like a blunt pencil tip.[7]
-
3
-
4Decorate your stylus with Washi tape or paint. A few layers of tape wrapped around the stylus may make it more comfortable to hold.
- Remember: this stylus will not work on an iPhone, Android, Kindle Fire, or other device with a capacitive screen.

Community Q&A
-
QuestionCan I make a stylus using cotton?
 Community AnswerIt should be possible if you roughly follow the instructions for the sponge method. Just remember that, if you have a capacitive screen, your fingers will need to be close to the screen when you use your stylus.
 -
QuestionCan you use duct tape instead of aluminum foil?
 Community AnswerNo. Duct tape is an insulator and would not let the energy from your finger transfer to the screen. The material needs to conduct energy.
 -
QuestionWill the chopstick work for the Nook?
 Community AnswerThe Nook has a resistive touch screen which only needs pressure to register contact, so yes, a chopstick will work.
Warnings
- Be careful whenever using a knife. Always push the knife away from your body when carving or whittling - don't pull it towards yourself!⧼thumbs_response⧽
Things You'll Need
Making a Stylus with a Sponge
- Clean sponge
- Ballpoint pen with a removable tip
- Scissors
Making a Stylus with Aluminum Foil
- Aluminum Foil
- Tape (Scotch, duct, etc)
- An unsharpened pencil
- Sharp knife (optional)
Making a Stylus with a Chopstick
- Chopstick
- Sharp knife or Hand-held Pencil Sharpener (not electric)
- Sandpaper
- Washi tape, paint, or markers for decoration


References
- ↑ https://nelson-miller.com/capacitive-vs-infrared-touchscreens-what-you-should-know/
- ↑ https://www.creativebloq.com/how-to/make-your-own-stylus
- ↑ https://www.creativebloq.com/how-to/make-your-own-stylus
- ↑ http://www.nytimes.com/2012/08/02/technology/personaltech/on-touch-screens-rest-your-finger-by-using-a-stylus-state-of-the-art.html?_r=0
- ↑ https://www.creativebloq.com/how-to/make-your-own-stylus
- ↑ https://lifehacker.com/turn-a-chopstick-into-a-tablet-stylus-5931329
- ↑ https://lifehacker.com/turn-a-chopstick-into-a-tablet-stylus-5931329
- ↑ https://lifehacker.com/turn-a-chopstick-into-a-tablet-stylus-5931329
About This Article
To make a stylus for your smartphone or tablet, start by cutting a finger-tip sized circle out of a dish sponge. If your sponge has an abrasive side for scouring, cut this off to avoid scratching your screen. After that, wash and dry it to get rid of any dirt. Then, remove the plastic tip and interior of a ballpoint pen. Pinch the sponge you cut out and push it into the base of the pen. Leave about ¼ of an inch of sponge sticking out to touch your screen with. For more tips, including how to make a stylus for a Nintendo DS or e-reader, read on!