X
wikiHow is a “wiki,” similar to Wikipedia, which means that many of our articles are co-written by multiple authors. To create this article, 13 people, some anonymous, worked to edit and improve it over time.
This article has been viewed 80,109 times.
Learn more...
Taking pictures is too easy. But scanning and printing pictures might be hard. If you want to scan and print pictures, read this easy article.
Steps
Method 1
Method 1 of 2:
Scanning a Photo
-
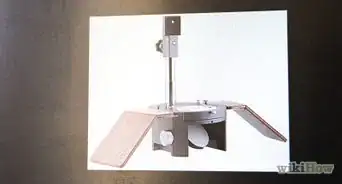
1Connect your scanner to your computer. Although most of today's scanners connect via USB cords, some older scanners connect to the serial and parallel ports on most computers. Plug the smaller end of the USB cord into your scanner's slot, and the bigger end into your PC.
-
2Power the scanner and turn the scanner on. Plug in the power cord to the scanner as well as the other end into the electrical outlet , and turn the device on. If you've already connected the scanner to your computer to grab the drivers to run the scanner to your computer, you can turn each item on in whatever order you feel to be most comfortable; however, if not, prepare to turn on the scanner once you are logged into your computer's user account.Advertisement
-
3Place whatever you want to scan into the scanner. Make sure that the picture is face down onto the scanner glass. Almost all scanners will have tiny insignias mentioning in which corner the picture will need to be placed. Place it a teensy-weensie bit below this area.
- If the scanner has what's called an automatic document feeder, do not use this. Using these, on top of not being able to re-obtain the finished pictures, will also cause the pictures to jam the machine and the picture will also smudge. Only use the flatbed area of your scanner to obtain scans of your pictures.
-
4Follow the directions from the scanner's manual as well as the scanner's third-party software to ensure you are pressing the right buttons. Sometimes the button will be called "Scan" and other times it may be called something else entirely.
- Sometimes, pressing the Scan button on your scanner will launch your scanning software, while other times, you can open your software where you can import pictures via your scanner and scan using this.
- Do not take your picture from the scanner flatbed portion. Most scanners will need to rescan a select portion and save that area (as you'll see later).
-
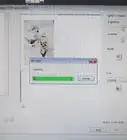
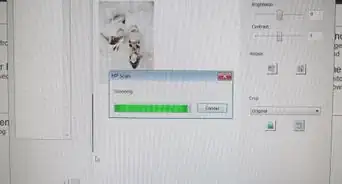
5Crop the previewed image if the scanning software you use offers you to preview the scan before you save the image. Make sure that any of the white background that was used isn't showing in your finished image, and remember to rotate the image if possible.
-
6Save the image. Most often doing so, this will take a secondary scan of the item as to scan only those areas.


Advertisement
Method 2
Method 2 of 2:
Printing a Photo
-
1Launch the program that you use to view your pictures. Sometimes this can be based off your operating system and sometimes this is a third-party software (such as Adobe Photoshop) or sometimes it's another program entirely different.
-
2Open the file of the picture you saved previously in this program. Most often times, this will be done with a quick keyboard shortcut of Ctrl+O, but you'll need to refer to your program documentation menus to ensure this can be done in your program, as not all programs use the same methods to open the Open window.
-
3Preview your picture, as you turn on your printer (if it isn't initially on). Make sure that the picture is really the one you want to view. Make any final adjustments to the picture to make the picture even better. If you aren't a photo-expert and can trust your program to make good decisions, use an Auto-Adjust setting to fix up your photos in edit mode. If you can't, you can manually adjust them with sliders and within the program boundaries until they are to exactly the style you'd like them to be.
-
4Save your file to ensure the most current picture will print, if you've made any changes.
-
5Use the keyboard shortcut Ctrl+P or whatever keyboard shortcut the print menu can be found in.
-
6Select the printer it should be printing on, as well as any other document style specifications that might need to be set. This may include the amount of copies that need to be printed, as well as type of paper that is installed in the printer. Some printers will need you to select other options such as borderless printing and the like, but each printer is different, so follow the directions to your particular printer to find out what that printer is capable of printing.
-
7Print the photo. Use the buttons on your computer to print the photo.


Advertisement
Community Q&A
-
QuestionWhat do I do if there is no print button?
 Community AnswerSelect the Office button, and you will see Print, Print Preview, and Quick Print. Select Print.
 -
QuestionHow do I save images on my computer?
 MikylaLovesMCCommunity AnswerPress [CTRL] or [Command] and right-click on your image, then click "Save Image As..." Rename the image (optional) and press ENTER. It will then automatically be saved to your computer.
 -
QuestionHow do I save an image onto my computer?Community AnswerOn a PC, press [CTRL] and right-click on it. Then, click "Save Image As". If you want, change the image name and press [ENTER]. The image will automatically be saved to your computer.
Advertisement


About This Article
Advertisement