This article was co-authored by Timothy Linetsky. Timothy Linetsky is a DJ, producer, and music educator that has been making music for over 15 years. He is a certified Ableton trainer and creates educational YouTube videos focused on producing electronic music. He has over 90,000 YouTube subscribers.
This article has been viewed 695,348 times.
If you want to upgrade your computer's audio inputs with an external microphone, either for chatting or to do some home recording, you can learn to hook up your new set-up, whether you've got basic computer microphones or more professional XLR-type mics. If you're struggling to figure out why you're not getting a signal, you can also learn to troubleshoot in the final section.
Things You Should Know
- You can upgrade your computer's audio input by connecting an external microphone.
- Basic microphones can be connected with their audio or USB jack.
- Professional mics may need adapters to connect to your computer.
Steps
Connecting Basic Computer Mics
-
1Examine the jack on the microphone. Generally, most basic computer microphones will have one of two varieties of jack: an 1/8" TRS jack, which is essentially the same kind of jack you would find on a pair of headphones, or a USB jack, which is flat. Both of these jacks have corresponding ports on most computers.
- If you're using an XLR microphone, a quarter-inch jack, or some other variety of mic, skip to the next section.
-
2Locate the corresponding port on your computer. Almost all desktop computers will have visible microphone ports on either the front or the back of the tower. Usually, this port will be colored pink, and have a microphone image over it. If you have an eighth-inch jack, all you've got to do is plug it into this port and start testing sound.
- If you have a USB jack on the end of your microphone, most computers will have two or more USB ports on the side, or the back of the computer. Simply plug the USB jack into one of these ports.
- Laptops and some more contemporary computers don't have microphone ports, because they're generally outfitted with internal microphones. It's usually possible to plug into the headphone port on most computers, however, and adjust your sound settings later.
Advertisement -
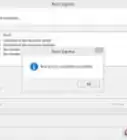
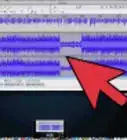
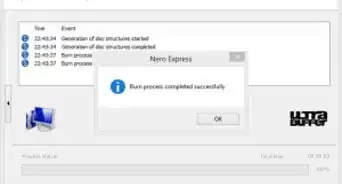
3Test your new microphone with the recording software of your choice. The easiest and quickest way to test your levels and check your settings is to go to your input sound options and make sure that the device you just plugged in is visible, and that it is selected for use. Open a recording program and attempt to use the microphone and set the levels.
- On Windows, you can use the Sound Recorder, on a Mac, Quicktime or GarageBand should do fine.
- If you're not getting a signal, skip to the last section for troubleshooting tips.


Connecting Professional Mics
-
1Examine the jack on the end of the microphone. Higher grade music microphones, condenser mics, and other professional gear will generally require an adapter or a converter cable before you plug them in. These range in price, and will vary depending on the type of microphone you're trying to input into the computer.
- If you see a triangle of prongs on the end of the end of the microphone, that's an XLR mic, and you'll need to get either a cable which converts the XLR jack into the eighth-inch port, a converter box which will convert it into USB, or a mixer.
- If the jack is a quarter-inch, the size of a guitar cable, you'll need to purchase an adapter cable that will convert into either USB or (more usually) eighth-inch size, and plug it into the mic port or the headphone port. These cables are usually quite cheap, no more than a few dollars.
-
2Get the appropriate converter. Both of these types of mics will need to be connected to some kind of adapter before you plug them into the computer. Because these microphones are typically higher quality, it's best to invest in good adaption equipment to keep the signal as strong as possible.
- XLR mics can be adapted relatively cheaply with cables or a USB converter box, but some users find that this can be "crackly," losing some of the presence of good microphones. For the best sound quality, invest in a mixing board with a USB output.
- Quarter-inch to eighth-inch converter cables are widely available and pretty cheap to buy. You can find them at any electronics store or online electronics retailer.
-
3Test your new microphone with the recording software of your choice. The easiest and quickest way to test your levels and check your settings is to go to your input sound options and make sure that the device you just plugged in is visible, and that it is selected for use. Open a recording program and attempt to use the microphone and set the levels.
- On Windows, you can use the Sound Recorder, on a Mac, Quicktime or GarageBand should do fine.
- If you're not getting a signal, skip to the next section for troubleshooting tips.


Troubleshooting Common Problems
-
1Check your sound input settings. If you're not getting a signal, navigate to your computer's sound settings and make sure that the correct device is selected, and the levels are appropriate.
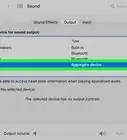
- On a mac there are no drivers to get in the way, so the only other thing you need to do is to go into System Settings and click on "Sound," then select "Input." Make sure that the microphone is checked, rather than the built-in microphone.
- On a PC, go into the Control Panel and clicking on "Hardware and Sound," then click on "Sound" and it should pop up another windows. At the top, click on recording, and you should see your microphone there. If it doesn't have a green check mark next to it, it isn't selected. Click on it and click properties. You can then change the settings at the bottom to "Use this Device" and it will automatically use it next time it is plugged into your computer.
-
2Set the input level. On most computers, you'll be able to control the level of the input volume. With lower quality mics, it'll usually need to be set somewhat high to get a half-way decent signal, but you don't want to blow out the levels, either. It's usually best to set it somewhere in the default range, about 50%.
- On a Mac, you can do this in the System Settings, under "Sound."
- On a PC, you can do this in "Hardware and Sound," under "Sound."
-
3Check your speaker and computer volume. If you have external speakers, or have headphones plugged in, you need to double-check and make sure that the volume levels are adjusted properly, as well as the settings on your desktop, or you may not be hearing anything.
-
4Check the settings on the microphone. Obviously, you need to make sure the microphone is switched on, the cable is plugged in flush, and that you've got any other settings adjusted correctly, depending on the microphone.
- Some condenser mics, and speaking microphones will have a variety of toggle settings, some of which might be louder, or feature a wider range of sound than others. Switch between them to get a sense for what sounds best for your purposes.
-
5Check the setting in the specific program that you're using. Different audio processing programs will have a variety of input settings as well, that you need to check. Some recording software may still be set to pick up internal mics, or audio from other sources, even if you changed it in your system settings.
- For example if you are using Skype, go to: Tools>Options>Audio settings, and select your microphone. If your microphone isn't listed or still doesn't work then check whether it requires software or drivers to run.
-
6Try restarting your computer. Sometimes, you'll need to close the program you're trying to use at least, or even restart to get some computers to recognize a new piece of hardware you've plugged in.
- If the microphone still doesn't work then try using another microphone or try using the microphone on another computer. This should help you figure out whether it is the computer or the microphone which is at fault.


Expert Q&A
-
QuestionHow do I improve the recording quality of my microphone?
 Timothy LinetskyTimothy Linetsky is a DJ, producer, and music educator that has been making music for over 15 years. He is a certified Ableton trainer and creates educational YouTube videos focused on producing electronic music. He has over 90,000 YouTube subscribers.
Music Producer & InstructorMake sure you cut down the amount of the reverb in the room where you're recording. Try recording in a closet surrounded by clothes to dampen the echoes. -
QuestionWhere can I hook up my mic if I don't have a mic jack?
 Community AnswerYou can purchase an adapter. There are adapters that allow you to plug your mic into a USB port.
 -
QuestionIs it necessary to use phantom power for a mic connected to a desktop PC?
 DenneiskTop AnswererPhantom power is only needed on XLR condenser microphones that connect to a preamplifier. Most likely if you do have a condenser microphone for USB, it's already running phantom power.
Warnings
- Do not connect your microphone to other ports instead of the appropriate pink-colored one. Doing so could damage the microphone or the port.⧼thumbs_response⧽
Things You'll Need
- A microphone to connect to your computer.
- A computer with a sound card or chip.
- A converter if you have an XLR or 1/4" TRS jack.


About This Article

1. Locate your computer's microphone port.
2. Purchase an adapter if needed.
3. Connect the microphone to the computer.
4. Make sure your volume is turned up.
5. Open Sound Recorder.
6. Click the Record button to test.