This article was co-authored by wikiHow staff writer, Sam Browning. Sam Browning is an Emerging Technology Writer for wikiHow. Sam has not only written countless step-by-step articles for social media and tech, but he also has experience writing instructional articles on technology for Davidson College and reviewing video games. He is currently pursuing a degree in English with a minor in Digital Studies at Davidson.
This article has been viewed 39,747 times.
Learn more...
If you have an iPad, a stylus is an incredibly useful tool. It lets you draw masterpieces, eat without getting food fingerprints on your screen, easily scroll through articles on the web, and more. These styluses can be a little expensive, but if you are looking to save money, or just looking for a fun DIY project, there are ways you can make your own. In this wikiHow article, we will show you how you can create a stylus for your iPad.
Steps
Creating a Stylus with Household Supplies
-
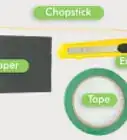
1Gather a pen, aluminum foil, a q-tip, scissors, and some tape. Lay these items out on your workspace. With just these supplies (and a few drops of water), you can make a stylus for your iPad.[1]
- When you get your foil, be sure you have enough to wrap it around the pen a few times.
-
2Unscrew the pen cap, remove the ink chamber, then reattach the cap. Unscrew the cap at the tip of your pen, then remove the ink cartridge to make space for other components of the stylus.Advertisement
-
3Cut your q-tip. Use your scissors to cut the q-tip in half. You should be left with two pieces that are roughly the same size, each with a fuzzy tip and shorter stem.
-
4Insert one piece of the q-tip into the pen. Push the stick end of a q-tip half into the tip of the pen cap, leaving the head of the q-tip exposed. This will be the “point” of your stylus.
-
5Tape the q-tip to the pen. Wrap tape around the point where the q-tip and the pen meet to secure it in place.
-
6Wrap the pen in aluminum foil. Encircle the pen several times with your aluminum foil, making sure the q-tip is in contact with the foil. Otherwise, your stylus will not work!
- In this case, the foil acts as a conductor for that electricity to and from your finger, sending it through the head of the q-tip. This means that if you are not touching the foil, or the foil is not touching the q-tip, your stylus will not work.
-
7Tape the aluminum foil down. To prevent your foil from uncurling, tape the edge down.
-
8Wet the end of the q-tip. Sometimes, your iPad might have some trouble recognizing your stylus. In that case, simply wet the end of the q-tip, and your stylus is ready to go.
- Wetting the end of the q-tip will increase its conductivity, making your stylus more easily recognizable by your iPad.
-
9Draw away! When testing out your new stylus, be sure you’re holding the aluminum foil. Also, don’t be afraid to apply some pressure when you’re using it.


Creating a Stylus that Doesn’t Need Water
-
1Grab a plastic highlighter, 3 feet of bare wire, a small piece of conductive foam, some electrical tape, pliers, and scissors. While some of these items are less common than those used in the other method, they are still quite inexpensive, and the stylus will be recognizable without using water.[2]
- Before you begin, make sure you are not using insulated wire. To act as a proper conductor, the wire must be stripped.
-
2Remove the inner parts of the highlighter. Unscrew the end of the highlighter to remove the ink well, then use your pliers to remove the tip, making space for the components of the stylus.
-
3Pull your wire through the highlighter. Insert your wire into the highlighter, leaving some extra wire out the tip and the end for later use.
-
4Wind your wire around the foam. Wrap your wire around one end of your conductive foam. This wire is responsible for providing conductivity to and from the foam and keeping it secure, so make sure you wrap it tightly.
-
5Pull the wire at the back of the highlighter to secure the foam. Use the wire hanging out the back of the highlighter to bring the conductive foam to the tip of the marker. Pull in enough foam that about ¼ inch is still exposed for the tip of the stylus.
-
6Wrap the remaining wire around the highlighter. Cover the outside of your highlighter with the rest of the wire. Be sure to wind it down the entire marker, otherwise the stylus won’t work.
- As mentioned in the previous method, the wire serves as a conductor between the iPad, the foam, and your hand, so you have to be touching the wire when using the stylus.
-
7Trim the foam tip. Use your scissors to shape the tip of your stylus however you please.
-
8Try out your brand new stylus! If it does not work, make sure your wire is properly attached to the conductive foam tip, and that you are touching the wire while using it. Also, do not be afraid to apply pressure with the stylus to help the iPad sense it.


References
- ↑ https://www.youtube.com/watch?v=2XKJ9bF0GVk
- ↑ https://www.techaccess-ri.org/make-you-own-stylus/
- ↑ https://www.idtech.com/blog/how-to-make-a-stylus
- ↑ https://scienceline.org/2012/01/okay-but-how-do-touch-screens-actually-work/
- ↑ https://www.youtube.com/watch?v=8jmfCcdMzQQ
- ↑ https://www.youtube.com/watch?v=4d2u5IX_qHc
About This Article