This article was co-authored by Ollie George Cigliano and by wikiHow staff writer, Dev Murphy. Ollie George Cigliano is a Private Chef, Food Educator, and Owner of Ollie George Cooks, based in Long Beach, California. With over 20 years of experience, she specializes in utilizing fresh, fun ingredients and mixing traditional and innovative cooking techniques. Ollie George holds a BA in Comparative Literature from The University of California, Berkeley, and a Nutrition and Healthy Living Certificate from eCornell University.
There are 11 references cited in this article, which can be found at the bottom of the page.
wikiHow marks an article as reader-approved once it receives enough positive feedback. This article received 17 testimonials and 100% of readers who voted found it helpful, earning it our reader-approved status.
This article has been viewed 2,501,640 times.
Whether you’re a culinary whiz or especially outdoorsy, your knives probably endure a fair amount of wear. Not only is a dull blade a challenge to cut with, it can be dangerous: having to work harder to slice through whatever you’re cutting means you’re more likely to cut yourself. Fortunately, it’s easy to hone and grind a knife yourself with traditional sharpening tools like a whetstone or a honing rod, or with less traditional tools like a mousepad, sandpaper, or even a coffee mug. Keep reading to learn how!
Things You Should Know
- Grind the blade by dragging it against a whet stone.
- Use a honing rod to hone the blade after every usage. This will limit the number of times you need to sharpen the blade.
- In a pinch, use a ceramic coffee mug to grind your blade: flip the mug over and drag the blade against the rough edge of the mug’s bottom.
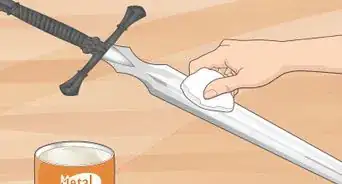
- Always wipe down your blade after grinding or honing to eliminate any steel residue.
Steps
Using a Whetstone
-
1Apply honing oil or water to your stone, if appropriate. Check your manufacturer's guidelines to see if your sharpening stone needs to be lubricated, and with what. Depending on what type of sharpening stone you’re using, it may need to be lubricated with oil or water, or with nothing at all. Cover the whole stone with the lubricant and keep it wet while you sharpen your knife.
- Lubrication will make it easier for the blade to pass over the stone, as well as keep the steel shavings (the by-product of sharpening) from clogging the stone's pores.[1]
- If you don’t have honing oil, you can use mineral oil, vegetable oil, or window cleaner as a substitute.[2]
-
2Determine what angle to sharpen your knife. Sharpen your knife at the same angle it was previously sharpened at. To find out the angle of your blade, ask the manufacturer of your knife or inquire at a knowledgeable knife shop to determine what angle is appropriate for your knife. If you have to make a gut decision, choose an angle of 10° - 30° per side.
- Shallower angles make a sharper edge that doesn't last as long; steeper angles are more durable, so 15° - 20° is a good compromise between the two.
- Sharpening at a different angle will take significantly more time and may take a few goes before any rough angles are smoothed out.
Advertisement -
3Draw the blade across the rough side of the stone. Drag with the blade edge toward the stone, rather than away, as if you might shave off the top layer of the stone.[3] Apply only light pressure here, beginning with the base of the knife (also called the heel) and ending at the tip, and make sure to maintain your 20° angle.
- Dragging the knife this way will help your blade to maintain a symmetrical edge and allow a burr to form on the stone and prolong the stone's life.
- In general, whetstones have different grits on either side. Check the grit on your stone, or the packaging that came with the stone, to identify which side is which.
- To estimate a 20° angle, use an angle guide.
-
4Repeat this motion about 20 times on each side of your blade. Alternating between sides of your blade is important to ensure you sharpen the blade evenly. Draw the blade against the stone 10 times on each side, then 5 times, then 3 times, then alternate single strokes back and forth 6 times. Stop when you’ve raised a burr on the knife’s edge—a feature that steel will naturally form when one bevel is ground until it meets another.
- You can test to see if a burr has formed by applying your fingernail—carefully!—to the edge of the blade.
- 20 times per knife edge is a rough estimate: if your knife just needs a touch-up, you may need to grind it fewer times. But if your knife is really dull, you may need to grind longer.
-
5Flip the stone over, and repeat the previous 2 steps to polish the edge. Turn the stone over to the softer side, and then, applying softer pressure, draw the blade across as if you’re trying to slice into it. As you did with the coarse side of the stone, alternate between sides of the blade about 20 times. Your goal is to smooth over and eliminate the burrs created by sharpening the knife over the coarser grit. This transforms the blade from a ground edge into a finer, honed edge.[4]
- The rough grit side of the stone is used to grind the steel down, while the fine grit side is used to sharpen or hone the knife.
-
6Further polish or strop the edge to the desired sharpness, if you want. Strop the blade by dragging the blade across a substrate—such as leather, paper, wood, or even the stone you’ve been using—in the opposite direction you’d drag it to slice (i.e., in the opposite direction you’ve been grinding it). This will help smooth out some of the burrs left by grinding.[5]
- Stropping will make the edge better suited for "push cutting" (cutting directly into materials, pushing straight down without sliding the blade across the object) but may impair slicing ability: without the microscopic serrations left by grinding with a stone, the blade tends to not bite into things like tomato skins.


Using a Honing Rod (Sharpening Steel)
-
1Hold the honing rod in your non-dominant hand with the rod facing away. Grip the handle, making sure to keep the rod at a comfortable angle facing away from your body. Keep the rod tip elevated above the rod handle.[6]
- If you’re new to honing, consider placing the tip of the rod against the surface of a cutting board or work table for stability. It’s slower than holding the rod out in the air, but much easier.
- Honing and sharpening aren’t the same thing. A honing rod realigns the metal in a blade, massaging small nicks, indentations, and flat spots away.
- Using a honing rod regularly delays the need to use a whetstone. The less you use your whetstone, the longer your knives will thrive.
-
2Use your other hand to position the blade against the rod at a 20° angle. Grip the handle firmly with the fingers of your dominant hand, and place your thumb on the spine of the knife, far away from the blade edge. Your angle doesn't need to be exact, just approximate.
- Make sure to maintain the same angle throughout the honing process. Changing the angle used during the honing process won't smooth out the metal in the blade as much as using a consistent angle will.[7]
-
3Draw the knife down the rod. Start this motion with the heel of the knife touching the rod and end it with the tip of the knife touching the rod. Drag the knife down blade-first, as if you are attempting to slice into the rod. Use only as much pressure as the weight of the knife itself.[8]
- It's all in the wrist: without moving the wrist, you won't be able to sweep the entire blade—heel to tip—across the honing rod.
-
4Alternate sides of the blade 6 to 8 times. This will ensure your blade is evenly honed. And voila! You’ve got a perfectly honed blade.[9]
- After you’ve finished honing your blade, wipe it down or rinse it off to get rid of any lingering steel particles.


Using a Coffee Mug or Sandpaper
-
1Lay sandpaper out flat, or place a mug upside down. If you're using sandpaper to sharpen your knife, pick the finest grit sandpaper you can and tape it flat on top of a cutting board or work table (or any surface you wouldn't mind damaging with your blade).[10] You can also use a coffee mug: start by placing it upside down so that its coarse bottom is right-side up.[11]
- If you want to sharpen your knife without any fancy equipment, a coffee mug can serve as a surprisingly effective sharpening tool in a pinch. The ceramic material of a mug is a material coarse enough to get good results.
- In fact, some honing rods even use ceramic material to keep a blade honed in between sharpenings!
- You can also lay your sandpaper down atop a mousepad, which will prevent it from slipping.
-
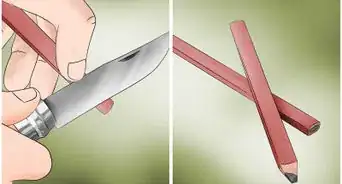
2Sweep each blade edge across the grit 20 times at a 20° angle. Grind against the gritty bottom of the ceramic mug, or against your sandpaper. Be sure to hone each edge of the blade to ensure it sharpens evenly. Grind with the blade facing away from you, as if you’re trying to slice into the mug or sandpaper.[12]
-
3Do a few more sweeps, alternating between sides of the blade. Take one side of the blade and run it across the coffee mug or sandpaper, then turn the blade around and hit the opposite side. Repeat this pattern several times.[13]
-
4Swipe your blade across a honing rod 6 to 8 times, if you want. If you have a honing rod, using it to polish off your blade is a good way to end the sharpening process. Smooth out any burrs or kinks in the metal with several swipes on your trusty honing rod, and there! Your knife is sharp and ready to cut![14]
- During the grinding process, your blade likely formed some burrs—features that steel will automatically form when one bevel is ground until it meets another. Honing the blade will help relax the burrs, leaving the blade edge even sharper and more polished.


Expert Q&A
-
QuestionWhat is the proper maintenance of knives?
 Ollie George CiglianoOllie George Cigliano is a Private Chef, Food Educator, and Owner of Ollie George Cooks, based in Long Beach, California. With over 20 years of experience, she specializes in utilizing fresh, fun ingredients and mixing traditional and innovative cooking techniques. Ollie George holds a BA in Comparative Literature from The University of California, Berkeley, and a Nutrition and Healthy Living Certificate from eCornell University.
Private Chef & Food EducatorDo not wash your knives in the dishwasher. Wash them with hot soapy water and dry by hand. Store knives safely in a knife roll, designated drawer, or magnetic wall knife holder. -
QuestionAre electric knife sharpeners any good?
 wikiHow Staff EditorThis answer was written by one of our trained team of researchers who validated it for accuracy and comprehensiveness.
Staff AnswerwikiHow Staff EditorStaff AnswerElectric knife sharpeners vary by brand, and some work really well. But sharpening by hand gives you total control over your blade, whereas electric sharpeners can grind inconsistently or leave you with a steeper or duller edge than you'd like. Keep in mind, too, that many electric sharpeners are designed to accommodate cheaper blades, which tend to be softer than higher-quality blades, so if you've got quality knives, your best bet is probably to sharpen them yourself. -
QuestionHow do I know if my whetstone is an oil stone? I just used mine with water as advised by someone on YouTube and am afraid I broke it.wikiHow Staff EditorThis answer was written by one of our trained team of researchers who validated it for accuracy and comprehensiveness.
Staff AnswerwikiHow Staff EditorStaff AnswerIt can be challenging to tell the difference between water stones and oil stones, but generally, water stones will be slightly coarser and more porous than oil stones. Some whetstones can be left in water, but some commercially manufactured stones can soften and break down (if this is what's happened to your stone, we're sorry to be the bearer of bad news!). To be on the safe side, always follow the manufacturer's guidelines when using your whetstone.
Warnings
- If you don’t remove enough metal to create a new edge, you will leave some of the dull edge in place. Remove enough material from the sides of the bevel so that the edge stops reflecting light.⧼thumbs_response⧽
- Don't drag your fingertip across the newly sharpened edge to see if it’s sharp! A safer way to test the blade is to try to cut a single piece of newspaper against the blade while holding the paper loosely between two fingers.⧼thumbs_response⧽
Things You'll Need
Using a Stone
- Knife
- Sharpening stone such as a whetstone, water stone, or oil stone
- Honing oil (optional)
- Strop (optional)
Using a Honing Rod (Sharpening Steel)
- Knife
- Honing rod
Using a Coffee Mug
- Knife
- Coffee mug
- Angle guide (optional)
- Honing rod (optional)


References
- ↑ https://www.foodfirefriends.com/types-knife-sharpeners/
- ↑ https://thediyplan.com/best-honing-oil-substitutes/
- ↑ https://youtu.be/gRzQtagagi8?t=68
- ↑ https://youtu.be/gRzQtagagi8?t=116
- ↑ https://chefsvisionknives.com/blogs/chefs-vision-blog/stropping-vs-honing-what-is-the-difference-between-each
- ↑ https://www.seriouseats.com/knife-skills-how-to-hone-a-dull-knife
- ↑ http://cooking.stackexchange.com/questions/27972/using-a-ceramic-honing-rod-for-global-knives
- ↑ https://www.seriouseats.com/knife-skills-how-to-hone-a-dull-knife
- ↑ https://www.seriouseats.com/knife-skills-how-to-hone-a-dull-knife
- ↑ https://youtu.be/GqYfDnEHpTQ?t=25
- ↑ https://www.backwoodshome.com/the-coffee-mug-knife-sharpener/
- ↑ https://www.seriouseats.com/2017/09/how-to-sharpen-a-knife-on-a-mug.html
- ↑ https://www.seriouseats.com/2017/09/how-to-sharpen-a-knife-on-a-mug.html
- ↑ https://www.seriouseats.com/2017/09/how-to-sharpen-a-knife-on-a-mug.html
- ↑ https://youtu.be/gRzQtagagi8?t=60
About This Article

The easiest way to sharpen a knife is to use a whetstone. First, soak the whetstone in water for 10 minutes. Then, set the whetstone down on top of a cloth. Hold the blade away from you and rest it on the corner of the whetstone at a 20-degree angle. Hold the blade by the handle while pressing the top of the blade down with your nondominant hand. Then, drag the blade into the stone 5 to 10 times before flipping it over and repeating the process on the opposite side. You can also use a sharpener to hone the blade of your knife. To use a sharpener, place the blade into the thin slot with the sharp side down. Drag the blade back and forth along the slot 5 to 10 times to sharpen both sides of the blade at the same time. If you don’t have a sharpener or whetstone, you can sharpen a blade using a ceramic mug or plate with a rough bottom. Put a cloth down and flip the mug or plate upside down on top of it. Next, place the blade at a 10-degree angle against the raised lip on the bottom of the mug or plate. Then, slowly drag the blade against the lip. Repeat this process 10 to 15 times before flipping the blade over and sharpening the opposite side. If you do have a whetstone or honing rod, read on for help on how to use it!


