This article was co-authored by wikiHow staff writer, Darlene Antonelli, MA. Darlene Antonelli is a Technology Writer and Editor for wikiHow. Darlene has experience teaching college courses, writing technology-related articles, and working hands-on in the technology field. She earned an MA in Writing from Rowan University in 2012 and wrote her thesis on online communities and the personalities curated in such communities.
This article has been viewed 272,392 times.
Learn more...
Do you want to download just one part of a YouTube video in high-definition? While many tools exist for downloading YouTube videos, it's harder to find one that lets you trim clips in the HD format. But don't worry—we've found several easy options for cropping only the part of the YouTube video that you want to keep. Read on to learn how to download and save YouTube video clips in HD (720p, 1080p, and higher) formats.
Steps

Download and Crop the Video Yourself
-
1Install a free HD YouTube video downloader like 4K Download. While this app won't let you trim part of a video, you can download the entire video and trim it yourself using free tools built in to Windows and macOS. This is a great option if the web-based YouTube croppers aren't downloading videos at HD quality.
- 4K Video Downloader is a popular free YouTube downloader that's been around for a while and still works. You can download it for your PC, Mac, or Android at https://www.4kdownload.com/downloads. Just click the Download link next to your operating system, double-click the downloaded file, and follow the on-screen instructions to install.
- As long as the video isn't private, age-restricted, or limited to certain regions, you should be able to download HD videos using 4K Video Downloader without problems.
- Keep in mind that downloading copyrighted content not only violates YouTube's policies, but is also illegal in nearly all jurisdictions.
-
2Copy the URL of the YouTube video you want to download. Open YouTube and search for the video you want to save. Then, highlight the URL in the address bar and press Ctrl + C (PC) or Cmd + C (Mac) to copy it.
- Before you download, click the gear icon at the bottom, select Quality, and make sure there's an HD version of the video available, such as 1080p or 2160p. If the video isn't HD to begin with, you won't be able to download it in high definition.
-
3Open 4K Video Downloader. You'll find it in your Windows Start menu or your Mac's Launchpad.
- This app allows you to download 30 videos per day without upgrading to the paid version.
-
4Click Paste Link. It's the green and white plus sign icon at the top-left corner. After a few moments, you'll see a list of options for downloading.
-
5Select Download Video from the first drop-down menu. This tells the downloader to download the entire video rather than just its audio track.
-
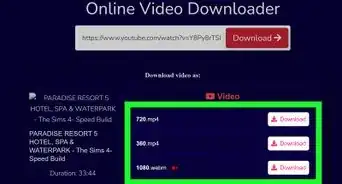
6Select a format. The most common format is MP4, but you can choose MKV if you prefer.
-
7Select a high-definition format. The options will vary depending on the original video quality. HD is considered 720p and up, while FHD (Full HD) is 1080p.
-
8Select a download location. This is especially important if you're using Windows, as the default download location might give you an error. Click Browse and choose a location like your Desktop or Downloads folder before you start the download.
-
9Click Download. This saves the video in HD format to your computer. Once the download is complete, you'll see the total size and length below the video in the list.
-
10Open the downloaded video for editing. Here's how:
-
Windows:
- Open the folder to which you downloaded the video. Then, right-click the downloaded video, choose Open with, and select Photos.
-
macOS:
- Open the Photos app on your Mac, then double-click the downloaded video.
-
Windows:
-
11Trim the video. You're almost done! Now you can choose just the part of the video you want to keep. The steps are a little different depending on your operating system:
-
Windows:
- Click the Video Trim icon, which is the icon of a photo with a pencil at the top-center.
- Drag the left guide to the place you want your clip to begin, and the right guide to where you want your clip to end.
- Click Save as at the top.
- Choose a saving location (and name, if you want) and click Save.
-
macOS:
- Click Edit to open the trimmer.[2]
- Drag the left guide to the place you want your clip to begin, and the right guide to where you want your clip to end.
- Click Done.
- Click Save Video (to overwrite the long version with the short one) or Save as New Clip (to create a new file for the shortened version without affecting the original.
-
Windows:


-
1Go to the video you want to share. If you just want to share part of a video with a friend, YouTube makes it easy to send an HD clip without downloading any special software. This option doesn't violate YouTube's terms and you won't have to worry about getting caught.
-
2Click Clip. It's under the video next to an icon of scissors.
-
3Clip the video. In the Clip window that appears, you'll see a little timeline of the video that you're watching. To create a clip, drag the blue box ends to the beginning and end of the clip that you want to share. You'll see the duration of the clip below your selection, and it will loop in the video above so you can see what clip you're sharing.
- You'll also notice the timestamps of your clip's start and end in the video.
-
4Add a description. This is what will accompany the social media share of the clip as well as what people see when they click your link, so make sure it accurately describes the video!
-
5Click Share Clip. It's clickable after you add the description of the clip.
-
6Click a sharing method or Copy. If you click a social media icon, like Facebook, a new window will open in a new post creator with a link to your clip.
- Continue by pressing Share or Post to put that clip on your social media.
- If you copied the URL link, you can paste it anywhere, like in an email.


References
About This Article

1. Go to https://youtube.com and sign in.
2. Click your profile picture and select Manage your Google Account.
3. Click Data & privacy
4. Click Download or delete your data.
5. Click Deselect all.
6. Click to check the box next to "YouTube and YouTube Music."
7. Click All YouTube data included.
8. Click Deselect all.
9. Click Next Step.
10. Choose your file type, download frequency, and download location.
11. Click Create export.