This article was co-authored by wikiHow staff writer, Nicole Levine, MFA. Nicole Levine is a Technology Writer and Editor for wikiHow. She has more than 20 years of experience creating technical documentation and leading support teams at major web hosting and software companies. Nicole also holds an MFA in Creative Writing from Portland State University and teaches composition, fiction-writing, and zine-making at various institutions.
This article has been viewed 24,280 times.
Learn more...
When you first open Tor, you're prompted to connect to the Tor network. This connects you to a relay and assigns you a browsing IP address that's different than your current home, work, or school IP address. If you just want to browse the web from a new IP address, this is all you'll need to do to get one! But if you're already using Tor and want an IP address that's different from the one you were assigned upon connecting, you can create a new Tor identity. This wikiHow article teaches you how to generate a new IP address using the Tor web browser.
Steps
-
1Open Tor on your computer. You'll find it in your Windows Start menu or your Mac's Launchpad.
- If you haven't already connected to Tor for a session, click Connect when prompted. This assigns you a new IP.
- If you already have a website open and want to change your IP address, read on.
-
2Click the hamburger menu ☰. It's at the top-right corner of Tor.Advertisement
-
3Click New Identity. Choose this option if you want a new IP address everywhere on Tor and don't want your previous activity to be linked to the new IP address. A pop-up window will appear, warning you that Tor will close all windows and tabs. If you have any downloads in progress, they'll be stopped as well.
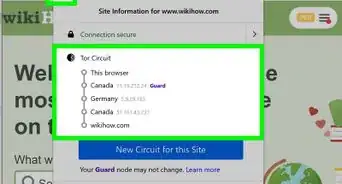
- If you just want a new IP address for the site you have open now, not everywhere on Tor, select New Tor Circuit for this site from the menu instead.[1]
- Once Tor acquires a new IP for the site, it will refresh the current tab so you're loading it from your new IP address.
- Any tabs open to the same site will also refresh to the new IP address once you activate them, but other websites and active downloads won't be affected.
- If you just want a new IP address for the site you have open now, not everywhere on Tor, select New Tor Circuit for this site from the menu instead.[1]
-
4Click Yes to restart. Tor will shut down and re-open, acquiring a new IP address during the process. Now that you have a new IP, the sites you visit will see this IP rather than your previous one.
- If you want to specify which country your IP address is in, you can specify a region using Strict Nodes.


References
About This Article

1. Click the three-line menu at the top-right.
2. Click New Identity.
3. Click Yes.