X
wikiHow is a “wiki,” similar to Wikipedia, which means that many of our articles are co-written by multiple authors. To create this article, volunteer authors worked to edit and improve it over time.
This article has been viewed 37,290 times.
Learn more...
The Windows 10 Start menu is a hybrid of the Windows 7 Start menu and the Windows 8 Start screen, as Windows 8 introduced tiles. The Start menu allows you to open and uninstall apps, access device power options, sign out of Windows, get instant info from live tiles, and do much more.al functions and customization options available at your fingertips from the Start Menu.
Steps
Part 1
Part 1 of 2:
Using the Start Menu
-
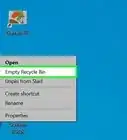
1Open the Start Menu. There are two ways to access the Start Menu: from the desktop or from the keyboard.
- Click the Start button at the bottom-left corner of your screen. It's a white Windows icon. When you hover over it, its color changes to your set accent color.
- Press the ⊞ Win (Windows logo) keyboard key. It's usually located on the bottom row of your keyboard.
- When you click/tap the Start button or hit the Windows key, the Start Menu pops up. You will see two panes. The left pane contains the menu-based list of folders, applications shortcuts, settings, and functions familiar to Windows 7 users. The right pane contains the finger-friendly screen full of tiles (similar to the Start Screen in Windows 8) where you can access Windows apps.
-
2Work with the menu column on left pane of the Start Menu. The left pane is divided into three general areas.
- On the top is the User Account section where you can find the active user account name and picture. Click/tap on this and you can lock the screen, sign out from the account, or change the account settings.
- Below the User Account section is a list of shortcuts to folders, programs, or apps that you configured to be placed on the Start Menu and those that you frequently use or have recently used. Clicking/tapping on the shortcut will open the folder or launch the application.
- Below this is the shortcut to “File Explorer.” Clicking/tapping on this will open the File Explorer window.
- Next is the “Settings” shortcut. Clicking/tapping on this will open the Settings menu in a different window. From the Settings menu, you can personalize your desktop, manage wired and wireless devices, set time and language, set privacy options, update Windows, among others.
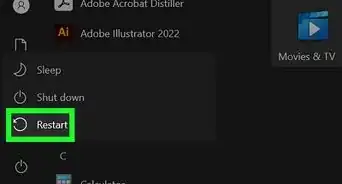
- Below “Settings” is the “Power” button where you can shut down, restart, or hibernate your device.
- At the bottom is the “All Apps” button. Clicking/tapping on “All Apps” will expand the directory tree. All programs and apps installed in your computer will be listed in alphabetical order, and you can launch the app or program by clicking/tapping on it.
Advertisement -
3Work with the tiles on the right pane of the Start Menu. On the right pane are “tiles” (tablet-style icons) that are shortcuts to folders or apps (usually Windows Store apps or built-in Windows apps). Clicking/tapping on a tile launches the app. Some of these tiles are “live” tiles, some are “static” tiles. Live tiles continuously display updated information from the app (weather updates, latest news, stock market movement, etc.). Static tiles are just app shortcuts.


Advertisement
Part 2
Part 2 of 2:
Customizing the Start Menu
-
1Resize the Start Menu. You can resize the Start Menu vertically by placing the mouse cursor on the top edge of the Start Menu until the cursor changes to a bi-directional vertical arrow then dragging it up or down. Similarly, you can change the width of the Start Menu by placing the cursor at the right edge of the Start Menu until it changes into a bi-directional horizontal arrow and dragging it left or right. Widening the Start Menu will extend the area for the tiles. At its narrowest, the Start Menu can fit three “medium” columns of the smaller tiles, but at its widest, six tiles can be fitted into the area.
-
2Personalize the Start Menu. You can determine what is contained in the Start Menu.
- Click/tap the Start button and click/tap “Settings” to open the Settings menu.
- At the Settings window, click/tap “Personalization.”
- At the left pane of the “Personalization” window, click “Start.” The personalization options for the Start Menu appears in the right pane.
- On the right side, you can find toggle switches that you can turn on or off by clicking or tapping on it. You can choose to show or not to show the most used or recently added apps and recently opened items by clicking/tapping the toggle switch on or off.
- The third toggle switch is labelled “Use Start full screen.” If turned on, the Windows 8-style Start Screen will appear when you click/tap the Start button.
- At the bottom of the right pane is a link entitled “Choose which folders appear on Start.” Clicking/tapping on the link takes you to a list of folders which you can toggle on or off to determine, which are shown in the Start Menu.
-
3Configure the tiles. By default, the tile area is divided into two sub-sections: “Life at a glance” and “Play and explore,” each of which contains tiles.
- To resize the tiles, right-click (tap and hold) the tile and place the mouse on “Resize” in the context menu. Four size options will be presented to you: small, medium, wide and large. Select the one you prefer.
- To move the tiles, click the tile and drag it wherever you like within the tile area.
- To turn live tile on or off, right-click (tap and hold) the tile and click/tap “Turn live tile on (or off).”
- To remove a tile from the Start Menu, right-click (tap and hold) the tile and click/tap “Unpin from Start.”


Advertisement
-Step-17.webp)
About This Article
Advertisement


-Step-17.webp)