This article was co-authored by wikiHow staff writer, Jack Lloyd. Jack Lloyd is a Technology Writer and Editor for wikiHow. He has over two years of experience writing and editing technology-related articles. He is technology enthusiast and an English teacher.
The wikiHow Tech Team also followed the article's instructions and verified that they work.
This article has been viewed 671,393 times.
Learn more...
Do you want to see thumbnail previews of pictures in folders without having to open the files? While photo previews should be enabled by default, some Windows 10 versions may inadvertently disable them. Fortunately, it's very easy to enable all types of file previews, including image previews, from your File Explorer's settings—we'll show you how!
Steps
Enabling Image Previews
-
1Open File Explorer . Click the folder-shaped File Explorer icon at the bottom of the screen, or press ⊞ Win+E.
- If File Explorer isn't at the bottom of the screen, you can also click Start , type in file explorer, and click File Explorer at the top of the menu.
-
2Open your folder. Using the File Explorer's left-hand column of folders, navigate to the folder in which you want to enable image previews.Advertisement
-
3Click the View tab. It's in the upper-left side of the File Explorer window. A toolbar will drop down from the top of the window.
-
4Click the Options icon. This icon is in the upper-right corner of the window and resembles a white box with checkmarks on it. Clicking it prompts a pop-up window to appear.
-
5Click the View tab. It's at the top of the pop-up window.
-
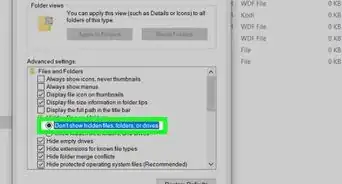
6Uncheck the "Always show icons, never thumbnails" box. You'll find this in the "Files and Folders" section near the bottom of the window.
- If you don't see this box, first double-click the "Files and Folders" heading to cause it to appear.
- If this box is already unchecked, you may have to fix a corrupted thumbnail cache first.
-
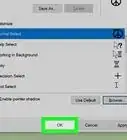
7Click Apply, then click OK. Both options are at the bottom of the window. Doing so will apply your settings and close the window.
-
8Make sure your folder is displaying the proper viewing option. In order to see thumbnail previews, your folder must display files and folders using a supported viewing option (e.g., Extra large icons). To change the current view setting, do the following:
- Click the View tab.
- Click one of the following "Layout" options: Extra large icons, Large icons, Medium icons, Tiles, or Content.
-Step-1.jpg)

-Step-2.jpg)
-Step-3.jpg)
-Step-4.jpg)
-Step-5.jpg)
-Step-6.jpg)
-Step-7.jpg)
-Step-8.jpg)
Fixing Corrupted Previews
-
1Know when this is necessary. Windows 10 keeps a cache of thumbnails for every one of your computer's files; if this cache becomes corrupted, your folders' images may not properly display. If you've tried enabling image previews already, clearing the thumbnail cache may solve your problem.[1]
-
2
-
3Open Disk Cleanup. Type in disk cleanup, then click Disk Cleanup when it appears at the top of the Start window. A pop-up window will open.
- You may have to click the Disk Cleanup icon when it appears in the taskbar to bring up the pop-up window.
-
4Scroll down and check the "Thumbnails" box. You can uncheck every other box in the main window, but the "Thumbnails" box must be checked.
-
5Click OK. It's at the bottom of the window.
-
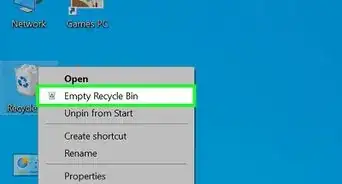
6Click Delete Files when prompted. Doing so will prompt Disk Cleanup to begin deleting your computer's thumbnails from the cache.
-
7Wait for your thumbnails to finish deleting. This can take several minutes, especially if you've never deleted thumbnails before. Once the pop-up window disappears, you can proceed.
-
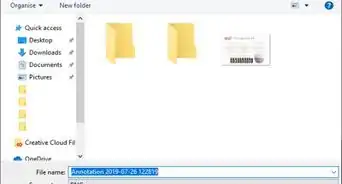
8Open your preferred folder. Go to the folder in which you wanted thumbnails to appear. After a moment of refreshing, your pictures' previews should begin to show up.
-
9Enable image previews if necessary. If thumbnails still aren't showing, you may need to disable the "Always show icons, never thumbnails" setting and ensure that your folder is using the proper viewing option.
-Step-9.jpg)
-Step-10.jpg)
-Step-11.jpg)
-Step-12.jpg)
-Step-13.jpg)
-Step-14.jpg)
-Step-15.jpg)
-Step-16.jpg)
-Step-17.jpg)
Community Q&A
-
QuestionHow do I make the pictures of the stuff in the folder show up when I change to large icons?
 Community AnswerThe first 2 items in the folder are the ones that show up on the folder icon. There's no way to change it directly, but since files are ordered alphabetically by default, you can just rename the files you want in front so they are the first two of the folder in alphabetical order.
 -
QuestionWhat happens to my pictures after clicking the delete files button?
 Curiousguy033Community AnswerThey will be deleted from the folder in which they are located and then moved to the "trash bin". There you can always renew it and use it, but if you don't need the pictures you can also delete them from the bin and they will be deleted from the entire computer. You cant renew them after that, so be careful.
 -
QuestionTried doing this but the folder is already unchecked. Does it make it a difference if its a compressed folder from WhatsApp?
 Community AnswerNo preview assets are generated when files are in a .zip file and they aren’t yet uncompressed. To solve this, just uncompress the folder.
Warnings
- Corrupted thumbnail caches can occur due to anything from a system update to a virus.⧼thumbs_response⧽
About This Article
1. Open File Explorer.
2. Open your folder.
3. Click the View tab.
4. Click Options.
5. Click the view tab.
6. Uncheck "Always show icons, never thumbnails" box.
7. Click Apply and then OK.
8. Click View.
9. Select a layout option.