wikiHow is a “wiki,” similar to Wikipedia, which means that many of our articles are co-written by multiple authors. To create this article, 12 people, some anonymous, worked to edit and improve it over time.
This article has been viewed 27,603 times.
Learn more...
The Raspberry Pi is one of the most versatile microcomputers on the planet. With a very active community and developers constantly upgrading the computers and making them cheaper. While many devices now come with Bluetooth capability that lets you link up your device to play music wirelessly, many older devices don't. Most devices come with an AUX port however. With a Raspberry Pi, the code provided in the article, and some time, you can have any device in your house ready to be Bluetooth stream-able. The code needed for each step at the bottom of the step is provided at the bottom of the article.
Steps
Designing The Speaker
-
1Download the latest version of Raspbian from the Raspberry Pi website and have it saved to your desktop. To get the file registered as an operating system, and not a zip file, you need to download win32 disk imager. Select the Raspbian file on your desktop as the image file, and select the removable disk as your device. Make sure the letter for the micro SD card is correct before you copy the file over so you don't overwrite the wrong drive. Once the image is finished copying over to the micro SD card, plug it into the Raspberry Pi and start it up.
-
2Use the default username, pi, and the default password, raspberry once Raspberry Pi has booted. Set up WiFi by either plugging in an Ethernet cable, or connect via WiFi by clicking on the icon at the top of the screen. Once you are finished setting up, you won't need WiFi anymore. The only reason you will need WiFi is to download the files.Advertisement
-
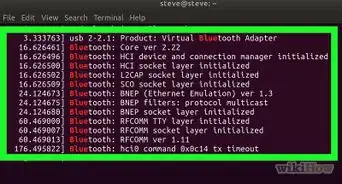
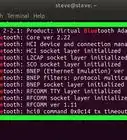
3Download the software needed for this to work. In the command terminal, enter the code in line A and B. The code in line A downloads the latest version of the software. The code in line B allows Bluetooth to work with Pulseaudio, which is an open source program that acts as a server, allowing external inputs to broadcast sound to the device. Once the program is done downloading, we can start editing some config files to enable the Bluetooth.
- A. sudo apt-get upgrade
- B. sudo apt-get install bluez pulseaudio-module-bluetooth python-gobject python-gobject-2 bluez-tools
-
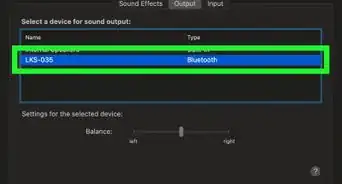
4Get ready to play music through the device by adding the user pi to pulse audio. In the terminal, enter the code from line A. This allows you to edit the default bluetooth streaming settings. Next, enable A2DP in the bluetooth configuration. A2DP is is a type of bluetooth streaming that lets us connect to other A2DP devices. It is a higher quality bluetooth connection than others since it can send more data faster. Enter the code from line B to open the config file.In the config file, under the [General]: tab, enter the code from line C. Use CTRL+O and ENTER to save, and CTRL+X to close the config file.
- A. sudo usermod –a –G lp pi
- B. sudo nano /etc/bluetooth/audio.conf
- C. Enable=Source,Sink,Media,Socket
-
5Modify the Pulse Daemon config file, which is the configuration file for Pulseaudio. Enter the code from line A. You change the resampling method because you need to be able to convert the audio from different qualities so it can be used on your device. In the config file, look for the line resample-method = speex-float-3, and add ; at the beginning of the line so it looks like the code in line B. Then add line C below line B.
- A. sudo nano /etc/pulse/daemon.conf
- B. ;resample-method = speex-float-3
- C. resample-method = trivial
-
6To have our devices automatically connect, you will need to edit some more config files. We need to edit the udev config files. In the terminal, enter the code from line A.Look for the lineSUBSYSTEM=="input", GROUP="input", MODE="0660"And under it, add the code from line B.Save your changes and exit the config file. Now you need to check and see if the udev/ directory exists by using the code from line C.If it does, move onto the next step, if not, enter the code from line D to create the directory.To fully get the bluetooth to work, you will have to copy the code from line E into a text editor and turn it into an executable file.Save and exit and then enter the code from line F.
- A. sudo nano /etc/udev/rules.d/99-input.rules
- B. KERNEL=="input[0-9]*", RUN+="/usr/lib/udev/bluetooth"
- C. sudo ls –la /usr/lib/udev
- D. sudo mkdir /usr/lib/udev
- E. AUDIOSINK="alsa_output.platform-bcm2835_AUD0.0.analog-stereo"echo "Executing bluetooth script...|$ACTION|" >> /var/log/bluetooth_devACTION=$(expr "$ACTION" : "\([a-zA-Z]\+\).*")if [ "$ACTION" = "add" ]thenhciconfig hci0 noscanamixer cset numid=3 1amixer set Master 100%pacmd set-sink-volume 0 65537 for dev in $(find /sys/devices/virtual/input/ -name input*) do if [ -f "$dev/name" ] then mac=$(cat "$dev/name" | sed 's/:/_/g') bluez_dev=bluez_source.$mac sleep 1 CONFIRM=`sudo -u pi pactl list short | grep $bluez_dev` if [ ! -z "$CONFIRM" ] then echo "Setting bluez_source to: $bluez_dev" >> /var/log/bluetooth_dev echo pactl load-module module-loopback source=$bluez_dev sink=$AUDIOSINK rate=44100 adjust_time=0 >> /var/log/bluetooth_dev sudo -u pi pactl load-module module-loopback source=$bluez_dev sink=$AUDIOSINK rate=44100 adjust_time=0 >> /var/log/bluetooth_dev fi fi donefiif [ "$ACTION" = "remove" ]thensudo hciconfig hci0 piscanFi
- F. sudo chmod 774 /usr/lib/udev/bluetooth
-
7Create another script that turns on and off bluetooth discoverability when it starts up so we can connect our device to the Raspberry Pi. First, in the terminal, enter the code from line A. Now open up the text editor to create a new script. In the text editor, enter the code from line B into the document. Save the script and exit the text editor. Give the text file execute permissions so it can be launched when it is used. Make this script start up when the Raspberry Pi boots up. To do this, we need to enter the lines of code from C and D.
- A. sudo nano /etc/init.d/bluetooth-agent
- B. USER=rootHOME=/rootexport USER HOMEcase "$1" instart)echo "setting bluetooth discoverable"sudo hciconfig hci0 piscanstart-stop-daemon -S -x /usr/bin/bluetooth-agent -c pi -b -- 0000echo "bluetooth-agent started pw: 0000";;stop)echo "Stopping bluetooth-agent"start-stop-daemon -K -x /usr/bin/bluetooth-agent;;*)echo "Usage: /etc/init.d/bluetooth-agent {start|stop}"exit 1;;esacexit 0
- C. sudo chmod 755 /etc/init.d/bluetooth-agent
- D. sudo update-rc.d bluetooth-agent defaults
-
8Go to the inittab config file. Inittab is the file that tells the Raspberry Pi what to launch in certain situations, such as start up. To get to that config file, enter the code from line A And look for the following line of code1:2345:respawn:/sbin/getty 115200 tty1,add # before it so it gets commented out and won't be read by the program. It should look like the code in line B. Below it, add the code from line C.Save and exit. Now just reboot Raspberry Pi and you are ready to go.
- A. sudo nano /etc/inittab
- B. #1:2345:respawn:/sbin/getty 115200 tty1
- C. 1:2345:respawn:/bin/login -f pi tty1 /dev/tty1 2>&1


Things You'll Need
- Raspberry Pi 3 model B
- 4GB micro SD card
- Portable Battery
- Rechargeable speakers with an AUX port
- Case