This article was co-authored by Adam Shuty. Adam Shuty is a Certified Strength and Conditioning Specialist and owner of ATOMIC Total Fitness, a fitness training studio in New York, New York. With over 15 years of experience, Adam specializes in weightlifting, strength and conditioning, and martial arts. Adam holds a BS in Industrial Engineering from Virginia Polytechnic Institute and State University. In 2014, Adam appeared on the Live With Kelly and Michael Show as one of the top five fitness instructors in the country.
There are 7 references cited in this article, which can be found at the bottom of the page.
This article has been viewed 9,273 times.
Before and after photos are a great way to see how much progress you’ve made when you’ve changed something about your exercise routine or diet! The most important thing to remember with progress photos is to keep everything the same every time—this makes it easier to see how your body is changing. Whether you just take one photo at the beginning of your experience and one at the end, or if you take regular weekly or monthly pictures, you’ll be glad you can look back and see how far you’ve come.
Steps
Choosing an Outfit
-
1Wear the same clothes in every picture so it’s easy to see small changes. What you wear can make your body look different on a day-to-day basis. Some clothes fit more snugly or accentuate curves, and wearing different outfits in your progress photos could give a false representation of what’s truly going on or make it so you can’t as easily see your progress.[1]
- You could get to a point where your clothes no longer fit and you have to change your outfit, and that’s okay! But while things still fit, always wear the same outfit in every progress photo.
- Get similar clothes in a smaller size when your original ones are too baggy.
- Even if you’re just taking one picture at the start of your journey and one once you’ve reached a goal, you should still wear the same outfit.
-
2Show as much of your body as possible by wearing your undergarments. Wear a bra and underwear, a swimsuit, or a pair of boxers. There’s no need to buy anything new or special; just your normal clothes will be just fine for your photos. If you plan on showing your photos to others or sharing them online, make sure your clothes are in good shape.[2]
- Remember, it’s okay if your tummy hangs out or if you have stomach rolls! These photos are for you (unless you choose the share them), and the best way to see your progress is to not hide your body.
Advertisement -
3Cover more of your skin while still showing progress with snug-fitting activewear. It’s okay if you’re not comfortable wearing undergarments or a swimsuit just yet. As an alternative, choose activewear that fits snugly on your arms, legs, and belly so that it’s easier to see physical changes.[3]
- Bike shorts are a great pick for bottoms. They’ll fit tightly against your legs so you can see how they change and get leaner or more muscular with time.
- Wear a tank top so your arms are easily visible.
- Make sure your top fits tightly against your torso so it’s easier to see any weight changes. You may also want to plan on lifting your shirt in your photos so you can see any definition changes to your stomach.


Picking a Location
-
1Use natural lighting for the most realistic and flattering pictures. Natural lighting makes it easier to see your body, whereas dim lighting can create weird shadows that make your body look different. Try standing near a window or opening a door to let more natural light inside.[4]
- Overhead lights can sometimes help to brighten a space, but be careful that they don’t cast shadows on your body.
- For a more professional setup, consider getting a lightbox or a soft light device. They help diffuse light to make it softer, which creates more natural-looking photos.[5]
-
2Stand in front of a neutral or blank background, like an empty wall. Too much background noise will distract from the main part of the photo—you and your progress! Plus, if you’re sharing photos online, no one needs to see what’s hanging out on your bedroom floor.[6]
- Try taking a photo of the area you’re planning to use, then look at it to see if there is anything you need to remove from the background. Things hanging on the wall or pieces of furniture could be moved out of the way to create a blank space.
-
3Take your progress photo in the same spot each time. For consistency’s sake, always take your photo in the same place.[7] This should help ensure that the lighting is the same and that your body remains the focus of the photo.[8]
- This could be at your home, at the gym, or some other location that you always have access to.
-
4Plan on taking your photo at the same time of the day each time. The best time to take your photo is in the morning before you’ve had anything to eat or drink because your body won’t be bloated.[9] If you can’t snap a photo in the morning, try to consistently take it at some other time of the day, preferably not after a big meal.[10]
- Your weight fluctuates throughout the day as you eat, drink, workout, and rest.
- You'll look leaner when you photograph yourself first thing in the morning.[11]


Snapping a Great Progress Photo
-
1Use your camera’s self-timer function to get full-length progress photos. Position the camera on a flat surface at about chest height and take some test photos to ensure your whole body is in the frame. If you can’t see your legs, move the camera back about 2–3 feet (0.61–0.91 m). Whether you’re using an actual camera or the camera on your phone, you should be able to set up the timer so you can get in place before the shutter goes off.[12]
- Putting the camera at chest height should produce the most realistic progress photo. If the camera is too high or too low, the proportions of your body would be skewed.
- Full-length photos are really important to see your progress! If you were holding the camera and taking a selfie, you’d be seeing your body at a different angle and it would be much harder to notice any changes.
- You could also recruit a friend to take your photos for you.
-
2Take a photo in a full-length mirror if you can’t set up your camera or phone. It will be harder to see small changes this way because one arm will be bent to take the photo, but it’s better than nothing! Stand far enough away from the mirror that your entire body is visible in the camera and position yourself so you can see as much of your body as possible.[13]
- Try holding the camera out to the side and angling it in to get the photo so that your stomach is fully visible.
-
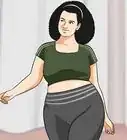
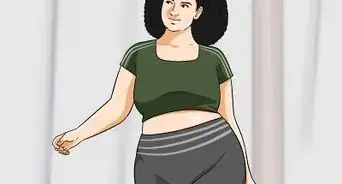
3Keep track of your weight loss and muscle gain with a front-facing photo. Stand in front of the camera with your legs spread about hip-width apart. Hold your arms down at your sides and relax your shoulders. Look straight ahead at the camera. Smile if you want to![14]
- Do your best to not suck in your stomach or clench your muscles.
-
4Check out your posterior progress with a photo from behind. Stand in front of the camera facing away from it. Keep your legs about hip-width apart and let your arms hang loosely at your sides. Keep your shoulders relaxed but avoid letting them slouch forward.[15]
- If you have long hair, put it up for this shot so you can more clearly see your back.
- You probably don’t get the chance to see your back muscles very often, so these photos will come in handy when reviewing your progress!
-
5Get a sideways photo to see how your belly changes from week to week. Stand sideways in front of the camera. Keep your hips level and let your arms and shoulders relax. Take a breath in, exhale, and let your stomach relax; avoid sucking it in if you can.[16]
- Photos taken from the side can also highlight changes to your arms, thighs, and butt.
-
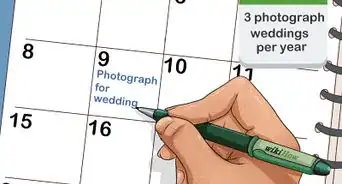
6Snap a photo every week or month to keep track of your progress over time. It usually takes 4-8 weeks to start seeing a change in your physical appearance once you’ve started exercising or changing your diet. Set a reminder in your phone for the same day each week or month so that you stay on track and don’t miss a photo.[17]
- If you take progress photos every day, it may be harder to notice changes in your body. Over time, though, it could be cool to look back at the day-by-day transformation.
- Consider tracking other measurements, like your waist circumference, your emotional health, how you’re sleeping, how your clothes fit, or your fitness level.[18]
- Try to be kind and gentle with yourself throughout your journey—life is too short for us to be so hard on ourselves about what we look like.[19]


Expert Q&A
-
QuestionHow do you take accurate progress pictures during weight loss?
 Adam ShutyAdam Shuty is a Certified Strength and Conditioning Specialist and owner of ATOMIC Total Fitness, a fitness training studio in New York, New York. With over 15 years of experience, Adam specializes in weightlifting, strength and conditioning, and martial arts. Adam holds a BS in Industrial Engineering from Virginia Polytechnic Institute and State University. In 2014, Adam appeared on the Live With Kelly and Michael Show as one of the top five fitness instructors in the country.
Certified Strength & Conditioning SpecialistYour body goes through a lot of changes every day. You're about an inch taller in the morning than you are at night, since your spinal discs become rehydrated when you sleep, for example. So, you really want to make sure you take your progress pictures at the same time and in the same place. Also, don't take your photos immediately after you've eaten a big meal, since that can make your stomach look bigger than it actually is. -
QuestionShould you take before and after pictures?Adam ShutyAdam Shuty is a Certified Strength and Conditioning Specialist and owner of ATOMIC Total Fitness, a fitness training studio in New York, New York. With over 15 years of experience, Adam specializes in weightlifting, strength and conditioning, and martial arts. Adam holds a BS in Industrial Engineering from Virginia Polytechnic Institute and State University. In 2014, Adam appeared on the Live With Kelly and Michael Show as one of the top five fitness instructors in the country.
Certified Strength & Conditioning SpecialistIt's not mandatory, but it's definitely something you should do if you want to track your progress over time! It's a great way to stay motivated if you can actually see how well you're doing. -
QuestionAre there any easy ways to measure progress with my photos?Adam ShutyAdam Shuty is a Certified Strength and Conditioning Specialist and owner of ATOMIC Total Fitness, a fitness training studio in New York, New York. With over 15 years of experience, Adam specializes in weightlifting, strength and conditioning, and martial arts. Adam holds a BS in Industrial Engineering from Virginia Polytechnic Institute and State University. In 2014, Adam appeared on the Live With Kelly and Michael Show as one of the top five fitness instructors in the country.
Certified Strength & Conditioning SpecialistYes! There are apps out there that you can use for this. They display grid lines and make sure that you take the photo from the same angle and distance. These will give you more concrete measurements than a normal camera.
Warnings
- Some progress photos you see online are doctored and could show false expectations for what you and your body can do in a short period of time. Take social media photos with a grain of salt, because you never know the editing that may have gone into a photo.[20]⧼thumbs_response⧽


References
- ↑ https://verv.com/your-guide-to-getting-the-best-workout-progress-pictures/
- ↑ https://theprogressapp.com/blog/before-after-photos-weight-loss/
- ↑ https://theprogressapp.com/blog/before-after-photos-weight-loss/
- ↑ https://www.naylor.com/associationadviser/professional-looking-headshot/
- ↑ https://www.photoworkout.com/make-full-body-portraits/
- ↑ https://www.naylor.com/associationadviser/professional-looking-headshot/
- ↑ Adam Shuty. Certified Strength & Conditioning Specialist. Expert Interview. 25 June 2021.
- ↑ https://theprogressapp.com/blog/before-after-photos-weight-loss/
- ↑ Adam Shuty. Certified Strength & Conditioning Specialist. Expert Interview. 25 June 2021.
- ↑ https://theprogressapp.com/blog/before-after-photos-weight-loss/
- ↑ Adam Shuty. Certified Strength & Conditioning Specialist. Expert Interview. 25 June 2021.
- ↑ https://www.naylor.com/associationadviser/professional-looking-headshot/
- ↑ https://theprogressapp.com/blog/before-after-photos-weight-loss/
- ↑ https://theprogressapp.com/blog/before-after-photos-weight-loss/
- ↑ https://theprogressapp.com/blog/before-after-photos-weight-loss/
- ↑ https://theprogressapp.com/blog/before-after-photos-weight-loss/
- ↑ https://www.fitnesshealth101.com/fitness/weight-loss/strategies/tools
- ↑ https://www.fitnesshealth101.com/fitness/weight-loss/strategies/tools
- ↑ Adam Shuty. Certified Strength & Conditioning Specialist. Expert Interview. 25 June 2021.
- ↑ https://theculturetrip.com/north-america/usa/new-york/articles/instagram-fitness-progress-pics-kayla-itsines/
About This Article