Illuminate your subject with a ring light to create beautiful well-lit portraits
This article was co-authored by wikiHow staff writer, Kyle Smith. Kyle Smith is a wikiHow Technology Writer, learning and sharing information about the latest technology. He has presented his research at multiple engineering conferences and is the writer and editor of hundreds of online electronics repair guides. Kyle received a BS in Industrial Engineering from Cal Poly, San Luis Obispo.
Learn more...
It seems like everyone has a ring light these days — and with good reason! Ring lights provide an affordable way to create even, variable lighting for portrait photography. This wikiHow will show you how to set up, adjust, and begin taking great portraits with your ring light.
Things You Should Know
- Set up the ring light by securing it to the mount and stand.
- Vary the light’s position to highlight your subject in different ways.
- Adjust the light settings (dimness, color temperature, and hue) to change the dynamics of the shot.
Steps
Ring Light Setup
-
1Secure the ring light to the mount. Mount systems typically have a screw-based system to secure the ring light to the mount, and the mount to the stand.
-
2Secure the mount to the stand.Advertisement
-
3Plug in the ring light. Then, turn on the ring light using the power button or switch.
-
4Download any necessary software. Some ring lights come with computer software or an app to control its settings. Refer to the manual to install the software.


Vary the Light Position
-
1Place your subject in a neutral position. Have your portrait subject sit or stand in a neutral way, facing the camera.
- See our guide on posing for photos for more info.
-
2Place the ring light in front of the camera. Have the camera pointing through the ring at your subject. This is a good place to start before moving the ring light.
- Check out how to set up indoor photography light.
-
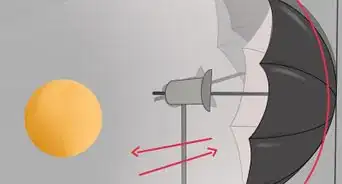
3Move the ring light. Adjust the ring light until you find the right angle for your portrait.
- Shift the light left and right to create an interesting, high contrast shot. Have the subject look in different directions too!
- Move the light up and down. This can add a sense of drama to the shot. Moving the light below the subject’s face can make the shot look haunting.
- Adjust the light closer or further from the subject. This will affect the brightness and sharpness of the light. If the shadows on the subject seem too harsh, try moving the light back.
-
4Block the light with a board. If you only want light on a portion of the subject, block part of the ring light with a dark board, like cardboard.


Adjust the Light Settings
-
1Dim the light. Dimming the light will reduce harshness without needing to move the light. You can also supplement the shot with other light sources to get the balance you’re looking for.
-
2Change the color temperature. Going in a warmer direction can be great for making an intimate, natural shot. A colder color could appear more serious and bold.
-
3Change the color. If your ring light supports other colors, you can quickly create an interesting effect by going with a less conventional color. If you have two ring lights, you can even make a cool two-tone shot. Experiment with different colors until you find your ideal portrait!


About This Article