This article was written by Stan Kats and by wikiHow staff writer, Jack Lloyd. Stan Kats is the COO and Chief Technologist for The STG IT Consulting Group in West Hollywood, California. Stan provides comprehensive technology & cybersecurity solutions to businesses through managed IT services, and for individuals through his consumer service business, Stan's Tech Garage. Stan has over 7 years of cybersecurity experience, holding senior positions in information security at General Motors, AIG, and Aramark over his career. Stan received a BA in International Relations from The University of Southern California.
The wikiHow Tech Team also followed the article's instructions and verified that they work.
This article has been viewed 1,168,379 times.
This wikiHow teaches you how to prevent unauthorized access to your wireless home network by securing your router. You can do this by editing your network's settings from the router's page. Keep in mind that router pages are often unique to the specific brand (and even model) of router that you use, meaning that you'll most likely have to poke around your router's page to find the settings that you need to change.
Steps
Using General Practices
-
1Refrain from giving out the network password. As paranoid as it may make you seem, refusing to give out your network's password lowers the chances of people who you don't trust finding out your network's password. Instead of giving out the password, offer to sign in friends and family when they visit rather than allowing them to sign into the Wi-Fi themselves.
-
2Place your router in the middle of your home. In addition to making your router coverage more balanced, doing this will limit the router's reach beyond your home's walls. This means that would-be network intruders won't be able to sit outside of your home and still connect to the network.[1]
- Your home's size and layout may make this impossible; if so, just try to keep your router well-away from windows and external doorways.
Advertisement -
3Disconnect the router when it's not in use. If you plan on leaving your home for a weekend or more, unplug your router and/or modem. This is more of a safety precaution than an active security measure, but it will prevent any potential attackers from connecting to your Internet while you're powerless to stop it.
- Even if you're going to be gone for a standard 8- or 9-hour work day, disconnecting your router will prevent any chances of your network being compromised while you're gone.
-
4Use a boring network name. It may sound stupid, but changing your clever Wi-Fi network name to a boring one will decrease the odds of it being picked out as a potential target.[2]
- For example, using the router's manufacturer and its number (e.g., "Belkin-3030") as the name will make the network stand out less than if its name is "Bill Wi the Science Fi" or something similar.
-
5Disable your computer's network sharing. Network sharing allows your computer to share files and information with other computers on the network, but it also makes your computer a weak point in the network's security. To disable network sharing:[3]
- Windows - Follow these instructions.
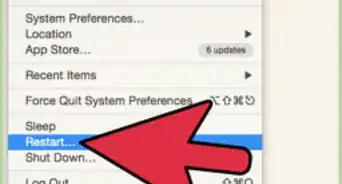
- Mac - Click the Apple menu , click System Preferences..., click Sharing, and uncheck the "File Sharing" box.[4]
-
6Use a VPN. Virtual Private Networks, or VPNs, direct your network traffic through one or more abnormal servers, hiding your network's activity in the process. VPNs don't necessarily secure your network so much as they hide it, but that's usually enough to prevent attacks as well as reduce the likelihood of future attacks.[5]
-
7Replace your router when it becomes obsolete. As with any technology, routers lose their value after a few years, especially in the security department. Since online threats are constantly updating and evolving, a brand-new router will be much better equipped for security than will a three- or four-year-old one.


Accessing Your Router's Page
-
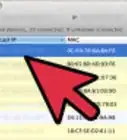
1Find your router's address. Just like a webpage, you can access your router's page in your browser by entering the router's address into the URL bar. To find your router's address:
- Windows - Open Start , click Settings , click Network & Internet, click Status, scroll down and click View your network properties, scroll down to the "Default gateway" heading, and review the numbered address to the right of the heading.
- Mac - Open the Apple menu , click System Preferences..., click Network, select your Wi-Fi network, click Advanced, click the TCP/IP tab, and review the numbered address to the right of the "Router" heading.
-
2Open a browser. In order to go to your router's page, you'll have to enter your router's numbered address into a browser's URL bar.
-
3Click the address bar. It's at the top of the browser window. This will highlight the current site's address.
-
4Type in your router's address. This is the numbered address (e.g., 192.168.1.1) that you found in your computer's settings.
-
5Press ↵ Enter. Doing so will take you to the router's page.
- It may take your computer a few seconds to connect to the router's page, especially if this is your first time doing so.
-
6Log in if necessary. Many router pages have a password-protected login page. If you've never set up a login page, the login credentials can be found in your router's manual or online documentation.
- If your router's page doesn't have a login requirement, you'll want to add one. Most routers will allow you to add a login password from the Settings section of the page.


Changing the Password
-
1Find the "Settings" section. Many router pages have a Settings or a Wireless Settings section at the top or bottom of the page.
- If you can't find a "Settings" option, look for a gear-shaped icon or a triangle-shaped icon in one of the corners of the page. Clicking such an icon will usually prompt a drop-down menu with options such as Settings.
- You may first have to click a Wireless tab or section.
-
2Click the Settings option. Doing so will take you to your router's Settings page, which is where you'll make all of the changes needed to secure your wireless home network.
-
3Look for your network's name and password. You'll usually find them on the main Settings page, but if your router's Settings page has different categories listed by tabs, you may have to click on the Security or Password tab first.
-
4Change the network name (SSID) if possible. If you see a text field with your network's name in it, change your network name to something inconspicuous (e.g., "Linksys-2018").
- You don't have to change the network name if you're using the default network name with which the router was programmed.
-
5Change the password. Find the current password that you're using, then change it to something difficult to guess. Most routers allow for up to 16 characters for a password, so use all 16 if possible.
- Your password should include both upper- and lower-case letters, numbers, and symbols. Avoid using any personal information (e.g., a pet's name) for the password.
- You may first have to enter the current password.
- Changing your password prevents people from accessing your network with the router's default password.
-
6Save your changes. There should be a Save (or similar) button at the bottom of the page, so click it to save your new router password.
- You may have to scroll down to see this option.
- If your router signs your computer out of your network at this point, connect to your network with the new password before proceeding.


Turning Off Wi-Fi Protected Setup
-
1Understand what Wi-Fi Protected Setup is. Wi-Fi Protected Setup, or WPS, is a feature that allows someone to connect to your network by selecting the network on their computer or phone and then pressing a button on the back of the router. Not all routers have this option, but the ones that do usually have it on by default.
- WPS is a huge security risk simply because literally anyone (e.g., friends, family, contractors, home intruders, etc.) can connect to your router within a few seconds by pushing a button.
-
2Re-open the Settings page if necessary. If your router signed you out or took you back to the main dashboard after you changed your password, go back to the Settings page before proceeding.
-
3Look for a "Wi-Fi Protected Setup" or "WPS" section. This is usually a tab somewhere on the Settings page, though you might find it in the Security section if applicable to your router.
-
4Disable Wi-Fi protected setup. In many cases, this is as simple as checking the "Off" or "Disabled" box next to or below the WPS heading.
- In some cases, you may have to confirm this decision or enter a password to complete the process.
-
5Save your changes. Click the Save button (or similar) to do so. This will prevent people from being able to sign into your Wi-Fi network without entering the password.


Enabling WPA2 Encryption
-
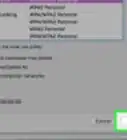
1Understand why your router's encryption matters. Router encryption typically comes in three flavors: WEP, WPA, and WPA2. While the former two—WEP and WPA—have been demonstrated to be exceptionally vulnerable to hacking and other attacks, they often remain as router defaults for encryption. WPA2, on the other hand, is usually supported but not necessarily enabled.
- WPA2 is much more secure than its WPA or WEP counterparts.
-
2Re-open the Settings page if necessary. If your router signed you out or took you back to the main dashboard after you changed your password, go back to the Settings page before proceeding.
-
3Find the "Security Type" section. You'll usually find this in the same general area of the Settings page as you found the password section, though your router may have a specific Encryption tab or section.
-
4Select "WPA2" or "WPA2 Personal" as your security. In most cases, you'll click the "Security Type" (or similar) drop-down box and then click WPA2 or WPA2 Personal in the resulting menu, but your options may vary.
-
5Select "AES" as the algorithm if possible. If given a choice for the encryption algorithm, select the AES option if possible, making sure to avoid any TKIP options.
-
6Save your changes. Click the Save button (or similar) to do so. This will encrypt your router, making it significantly more difficult for someone who doesn't have the password to hack into your network.


Enabling Your Router's Firewall
-
1Find the "Firewall" section. Unlike other security options, you'll often find your router's "Firewall" section in its own part of the router page rather than on the Settings page. The easiest way to find this section is by opening your browser's "Find" feature (press Ctrl+F on Windows or ⌘ Command+F on Mac), typing in firewall, and scrolling through the results.
- For some routers, you may find the "Firewall" section on the Settings page.
- Your router may not have a firewall included. If you can't find a "Firewall" section, check your router's manual or online documentation to determine whether or not there is a firewall feature, and where it is if so.
-
2Open the Firewall section. Click the Firewall tab or link to do so.
-
3Enable the firewall. In most cases, all you'll need to do to enable the firewall is click the "Enable" or "On" switch or checkbox—your router will take care of the rest.
- If you see any on-screen instructions appear after doing this, follow them.
-
4Save your changes. Click the Save button (or similar) to do so. This will add firewall protection to your router, making it more difficult for viruses and intruders to access your network.
-
5Exit the router's page. Now that your router is secured, you shouldn't have to worry about intruders on your home network.


Community Q&A
-
QuestionDo I need a third party to secure my network?
 Community AnswerOnly for corporation networks. Third party software and hardware is needed in order to secure the network. For a home network, the configurations from the router is just fine if made correctly.
 -
QuestionHow do I get rid of foreign addresses in my home network?
 Community AnswerSet up a strong password, ideally greater than 8 characters. Be sure to include lower and uppercase letters, symbols, and numbers. Also, try to set the security to WPA2 (never WEP). Lastly, do not hide your SSID (the name of your router) as hackers are usually interested in hidden WiFis.
 -
QuestionIf someone is connected to my WiFi, can they control it?
 Community AnswerNo, as long as they do not have your router name and password.
Warnings
- Not all router pages look alike. If you can't find on your router's page an option referenced in this article, don't panic; just look up the router's model name, number, and whatever it is that you're looking for (e.g., "firewall").⧼thumbs_response⧽


-Step-8-Version-2.webp)


-Step-30.webp)
Expert Interview
References
- ↑ https://heimdalsecurity.com/blog/home-wireless-network-security/
- ↑ https://www.lifewire.com/securing-your-wireless-network-2487649
- ↑ https://www.pcmag.com/article2/0,2817,2409751,00.asp
- ↑ https://support.apple.com/kb/PH25346?locale=en_US
- ↑ https://www.lifewire.com/how-to-hack-proof-your-wireless-router-2487654
About This Article