This article was co-authored by wikiHow staff writer, Jack Lloyd. Jack Lloyd is a Technology Writer and Editor for wikiHow. He has over two years of experience writing and editing technology-related articles. He is technology enthusiast and an English teacher.
The wikiHow Tech Team also followed the article's instructions and verified that they work.
This article has been viewed 475,589 times.
Learn more...
This wikiHow teaches you how to erase and reformat a memory card. Memory cards are often used as storage in things like cameras and tablets; in order to use your memory card with a specific operating system, you may have to format it first. Keep in mind that formatting your memory card will erase everything on it.
Steps
On Windows
-
1Check to see if your computer has a memory card slot. If you find a thin, rectangular slot into which your memory card will fit on your computer, you can insert the memory card without an adapter.
- If you do find a memory card slot on your computer, skip the next step.
-
2Plug your memory card into an adapter. Chances are high that your computer doesn't have a memory card slot, so you'll need to use a USB memory card adapter.
- Memory card adapters can usually support both standard SD cards and microSD cards, though you may need a separate one for larger, non-SD cards.
Advertisement -
3Insert your memory card. Plug your memory card's adapter into one of your computer's USB ports. If a window on your computer opens when you do this, you can close it.
- If your computer has a memory card slot, make sure that the memory card's label is face-up (gold connector side-down), then push the memory card into your computer angled side first.
-
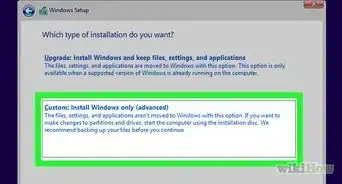
4
-
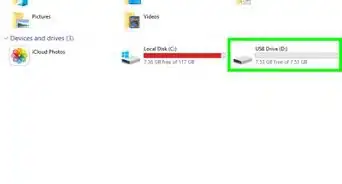
5Open This PC. Type in this pc, then click This PC at the top of the Start window.
-
6Find your memory card. You'll find your memory card listed below the "Devices and drives" heading in the middle of the This PC window.
- If you don't see anything listed below the "Devices and drives" heading, double-click the heading to expand it.
-
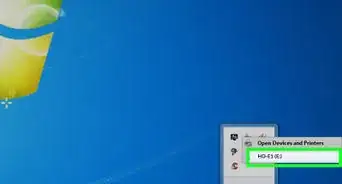
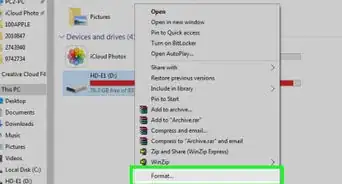
7Right-click your memory card. Doing so prompts a drop-down menu.
-
8Click Format…. It's in the middle of the drop-down menu. This will open the Format menu.
-
9Click the "File system" drop-down box. This option is in the middle of the menu. Doing so prompts a drop-down menu.
-
10Select a file system. Click one of the following options (you may also see additional options in the menu):
- FAT32 — Formats the memory card for most platforms with a 4 GB file size limit (e.g., no file on the card can be over 4 GB in size).
- NTFS — Formats the memory card for Windows only.
- exFAT — Formats the memory card for most platforms with no file size limit.
-
11Click Start. It's at the bottom of the window.
- If you want to run an in-depth formatting process that deletes and overwrites the entire memory card, uncheck the "Quick Format" box before clicking Start.
-
12Click OK when prompted. Doing so will allow Windows to begin formatting your memory card.
- The formatting process can take anywhere from a few seconds to several hours depending on the card's size, your computer's speed, and whether or not you're using the "Quick Format" option.


On Mac
-
1Check to see if your computer has a memory card slot. If you find a thin, rectangular slot into which your memory card will fit on your computer, you can insert the memory card without an adapter.
- If you do find a memory card slot on your computer, skip the next step.
-
2Plug your memory card into an adapter. Chances are high that your computer doesn't have a memory card slot, so you'll need to use a USB memory card adapter.
- If your Mac doesn't have USB 3.0 ports, you'll need to buy a USB 3.0 to USB-C adapter into which you can plug your SD card adapter as well.
- Memory card adapters can usually support both standard SD cards and microSD cards, though you may need a separate one for larger, non-SD cards.
-
3Insert your memory card. Plug your memory card's adapter into one of your computer's USB ports. If a window on your computer opens when you do this, you can close it.
- If you're using a USB-C adapter, plug it into one of your Mac's USB-C ports first, then plug the memory card adapter into the USB 3.0 port on the other end of the USB-C adapter.
- If your computer has a memory card slot, make sure that the memory card's label is face-up (gold connector side-down), then push the memory card into your computer angled side first.
-
4
-
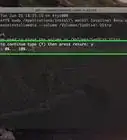
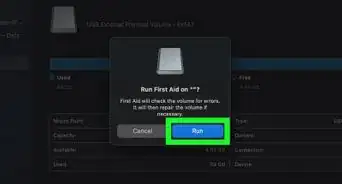
5Open Disk Utility. Type disk utility into Spotlight, then double-click Disk Utility in the resulting menu.
-
6Select your memory card. Click the name of your memory card in the upper-left side of the Disk Utility window to do so.
-
7Click Erase. This tab is at the top of the Disk Utility window. A pop-up window will appear.
-
8Click the "Format" drop-down box. It's in the middle of the window. Doing so prompts a drop-down menu.
-
9Select a format. Click one of the formats in the drop-down box:
-
MacOS Extended (Journaled) — Formats your memory card for use with macOS only.
- You'll see other MacOS Extended options here (e.g., MacOS Extended (Journaled, Encrypted)). These options are also usable on a Mac.
- MS-DOS (FAT) — Formats your memory card for FAT, which has a 4 GB file size limit but can run on most platforms.
- ExFAT — Formats your memory card for use with most platforms.
- You may see additional options in the "Format" menu as well.
-
MacOS Extended (Journaled) — Formats your memory card for use with macOS only.
-
10Click Erase. It's a blue button at the bottom of the window.
-
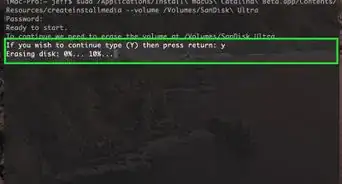
11Click Erase when prompted. This allows your Mac to begin formatting your memory card.
- The formatting process can take anywhere from a few seconds to several hours depending on the card's size and your computer's speed.


On Android
-
1Make sure your memory card is in your Android. Before you can format your Android's memory card (usually a microSD card), the card must be inserted into your Android.
-
2
-
3Tap Storage. It's near the top of the Settings menu.
- On a Samsung Galaxy, you'll tap Device maintenance instead.
-
4Select your memory card. Tap your memory card's name to do so.
- On a Samsung Galaxy, tap Storage at the bottom of the page instead.
-
5Tap ⋮. This is in the top-right corner of the screen. Tapping it prompts a drop-down menu.[1]
-
6Tap Storage settings. It's in the drop-down menu.
-
7Tap Format as internal. You'll see this near the top of the page.
- If you just want to erase the memory card, you can tap Format here instead.
- On a Samsung Galaxy, you must first tap your SD card's name. You'll then tap Format instead of Format as internal.[2]
-
8Tap ERASE & FORMAT. It's in the bottom-right corner of the screen. Doing so will erase and reformat your memory card.
- On a Samsung Galaxy, tap FORMAT here.


On a Camera
-
1Make sure that the memory card is in your camera. In order to format your memory card from within your camera's settings, you'll need to have the card in the camera.
-
2Turn on the camera. Push the camera's Power button or turn its dial to do so.
-
3Switch to Playback Mode. This is the mode in which you can scroll through your SD card's photos; in most cases, you'll press a button next to a "Play" icon to do so.
- On some cameras, you may have to rotate a dial to open the Playback Mode menu.
- If you can't figure out how to open Playback Mode, consult your camera's manual or online documentation.
-
4Press the "Menu" button. This button will vary from camera to camera, but it's usually a button marked "Menu", "Settings", "Preferences", or an abbreviation of any of those options. Doing so will bring up a pop-up menu.[3]
-
5Select the Format option. In most cases, you'll use your camera's arrows to scroll down to and select the Format entry and the press the circle in the middle of the arrows to select it.
- Again, consult your camera's manual or online documentation for explicit instructions on where to find the Format option.
-
6Select OK or Yes when prompted. Doing so will cause your camera to erase and format the SD card. Once it's done, your camera will alert you that you can proceed with using the card.


Community Q&A
-
QuestionDo I need to backup all files?
 VINDICATORCommunity AnswerKeep a backup of only those files which you feel are of the utmost importance. If you create backups of all files, you'll be wasting a truckload of useful memory.
 -
QuestionWhat do I do if my computer is not recognizing my memory card?
 Community AnswerIt is likely that is faulty or damaged. Try testing it in other computers to see if they recognize it.
 -
QuestionWill this erase everything on the card?
 Community AnswerYes, everything will be erased. Save any important files elsewhere before you format the card.
Warnings
- Formatting a memory card will erase all of the data stored on the device. Remember to backup all of your data before formatting.⧼thumbs_response⧽
- Formatting is irreversible, so be sure it is what you want to do before beginning the steps above.⧼thumbs_response⧽


References
About This Article
1. Plug the card into a slot or a USB adapter.
2. Open the Windows search bar.
3. Type "this pc" and click This PC.
4. Right-click the memory card.
5. Click Format.
6. Select a file system.
7. Click Start.
8. Click OK.