This article was co-authored by wikiHow staff writer, Nicole Levine, MFA. Nicole Levine is a Technology Writer and Editor for wikiHow. She has more than 20 years of experience creating technical documentation and leading support teams at major web hosting and software companies. Nicole also holds an MFA in Creative Writing from Portland State University and teaches composition, fiction-writing, and zine-making at various institutions.
The wikiHow Tech Team also followed the article's instructions and verified that they work.
This article has been viewed 87,828 times.
Learn more...
If you need to update the BIOS in your PC laptop, you're in luck—flashing the BIOS (or UEFI, in most newer laptops) is easier than ever. On most modern laptops, you can quickly download a BIOS flash utility that makes updating the BIOS or UEFI a breeze. But even if your model requires you to use a USB flash drive for BIOS updates, the process is still pretty simple. This wikiHow article will walk you through the safest way to flash your BIOS or UEFI on any Windows laptop.
Steps
Preparing to Flash
-
1Make sure you really need to flash the BIOS. Updating the BIOS (or UEFI) is simple, but not without risks—if anything goes wrong during the flashing process, you could render your computer unbootable. In most cases, you should only update the BIOS if a BIOS update is recommended by your manufacturer to resolve a specific problem, such as a security vulnerability or a hardware/compatibility issue.
- If your laptop manufacturer has a built-in support or driver update program (such as Dell Update or HP Support Assistant), run the update utility to check for required updates. If a BIOS update is not recommended, you likely don't need to update the BIOS.
- Some manufactures, including Lenovo, bundle certain models' required BIOS updates with Windows Update. Try running Windows Update to see if a BIOS update is available. If it is, just plug your laptop into a reliable power source, disable BitLocker if running, and follow the on-screen instructions to install the update.
-
2Check your manufacturer's BIOS update recommendations. The process to update the BIOS of each laptop is different, so you'll want to check your manufacturer's recommendations before you update.
- Some laptop manufacturers, including Dell and HP, offer BIOS updates along with regular updates using your built-in support app. If not (or you prefer a manual download), you can download the BIOS flash file manually from your laptop manufacturers' website.
- Depending on your model, you may be able to start the BIOS flash process from within Windows. If you can't boot into Windows (or there's no Windows-based app that can perform a BIOS flash for your model), you can add the BIOS to a USB flash drive.
- If your laptop has a UEFI instead of a BIOS, you may be able to update by booting into the UEFI and looking for an "Update" or "Download" option. This option requires internet access.
Advertisement -
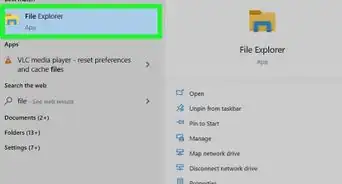
3Find your exact laptop model and BIOS version. Because each laptop's BIOS varies, you'll need to make sure you know the exact make and model of your computer. You'll also want to check the current BIOS version so you don't inadvertently downgrade or flash the same version when you're trying to upgrade. To find your specs:
- Press Windows key + S.
- Type system.
- Click System Information.
- You'll find the model next to the "System Manufacturer" and "System Model" values.
- Find the BIOS version next to "BIOS Version/Date."
-
4Disable BitLocker drive encryption. If you're using BitLocker, you'll have to disable it before you continue. Otherwise, BitLocker may not recognize your key the next time you start your laptop.[1] To disable BitLocker:
- Press Windows key + S.
- Type bitlocker.
- Click Manage BitLocker.
- Click Suspend protection.
- Click Yes.
- Make sure you have your recovery key available, as you may need it to turn BitLocker back on later.
-
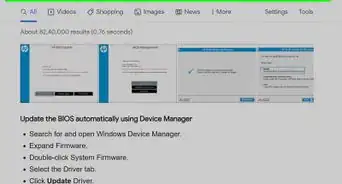
5Download the BIOS update from your laptop manufacturer. Visit your manufacturer's support site and locate the drivers and downloads for your particular model. You'll usually find BIOS updates in a section called "BIOS" or "firmware." Double-check the version to make sure you're downloading the latest version.
- Acer: https://www.acer.com/ac/en/US/content/drivers
- Asus: https://www.asus.com/support/Download-Center
- Dell: https://www.dell.com/support/home/en-us/?app=drivers
- EVOO: https://evooproducts.com
- Gateway: https://www.gateway.com/gw/en/US/content/drivers-downloads
- HP: https://support.hp.com/us-en/drivers
- Lenovo: https://pcsupport.lenovo.com/us/en
- LG: https://www.lg.com/us/support/software-firmware-drivers
- Microsoft Surface: https://support.microsoft.com/en-us/surface/download-drivers-and-firmware-for-surface-09bb2e09-2a4b-cb69-0951-078a7739e120
- MSI: https://us.msi.com/support/download
- Razer: https://drivers.razersupport.com/index.php
- Samsung: https://www.samsung.com/us/support/downloads
- Toshiba/Dynabook: https://support.dynabook.com/drivers
-
6Unzip the downloaded file (if it's compressed). If the file you downloaded ends with .ZIP, you'll need to decompress the file. Just right-click the downloaded file, select Extract All, select a location, and then click Extract.
-
7Plug your laptop into a reliable power source. You should not attempt to flash the BIOS unless your laptop is plugged in. Flashing the BIOS is usually fairly fast, but any hiccups may cause the flash process to take longer. If you lose power during the flash, you can destroy the BIOS.
-
8Unplug any peripherals or external hardware. If you have any devices connected to your laptop's ports, including printers, smartphones, hubs, or dongles, unplug them before you flash the BIOS.
-
9Close all open programs. The fewer programs you have open right now, the better. Save your work and close all open programs before you continue.
- Most manufacturers recommend disabling your antivirus software before you launch a BIOS flash utility. If you're using Windows Defender, you shouldn't have to do this.


Flashing the BIOS
-
1Double-click the downloaded BIOS file. In most cases, your BIOS download will contain an executable program that will start the installation. You'll typically have to agree to the terms to start the utility.
-
2Follow the on-screen instructions to begin the flash process. Most modern BIOS updates will walk you through restarting our PC into the BIOS flash utility, which will instantly flash the BIOS for you. This is the easiest scenario, and also the most common on recent laptops. However, the process varies by PC, so here are some other common scenarios:
- The program may walk you through the process of creating a bootable USB drive that you can use to flash the BIOS. If prompted, insert a blank USB drive to create a bootable drive, and then follow the on-screen instructions to boot the PC from the drive.
- If there's no application that starts the process for you, you'll need to copy the BIOS file directly to a formatted USB flash drive, and then restart the PC into the BIOS.[2] From there, select an option called BIOS Flash Update (or similar—you may need to browse around in the menus to find the update option). Then, select your flash drive, followed by the file you copied to it, and choose the Flash, Start Easy Flash, or Flash Upgrade option (the name will vary) to start the flash.
-
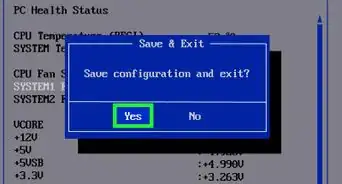
3Follow the on-screen instructions to reboot when the flash is complete. The flash usually takes a few minutes but can take up to a half hour in some situations. When the flash is complete, your PC may reboot on its own, or you may be prompted to choose a Yes or OK option to reboot it yourself.
- Whatever you do, do not remove the laptop from its power source or attempt to stop the flash once it begins. This can corrupt the firmware and leave your PC unbootable.
-
4Resume BitLocker protection once your PC reboots. If you disabled BitLocker, you can reenable it easily:
- Press Windows key + S.
- Type bitlocker.
- Click Manage BitLocker.
- Click Resume protection.
- Click Yes and follow the on-screen instructions.


Community Q&A
-
QuestionHow do I fix a computer that says there's no operating system?
 Community AnswerMake sure the HDD or SSD is connected, or take your laptop to its support.
 -
QuestionI have this RLG model MGS 1 laptop. I can't install Windows 7 32- or 64-bit , but I can use that same OS do installation on other laptops. The only OS its support is Win 8.1 with no sound. What can I do?
 Community AnswerTry going to boot setup and change the boot type from UEFI to legacy boot before installing the OS.
 -
QuestionHow can I flash a laptop when I have forgotten the password?
 09WIKIHOWuser1Community AnswerWhen you use the laptop next, click the "Forgot password" button and type in the last password you remember. This changes the password to the one you remember and then you can flash the laptop BIOS.


References
About This Article