X
This article was co-authored by wikiHow staff writer, Jack Lloyd. Jack Lloyd is a Technology Writer and Editor for wikiHow. He has over two years of experience writing and editing technology-related articles. He is technology enthusiast and an English teacher.
The wikiHow Tech Team also followed the article's instructions and verified that they work.
This article has been viewed 344,749 times.
Learn more...
This wikiHow teaches you how to make an Apple ID account without having to enter any payment information. You can do this either on the Apple ID website, on iTunes, or on your iPhone or iPad. Apple ID accounts are used to log into Apple apps, phones, tablets, and computers.
Steps
Method 1
Method 1 of 3:
Apple ID Website
-
1Open the Apple ID site. Go to https://appleid.apple.com/. This will open the login page.
- If this opens a current Apple ID page, log out before continuing.
-
2Click Create Your Apple ID. It's a link in the upper-right corner of the page. Doing so will open the Apple ID creation form.Advertisement
-
3Enter your Apple ID information. Fill out the following fields:
- first name and last name - Enter your first and last name.
- birthday - Enter your birthday in "mm/dd/yyyy" format.
- name@example.com - Type in the email address that you want to use for your Apple ID. You can't use an email address that's already being used as an Apple ID.
- password and confirm password - Enter the password that you want to use for your Apple ID.
-
4Select security questions and answers. Click a Security Question drop-down box, click a question in the drop-down menu, and then type an answer into the "answer" text field below the box.
- You'll need to do this for the remaining two security questions as well.
-
5Scroll down and enter the security code. Type the characters displayed in the grey box into the text field to the right of the box.
- You can click New Code to generate a different security code if you can't read the first one.
-
6Click Continue. It's at the bottom of the page.
-
7Retrieve your email address verification code. Open the email address that you set as your Apple ID, open the "Verify your Apple ID email address" email from Apple, and note the six-digit code in the middle of the email.
-
8Enter the verification code. Type the six-digit code into the verification window on the Apple ID website.
- Make sure that you don't include any spaces.
-
9Click Continue. It's in the bottom-right corner of the verification window. As long as the code that you enter matches the one sent to your email address, doing so will create your Apple ID account.


Advertisement
Method 2
Method 2 of 3:
iPhone
-
1
-
2Open the App Store. It's the blue app with a white "A" on it. You'll be able to create a brand-new Apple ID from here.[1]
-
3Tap Apps. This tab is at the bottom of the screen.
-
4Tap GET next to a free app. Doing so will prompt a pop-up window.
-
5Tap Create New Apple ID. It's in the pop-up window. The Apple ID creation form will open.
-
6Enter your Apple ID's information. Fill out the following fields:
- Email - Enter the email address that you want to use for your Apple ID.
- Password - Type in a password for your Apple ID account.
- Verify - Re-enter the password.
- Tap the switch next to Agree to Terms and Conditions to ON
- Tap Next in the top-right corner of the screen.
-
7Enter your personal information. Fill out the following fields:
- Title - Your title (e.g., "Mr." or "Ms.").
- First Name - Your first name.
- Last Name - Your last name.
- Birthday - Your date of birth in "mm/dd/yyyy" format.
-
8Select security questions and answers. Tap a Question box, tap a question to use, and then tap the "Answer" box and enter your answer.
- You'll need to do this for all three security questions.
-
9Tap Next. It's in the top-right corner of the screen.
-
10Tap None. This option is in the "PAYMENT METHOD" group of options. Selecting it will negate the need for a payment method.
-
11Enter your billing information. This will include your first and last name, your address, your country, and your phone number.
-
12Tap Next.
-
13Retrieve your email address verification code. Open the email address that you set as your Apple ID, open the "Verify your Apple ID email address" email from Apple, and note the five-digit code in the middle of the email.
-
14Enter your code. Tap the "Code" text field, then type in the five-digit code from your email.
-
15Tap Verify. It's in the top-right corner of the screen.
-
16Tap Continue when prompted. As long as the code you entered matches the code that you received in your email, this will sign you into your new Apple ID on your iPhone or iPad.


Advertisement
Method 3
Method 3 of 3:
iTunes
-
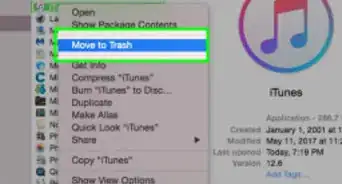
1Open iTunes on a computer. This is the white icon with a multicolored musical note on it.
- If prompted to update, click Download iTunes, wait for the installation to complete, and restart your computer if prompted before continuing.
-
2Sign out of your current Apple ID. Skip this step if you're not signed into an Apple ID on your iTunes program. To sign out:
- Click Account at the top of the screen (Mac) or page (Windows).
- Click Sign Out... in the drop-down menu.
-
3Click the Store tab. It's near the top of the iTunes window.
-
4Click the Music box. This drop-down box with a note on it is in the upper-left side of the iTunes window. Doing so prompts a drop-down menu.
-
5Click TV Shows. It's in the Music drop-down menu. Clicking this will switch the store's display over to movies and TV.
-
6Click the Free TV Episodes link. It's a grey link on the right-hand side of the iTunes page. Doing so opens a list of TV shows that have free episodes.
-
7Select a TV show. Click a show with a free episode. It doesn't matter which show you choose here, since all of them have at least one free episode.
-
8Click Get. It's on the far-right side of the free episode's name. Doing so prompts a pop-up window.
-
9Click Create New Apple ID. You'll see this option in the bottom-left corner of the pop-up window.
-
10Enter your Apple ID information. Fill out the following fields:
- Email - Type in the email address that you want to use for your Apple ID. You can't use an existing Apple ID's email address.
- Password - Enter the password that you want to use for your account.
- Verify - Re-enter the password that you entered above.
-
11Check the "By clicking Continue" box. It's near the bottom of the page.
-
12Click Continue. You'll find this button at the bottom of the page.
-
13Enter your personal information. This includes the following information:
- Title
- First name
- Last name
- Birthday
-
14Add security questions and answers. Click a Security Question drop-down box, click a question in the drop-down menu, and then type an answer into the text field below the box.
- You'll need to fill out all three of these before proceeding.
-
15Click Continue. This option is at the bottom of the page.
-
16Click None. It's on the far-right side of the list of payment options that's near the top of the page. If you don't see the None option, you may be unable to create an Apple ID without a payment method for one of the following reasons:[2]
- You're not in the correct country - If your current country is different than the country to which your iTunes program is registered, you won't see None.
- You didn't sign out of iTunes - If you forgot to sign out of your Apple ID account, you won't be able to select None.
- You have an unpaid balance on iTunes - You'll need to enter a payment method to proceed if you have a purchased item pending on your iTunes program.
-
17Enter your billing information. This includes the following information:
- Name
- Address
- Phone number
-
18Click Continue. It's at the bottom of the page.
-
19Retrieve your email address verification code. Open the email address that you set as your Apple ID, open the "Verify your Apple ID email address" email from Apple, and note the five-digit code in the middle of the email.
-
20Enter the email verification code. Type the five-digit code into the field in the middle of iTunes.
-
21Click Verify. It's at the bottom of the page. A pop-up window will appear.
-
22Enter your Apple ID password when prompted. As long as the verification code was correct, you'll be prompted to enter the password for your Apple ID, after which point you will be signed into your Apple ID account.


Advertisement
Community Q&A
-
QuestionWhen creating an ID what is meant by postal code?
 Community AnswerA postal code is a code comprised of several numbers and letters which identifies which postal zone you are in so that you can receive mail. Also known as a post code or ZIP code.
 -
QuestionWhere can I find the no credit card option to create my Apple ID?
 Community AnswerThere should be a "none" option at the bottom of the page. Remember that when you are first creating an Apple ID, you will be asked for credit card information, but you can remove your information after signing into the App Store.
 -
QuestionWhy can't I create an Apple ID on my iPhone 4S?Community AnswerCreate one on the computer (if possible), then log in on your iPhone 4S.
Advertisement
Warnings
- You cannot download apps or music that require payment without having a payment method registered to your Apple ID.⧼thumbs_response⧽
Advertisement


About This Article
Jack Lloyd
wikiHow Technology Writer
This article was co-authored by wikiHow staff writer, Jack Lloyd. Jack Lloyd is a Technology Writer and Editor for wikiHow. He has over two years of experience writing and editing technology-related articles. He is technology enthusiast and an English teacher. This article has been viewed 344,749 times.
How helpful is this?
Co-authors: 15
Updated: July 28, 2022
Views: 344,749
Categories: Website Application Instructions
Advertisement