This article was written by Stan Kats and by wikiHow staff writer, Jack Lloyd. Stan Kats is a Professional Technologist and the COO and Chief Technologist for The STG IT Consulting Group in West Hollywood, California. Stan provides comprehensive technology solutions to businesses through managed IT services, and for individuals through his consumer service business, Stan's Tech Garage. Stan holds a BA in International Relations from The University of Southern California. He began his career working in the Fortune 500 IT world. Stan founded his companies to offer an enterprise-level of expertise for small businesses and individuals.
The wikiHow Tech Team also followed the article's instructions and verified that they work.
This article has been viewed 453,992 times.
This wikiHow teaches you how to set a static IP address for your computer within your Wi-Fi network. A static IP address won't change when your router or computer reboots, making it useful for remote operation and website hosting. Static IP addresses can also prevent connection issues on routers to which several items are connected.
Steps
Finding Your Addresses on Windows
-
1
-
2Advertisement
-
3Click Network & Internet. It's in the middle of the Settings window.[1]
-
4Click View your network properties. This link is near the bottom of the page.
- If you don't see this link, scroll down. You may also need to click the About tab in the upper-left corner of the window.
-
5Scroll down to the "Wi-Fi" heading. It's near the bottom of the page. You'll see a list of information about your Wi-Fi connection here.
-
6Note the "Default gateway" address. The address to the right of the "Default gateway" heading is the address you'll enter in a web browser to access your router's page.
-
7Press ⊞ Win+X. Doing so will open the advanced Start menu.
- You can also right-click the Start icon in the lower-left corner of the screen.
-
8Click System. It's in the advanced Start menu. Doing so opens a window with your Windows computer's specifications.
-
9Note your computer's name. This is a name (typically a jumble of letters and numbers) to the right of the "Device name" heading in the middle of the page. At this point, you're ready to proceed with setting a static IP address.
-Address-on-a-Computer-Step-1-Version-4.jpg)

-Address-on-a-Computer-Step-2-Version-5.jpg)

-Address-on-a-Computer-Step-3-Version-5.jpg)

-Address-on-a-Computer-Step-4-Version-5.jpg)
-Address-on-a-Computer-Step-5-Version-5.jpg)
-Address-on-a-Computer-Step-6-Version-5.jpg)
-Address-on-a-Computer-Step-7-Version-5.jpg)
-Address-on-a-Computer-Step-8-Version-5.jpg)
-Address-on-a-Computer-Step-9-Version-5.jpg)
Finding Your Addresses on Mac
-
1
-
2Click System Preferences…. You'll find this option in the drop-down menu.[2]
-
3Click Network. It's in the System Preferences window.[3]
-
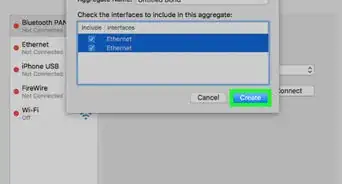
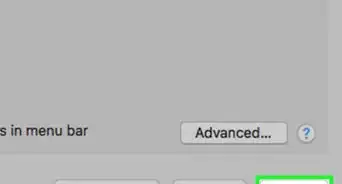
4Click Advanced…. This option is in the lower-right side of the window. Doing so opens a new window.
-
5Click the TCP/IP tab. It's at the top of the window.
-
6Note the "Router" address. The address to the right of the "Router" heading (usually some variation of "192.168.X.X" or "10.0.0.X") is the address you'll use to access your router's page.
-
7Find your Mac's name. You'll need to know the name of your Mac in order to find your Mac on your router's page; once you do this, you'll be ready to set a static IP address:
- Close the Advanced window.
- Click ⋮⋮⋮⋮ in the upper-left side of System Preferences.
- Click Sharing.
- Note the "Computer Name" entry at the top of the window.
-Address-on-a-Computer-Step-10-Version-5.jpg)

-Address-on-a-Computer-Step-11-Version-5.jpg)
-Address-on-a-Computer-Step-12-Version-2.jpg)
-Address-on-a-Computer-Step-13.jpg)
-Address-on-a-Computer-Step-14.jpg)
-Address-on-a-Computer-Step-15.jpg)
-Address-on-a-Computer-Step-16.jpg)
Setting a Static IP Address
-
1
-
2Enter your router's address. In the address bar at the top of the browser window, type in the address you retrieved for your router, then press ↵ Enter. This will open your router's page.
-
3Log in if necessary. If prompted for a username and/or password, type in the required credentials and press ↵ Enter.
- If you didn't set a username and/or password, you'll probably need to use the factory credentials found either in the router's manual or on the router itself.
-
4Find the list of connected Internet items. Since each router's page will vary in terms of item placement and titling, you may have to poke around the router page or menu to find this section.
- For example, some routers place the Connected Devices button on the main page, while other router pages require you to click Settings or Advanced to see the list of connected items.
-
5Find your computer's name. Look for the name that you found earlier in the list of connected items.
-
6Click the Reserve button. You'll probably find this next to (or below) the computer's name and address, though you may first have to click your computer's name to do so.
- Again, your router's page may show a different option here.
- If prompted to confirm your choice or specify an unused IP address, do so before proceeding.
-
7Click Save or Apply. It's usually at the bottom of the page. This will save your changes and apply your new IP address to the computer.
- You may need to restart your computer for the changes to take place, and the router may reboot as well.
-Address-on-a-Computer-Step-17.jpg)

-Address-on-a-Computer-Step-18.jpg)
-Address-on-a-Computer-Step-19.jpg)
-Address-on-a-Computer-Step-20.jpg)
-Address-on-a-Computer-Step-21.jpg)
-Address-on-a-Computer-Step-22.jpg)
-Address-on-a-Computer-Step-23.jpg)
Expert Q&A
-
QuestionHow do I manually set a static IP address in Windows?
 Stan KatsStan Kats is a Professional Technologist and the COO and Chief Technologist for The STG IT Consulting Group in West Hollywood, California. Stan provides comprehensive technology solutions to businesses through managed IT services, and for individuals through his consumer service business, Stan's Tech Garage. Stan holds a BA in International Relations from The University of Southern California. He began his career working in the Fortune 500 IT world. Stan founded his companies to offer an enterprise-level of expertise for small businesses and individuals.
Professional TechnologistGo to the TCP IP settings, which are found under the networking settings. Then, in the IPv4 section, specify the static IP address that you need. -
QuestionHow do I assign a static IP address on Mac?Stan KatsStan Kats is a Professional Technologist and the COO and Chief Technologist for The STG IT Consulting Group in West Hollywood, California. Stan provides comprehensive technology solutions to businesses through managed IT services, and for individuals through his consumer service business, Stan's Tech Garage. Stan holds a BA in International Relations from The University of Southern California. He began his career working in the Fortune 500 IT world. Stan founded his companies to offer an enterprise-level of expertise for small businesses and individuals.
Professional TechnologistGo to the "networking" section in your system preferences. In the IPv4 section, state the static IP address. -
QuestionHow do I configure an IP address?
 Community AnswerRight-click on the network adapter you want to assign an IP address and click Properties. Highlight Internet Protocol Version 4 (TCP/IPv4), then click the Properties button. Now change the IP, Subnet mask, Default Gateway, and DNS Server addresses. When you're finished, click OK.
Warnings
- Attempting to use the IP address of another connected item will either result in an error or kick the item off of the network.⧼thumbs_response⧽


References
About This Article