This article was co-authored by wikiHow staff writer, Travis Boylls. Travis Boylls is a Technology Writer and Editor for wikiHow. Travis has experience writing technology-related articles, providing software customer service, and in graphic design. He specializes in Windows, macOS, Android, iOS, and Linux platforms. He studied graphic design at Pikes Peak Community College.
The wikiHow Tech Team also followed the article's instructions and verified that they work.
This article has been viewed 2,635,795 times.
Learn more...
Are you working with an image that's too large or small? Whether you need to increase, decrease, or specify the exact number of kilobytes (KB) of an image, we have you covered! This wikiHow article will teach you easy ways to make a picture larger or smaller by changing its dimensions and file size.
Steps
Using LunaPic
-
1Go to https://www140.lunapic.com/editor/ in your browser. LunaPic is a free, online photo editor with which you can increase or decrease an image's size by kilobyte.
-
2Click Quick Upload. It's on the right below the image banner on the right.Advertisement
-
3Click Choose file. This grey button is in the middle of the page. Clicking it opens a file browser window.
-
4Click the photo that you want to resize. Use the file browser window to locate a photo you want to resize. Then click it to select it. You may first have to select the photo's folder on the left side of the window.
-
5Click Open. It's in the bottom-right corner of the window. The photo will be uploaded to the LunaPic site.
-
6Click Set File Size. This link is in the group of options above the photo.
-
7Type a file size in kBs. Double-click the white file size text field above the folder to select its contents, then type the kB size you want the photo to be.
- If you need your file to be larger, you'll type in a number that's larger than the number currently listed here (and vice versa).
-
8Click Resize File. It's a grey button to the right of the kilobyte number field. Your photo will be resized, both in file size and in physical dimensions.
-
9Click Save. It's below the image on the left size. This downloads the newly resized photo.
- You may have to scroll down to see Save.
- Alternatively, you can click "Facebook", "Imgur", "Pinterest", "Google Photos", or "Twitter" to share the image on one of these platforms.


On Windows
-
1Click the Windows Start menu . It's the button with the Windows logo in the bottom-left corner of the screen.
-
2Type in paint. Doing so searches your computer for the Paint program.
-
3Click Paint. It's at the top of the Start window. This will open the Paint program.
-
4Open your image in Paint. Use the following steps to open an image in Paint:
- Click File in the upper-left corner of the window
- Click Open to open a file browser.
- Click a photo you want to resize.
- Click Open in the lower-right corner of the file browser.
-
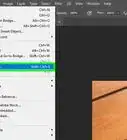
5Click on Resize. It's the rectangular icon in the "Image" section of the toolbar at the top of the window. This will open the "Resize and Skew" dialog box.
-
6
-
7Set a new size for the image. Use one of the following options to resize the image.
- Check the Percentage box. Then type a number percentage in either the "Vertical" or "Horizontal" field.
- Check the Pixels box. Then type a specific pixel number (e.g., 800 x 600) in the "Vertical" or "Horizontal" field.
-
8Click OK. It's in the bottom-right corner of the window. Your dimensions will be applied.
-
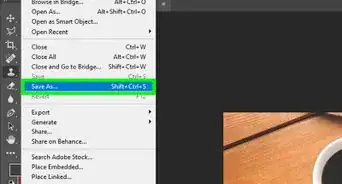
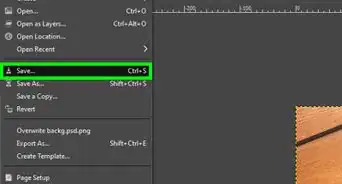
9Save your file. Use the following steps to save the image:
- Click File in the upper-left corner.
- Click Save as in the pop-out menu.
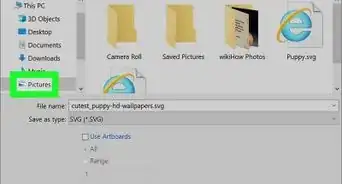
- Type a name for the image in the "File name" text box.
- Click Save as type (optional)
- Select one of the following file types:
- GIF - best for web graphics. Small files.
- BMP - best for web graphics. Compact files.
- JPEG - best for photos on the web. Compact files.
- PNG - best for graphics and small Web files. Larger files.
- TIFF - best for editing and storing images. Larger files.
- Click Save.


On Mac
-
1
-
2Navigate to the photo you want to resize. Use the Finder to open the folder containing the photo you want to resize. You can use the sidebar on the left to open common folders on your Mac.
-
3Open the image you want to resize in Preview. Preview is the default image viewing app on Mac. You can normally open an image in Preview by double-clicking it. If Preview is not your default image viewer, use the following steps to open the image in Preview.
- Right-click on the image. If you are using a Magic Mouse or trackpad, click with two fingers.
- Click File.
- Click Open With.
- Click Preview.app.
-
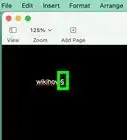
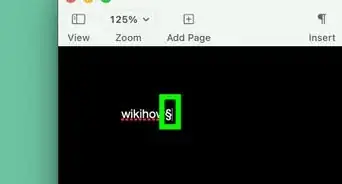
4Click Tools. It's in the menu bar at the top of the screen.
-
5Click Adjust Size…. You'll find this in the Tools drop-down menu.
-
6Select a unit of measurement. Use the drop-down menu next to the "Height" and "Width" boxes to select a percentage. The default unit is "Percentage". You can also select "pixels". "inches", "cm", and more.
-
7Type a new number in the "Width" or "Height" boxes. You can use either one of these boxes to resize the image. If you selected "Percentage" type what percent you want the new image size to be. If you selected "pixels", or "inches" or another unit, type however many units you want to new image size to be in the boxes.
- Ensure that the checkbox next to "Scale proportionally" is checked so that the image is not distorted when you resize it.
- Alternatively, you can click the drop-down menu next to "Fit into" and select an image size to quickly resize the image.
-
8Click OK. It's in the lower-right corner of the "Image Dimensions" window. This applies your changes to the photo.
-
9Click File. It's in the menu bar in the upper-right corner.
-
10Click Save. It's in the File drop-down menu. This will save your file on your computer using the dimensions that you selected.
- To save the image in a different format, click Export… in the File drop-down menu, then click the "Format" drop-down menu and select one of the following image formats:
- JPEG - best for photos on the web. Compact files.
- JPEG-2000 - high quality, good compression. Smaller files.
- OpenEXR - best used to compress video files.
- PNG - best for graphics and small Web files. Larger files.
- TIFF - best for editing and storing images. Larger files.
- To save the image in a different format, click Export… in the File drop-down menu, then click the "Format" drop-down menu and select one of the following image formats:


Using iPhone
-
1Download the free Resize Image app from the App Store . Use the following steps to download Resize Image:
- Open the App Store.
- Tap Search
- Tap the search bar.
- Type in resize image
- Tap Search in the keyboard.
- Scroll down to the "Resize Image" app.
- Tap GET next to "Resize Image".
- Enter your Touch ID, or tap Install and enter your Apple ID when prompted.
- Wait for the app to install.
-
2Open Resize Image. Tap OPEN in the App Store, or tap the Resize Image app icon on your home screen. It has an icon of a photo of a tree and clouds.
- If you are asked if you want to allow Resize Image to send you notifications, tap Allow or Don't allow,
-
3Tap the "Photos" icon. It's in the bottom-left corner of the screen.
-
4Tap Photo Library when prompted. Doing so will open a window with your phone's photos in it.
-
5Tap a photo album. This displays a list of photos in the album.
-
6Tap a photo. Doing so will open it in the main Resize Image window.
-
7Tap the grey image with slider bars. This is the Settings icon. It's the second button at the bottom of the screen, just right of the "Photos" icon. A window will appear in the middle of the screen.
-
8Resize the image. Drag the "Width" or "Height" slider left to lower the image's size, or drag one of these sliders right to increase the image's size.
- Check that the "Keep aspect ratio" switch is green, to ensure that the image stays proportional when you adjust the image size.
- Alternatively, you can tap one of the "Standard Sizes" tabs at the top of the window to quickly resize the image.
-
9Tap Resize. It's at the bottom of the window. Doing so will resize your photo.
- If prompted that resizing your photo will cause the app to crash, just tap Yes.
-
10Tap the icon that resembles a floppy disk. This is the "Save" icon. It's the fourth button at the bottom of the screen.
-
11Tap the icon with a sunflower. Your resized photo will be saved to your iPhone's Camera Roll.
-
12Tap Ok. This closes the window in the center of the screen.


On Android
-
1Download the free Photo Resizer HD app from the Google Play Store . Use the following steps to download the Photo Resizer app.
- Open your Android's Google Play Store.
- Tap the search bar.
- Type in photo resizer hd.
- Tap Photo Resizer HD.
- Tap INSTALL.
- Tap ACCEPT.
- Wait for the app to install.
-
2Open Photo Resizer HD. Tap OPEN in the Google Play Store, or tap the Photo Resizer HD icon on your home screen. It has a blue icon with four arrows pointing in.
-
3Tap Gallery. It's in the middle of the screen. This will open your Photo Gallery app.
-
4Tap the photo that you want to resize. It will open in the Photo Resizer HD app.
-
5Tap the icon with a diagonal arrow. This is the Resize icon. This icon opens the resize menu.
-
6Tap Custom. It's at the top of the menu.
- Alternatively, you can tap one of the image dimensions in the list to quickly resize the image.
-
7Type a new image size number in the text field. There are two text fields for the horizontal and vertical dimensions. You can use either to edit the photo size. Tap the text field and then type the number you want for the image size. For example, if the text field has "300" written in it, you would replace it with "150" to halve the image's file size. You cloud also replace it with "600" to double the file size.
- Check that the checkbox next to "Keep aspect ratio" is checked to ensure that the image size stays proportional as you resize the image.
-
8Tap OK. It's at the bottom of the menu. This will apply your changes to the photo.
-
9Tap the icon that resembles a floppy disk. This floppy disk-shaped icon is in the top-right corner of the screen. This saves the photo to your Android's Photo Gallery using your new dimensions.


Community Q&A
-
QuestionWhich app can I use for this?
 Community AnswerTo decrease or increase size, decrease or increase the resolution of the image in a program like Photoshop or GIMP.
 -
QuestionHow can I reduce the size of a 2 MB image to 30 KB without compromising on the quality of the photo?
 JLloydCommunity AnswerUnfortunately, what you're trying to do isn't possible (at least, not in this dimension!). Lowering an image's size inherently means that you're lowering the picture's quality.
 -
QuestionCan I increase a 103kb size photo to 1mb to get it printed on an a canvas?
 Community AnswerIncrease the resolution in a program such as Photoshop or GIMP to make it fit.
Warnings
- Resizing an image will always change the image's resolution and perceptible quality. You cannot resize an image without changing its quality.⧼thumbs_response⧽


About This Article

To change the size of an image in kilobytes, or KB, try LunaPic, which is a free online photo editor that allows you to increase or decrease an image’s size. Start by clicking “Quick upload” and “Choose file” to open a file browser window. Once you access your photos, click on the one that you want to resize. After you click “Open” to select your photo, tap “Set file size” and type the KB size you want the photo to be. After picking the new size, tap “Resize file” and “Save” to finish the job. To learn how to resize a photo on your iPhone, keep reading!