This article was co-authored by wikiHow staff writer, Nicole Levine, MFA. Nicole Levine is a Technology Writer and Editor for wikiHow. She has more than 20 years of experience creating technical documentation and leading support teams at major web hosting and software companies. Nicole also holds an MFA in Creative Writing from Portland State University and teaches composition, fiction-writing, and zine-making at various institutions.
wikiHow marks an article as reader-approved once it receives enough positive feedback. This article received 12 testimonials and 93% of readers who voted found it helpful, earning it our reader-approved status.
This article has been viewed 1,169,611 times.
Learn more...
Resizing an image on your Mac is simple with Preview, a free image utility that comes pre-installed on OS X. Preview helps you crop images easily and adjust their dimensions without having to install additional software. Learn how to gain control over the size of your photos, remove unwanted areas, and adjust the resolution for various uses with Preview.
Steps
Resizing an Image in Preview
-
1Navigate to the image you wish to resize. This method will help you change the size of the entire image. If you want to crop out a part of the image to resize, see Cropping an Image in Preview.
- To search for an image name or tag, open Finder, then click the magnifying glass icon in the menu bar. Type in your search criteria and press ⏎ Return to show your results.
-
2Drag the image to the Preview icon in the Dock or Finder.[1] This will open the image in Preview.
- You can also right-click the image and select “Open With” and then “Preview.”
Advertisement -
3Click the edit button (a square with a pencil) to switch to Edit Mode. This will launch a new toolbar at the top of the Preview window.
-
4Click the “Tools” menu and select “Adjust Size”.
-
5Change the resolution. Resolution is measured in pixels per inch (also called “dots per inch” or “dpi”). If you plan to print your image or simply want it to retain as much of its quality as possible, consider raising the resolution.
- If your image is for the web or for use in an app like Facebook, the default (72) is fine. If you start with a higher resolution, reducing it will give you a smaller file size.
- If you plan to print your image in a high-quality format, such as for advertisements or other forms of business communications, set it to at least 600. Note: this will raise the size of the file significantly.
- To print glossy photos, 300 will suffice. The file size will be much larger than that of a default 72 dpi image, but the final quality will be worth it.
-
6Type your desired width and height in the designated boxes. The larger the width and height, the larger the file size.
- It may be helpful to change the unit of measurement to best visualize your image. For example, you can change it to “cm” if you want to specify the width in centimeters. Click the drop-down right next to both Width and Height to make your selection.
- If you would prefer, you can choose the size by selecting a percentage of the current size. Select “Scale,” then choose a percentage from the drop-down.
-
7Place a check next to “Scale proportionally” to avoid warping the image.[2] This is optional, but you can use this option to make sure that setting the width also modifies the height. This ensures that the image retains its original proportions.
-
8Click OK to view the image at its new size. If you are dissatisfied with the changes, press ⌘ Cmd+Z to undo them.
-
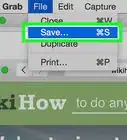
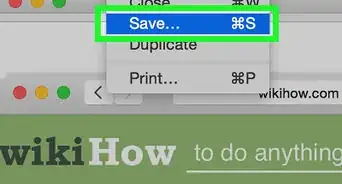
9Press ⌘ Command+S to save your changes. Once you’re done resizing the image, remember to save your work.
- If you want to save this newly resized image as a brand new file, Click “File,” then “Save As,” then choose a new filename.
- If you realize you made a mistake after saving, click “Revert To” in the File menu and select “Browse All Versions…” Choose a previous version of the image to which you would like to revert.
-Step-1-Version-3.jpg)
-Step-2-Version-3.jpg)
-Step-3-Version-3.jpg)
-Step-4-Version-3.jpg)
-Step-5-Version-3.jpg)
-Step-6-Version-3.jpg)
-Step-7-Version-3.jpg)
-Step-8-Version-3.jpg)
-Step-9-Version-3.jpg)
Cropping an Image in Preview
-
1Click the Edit icon (a square with a pencil) to enter Edit Mode.
-
2Click the dotted rectangle icon in the editing toolbar, then select “Rectangular Selection”.[3]
-
3Click and drag a part of the image you want to keep. Once you let go of the mouse button, you will see the dotted rectangle appear over a portion of the image.
-
4Click Crop button. This will remove all parts of the image that are outside of the rectangular selection.
- You can resize the cropped area as you would any image.
- If you don’t want to save your changes, press ⌘ Cmd+Z to undo them.
-
5Press ⌘ Cmd+S to save your file.
- If you want to save the cropped area as a brand new file (and keep the entire image from which you cropped it), Click “File,” then “Save As,” then choose a new filename.
- To revert the image to a previous version after saving, click “File,” then “Revert To,” and select “Browse All Versions…” Now, choose an older version of the image.
-Step-10-Version-2.jpg)
-Step-11-Version-2.jpg)
-Step-12-Version-2.jpg)
-Step-13-Version-2.jpg)
-Step-14-Version-2.jpg)
Community Q&A
-
QuestionWhen I make changes to the image, it does not appear to keep the changes. The image is still at the wrong dpi as well.
 Community AnswerYou can try to export the image to different file formats by going to the menu bar and click on "File>Export." This will create a new file in the type you specified with the resized settings. Be sure you are opening the file you duplicated rather than the original file if they are placed in different locations.
 -
QuestionWhat do I do if my picture gets rotated or flipped when I upload it to my Mac?
 NanaviCommunity AnswerThere are options to edit on System preference -> Track pad. Go through options to get the settings and your picture correct.
 -
QuestionHow can I expand a 3x3 photo to 4x6?
 Community AnswerIf you do that, it will distort your photo. You can crop an area of it to make it rectangular instead of square before increasing the size - just keep the ratios for height and width in sync while your making changes. Remember CMD + Z undoes failed attempts.


-Step-6.webp)
References
About This Article