This article was co-authored by wikiHow staff writer, Nicole Levine, MFA. Nicole Levine is a Technology Writer and Editor for wikiHow. She has more than 20 years of experience creating technical documentation and leading support teams at major web hosting and software companies. Nicole also holds an MFA in Creative Writing from Portland State University and teaches composition, fiction-writing, and zine-making at various institutions.
This article has been viewed 515,577 times.
Learn more...
Do you want to cancel an automatic payment you've set up in PayPal? If you've subscribed to a service using PayPal as your billing method, you can cancel upcoming automatic payments in your PayPal account settings. You will need to use your web browser to cancel these recurring payments, as there's no cancellation option in the PayPal mobile app. This wikiHow article will walk you through canceling a subscription through PayPal using your PayPal Personal or Business account.
Things You Should Know
- If you have a personal PayPal account, click the gear icon and select Payments > Manage Automatic Payments to find your recurring payments.
- For Business accounts, click your name and go to Account Settings > Money, bank, and cards > Manage Automatic Payments.
- It's not possible to cancel subscriptions or automatic payments in the PayPal mobile app.
Steps
Personal Accounts
-
1Sign in to https://www.paypal.com. If you're using a computer, you can use any web browser (such as Chrome, Safari, or Edge) to cancel automatic payments and recurring subscriptions in PayPal.
- It's not possible to cancel recurring PayPal payments using the mobile app. If you don't have access to a computer, you can use your Android or iPhone's web browser in desktop mode.
- Chrome: Tap the three-dot menu and select Request desktop site.
- Safari: Tap the Aa icon and select Request Desktop Website.
-
2Click the gear icon. It’s at the top-right corner of the page. This takes you to your account settings.[1]
- If you have a PayPal Business account, you'll see your name at the top-right instead of a gear icon. In this case, use the instructions for Business Accounts instead.
Advertisement -
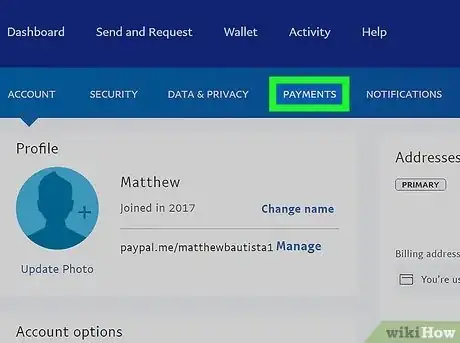
3Click the Payments tab. You'll see this in the second row of tabs along the top of the screen.
-
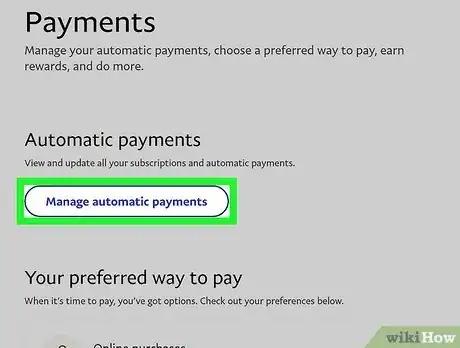
4Click Manage automatic payments. This button is below "Automatic payments" near the middle of the page.
-
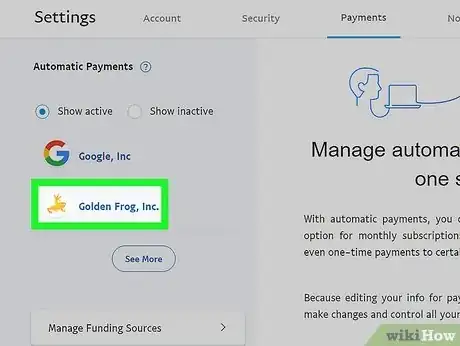
5Select the service you want to cancel. Each service with whom you've set up automatic payments appears in the left panel of the page. Clicking a service name brings up information about your past and future payments.
- If a subscription is still active, you'll see "ACTIVE" below the upcoming payment amount in the right panel.
- If you don’t see the service or company's name, either the subscription is inactive, or it’s not set up with PayPal. Contact the company’s customer support team to cancel the subscription.
-
6Click the Cancel button. It’s at the top of the right panel next to "ACTIVE."
-
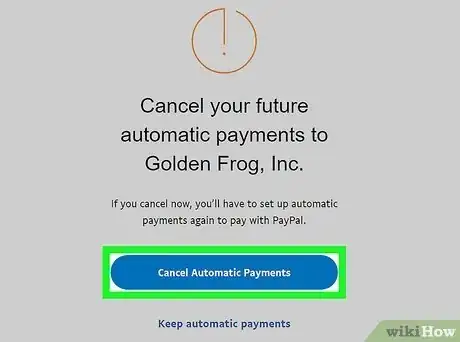
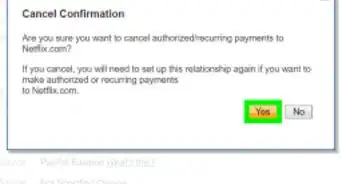
7Click the Cancel Automatic Paymentsl button to confirm. The next payment, as well as all subsequent payments, are now canceled.
Business Accounts
-
1Sign in to https://www.paypal.com. If you're using a computer, you can use any web browser (such as Chrome, Safari, or Edge) to cancel automatic payments and recurring subscriptions billed to your PayPal Business account.
- It's not possible to cancel recurring PayPal payments using the mobile app. If you don't have access to a computer, you can use your Android or iPhone's web browser in desktop mode.
- Chrome: Tap the three-dot menu and select Request desktop site.
- Safari: Tap the Aa icon and select Request Desktop Website.
-
2Click the settings gear on the top right of the page. A menu will expand.
-
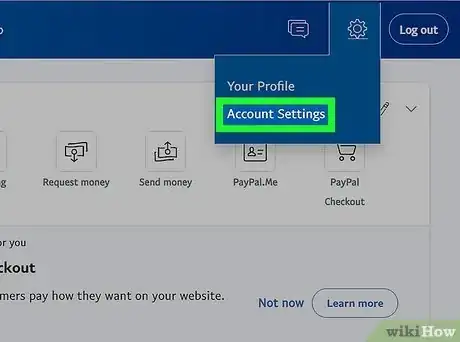
3Click Account Settings on the menu. This displays all of your account settings.
-
4Click the Money, bank, and cards tab. You'll see this under "BUSINESS PROFILE" in the left panel.
-
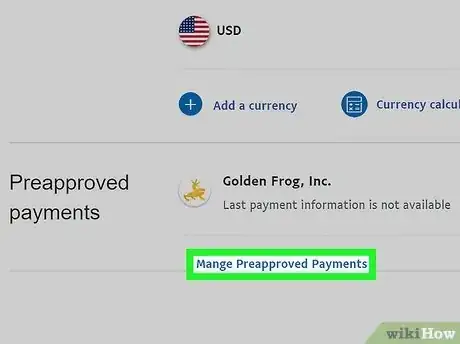
5Scroll down and click Manage Automatic Payments. This is a blue link at the bottom of the "Automatic payments" section, which is toward the bottom of the page.
-
6Select the service you want to cancel. Each service with whom you've set up automatic payments appears in the left panel of the page. Clicking a service name brings up information about your past and future payments.
- If a subscription is still active, you'll see "ACTIVE" below the upcoming payment amount in the right panel.
- If you don’t see the service or company's name, either the subscription is inactive, or it’s not set up with PayPal. Contact the company’s customer support team to cancel the subscription.
-
7Click the Cancel button. It’s at the top of the right panel next to "ACTIVE."
-
8Click the Cancel Automatic Payments button to confirm. The next payment, as well as all subsequent payments, are now canceled.
Community Q&A
-
QuestionI want to cancel a subscription with a vendor; they say I have to let PayPal cancel it as well even though I paid by Visa. What can I do?
 Community AnswerYou probably have to cancel the subscription both with the vendor and within the PayPal system. If you are sure you did not use PayPal then, to be on the safe side, contact whoever issued the credit card.
 -
QuestionHow can I get my money back as soon as possible?
 Community AnswerUnfortunately, you'll only be able to cancel upcoming payments, not payments made in the past. Try contacting the service you subscribe to request a refund.
 -
QuestionHow do I cancel a recurring charge from a business that was set up in PayPal?
 Community AnswerWhen you sign into PayPal, click the gear icon at the top of the page, click "Payments," "Manage pre-approved payments," and then click the name of the business. You can cancel the recurring payment on that screen.
References
About This Article
1. Log in to PayPal.com.
2. Click the gear.
3. Click Payments.
4. Click Manage Pre-approved payments.
5. Select a payment to cancel.
6. Click Cancel and confirm.


