X
This article was co-authored by wikiHow Staff. Our trained team of editors and researchers validate articles for accuracy and comprehensiveness. wikiHow's Content Management Team carefully monitors the work from our editorial staff to ensure that each article is backed by trusted research and meets our high quality standards.
The wikiHow Tech Team also followed the article's instructions and verified that they work.
This article has been viewed 37,116 times.
Learn more...
This wikiHow teaches you how to increase your microphone's input volume to a higher level in your computer's settings, using Windows or Mac.
Steps
Method 1
Method 1 of 2:
Using Windows
-
1Find and right-click the speaker icon on your taskbar. This button is located next to the date and time information in the lower-right corner of your desktop. A menu will pop up.
-
2Click Recording devices on the menu. This will open a new window, and show a list of all the audio input hardware connected to your computer.Advertisement
-
3Select your microphone on the Recording list. Find the microphone you're using on the list here, and click on it.
-
4Click the Properties button. This button is in the lower-right corner of the Sound window. It will open your microphone's settings in a new window.
-
5Click the Levels tab. This button is between Listen and Advanced at the top of the window.
-
6Drag the Microphone Boost slider to the right. This will boost your microphone's input volume to a higher decibel level.
- You can see the amount of boost you're adding in decibels (dB) to the right of the slider here.
-
7Click the OK button. This will save your new microphone settings, and close the microphone window.
-
8Click the OK button in the Sound window. This will save your new audio settings, and close the Sound window.
Advertisement
Method 2
Method 2 of 2:
Using Mac
-
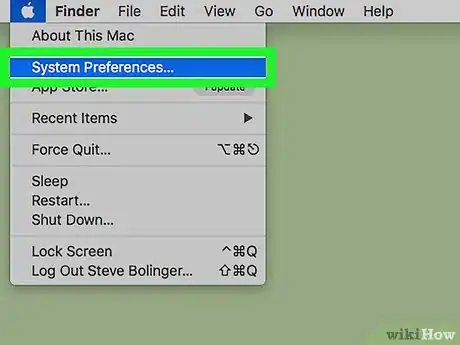
1Click the Apple icon on your menu bar. This button looks like a black Apple icon in the upper-left corner of your screen. It will open a drop-down menu.
-
2Click System Preferences on the menu. This will open your System Preferences in a new window.
-
3Click Sound in System Preferences. This option looks like a speaker icon on the System Preferences menu. It will open your computer's audio settings.
-
4Click the Input tab. This button is located next to Sound Effects and Output at the top of the Sound window.
-
5Select your microphone on the Input menu. You'll see a list of all the audio input devices connected to your computer here. Find the microphone you're using, and click on its name.
-
6Slide the Input volume slider to the right. This will boost the selected microphone's audio input to a higher level of volume.
- You can now speak to your microphone, and check the Input level indicator here in order to see if your microphone's input is boosted.
Advertisement
About This Article
Advertisement


