This article was co-authored by wikiHow staff writer, Megaera Lorenz, PhD. Megaera Lorenz is an Egyptologist and Writer with over 20 years of experience in public education. In 2017, she graduated with her PhD in Egyptology from The University of Chicago, where she served for several years as a content advisor and program facilitator for the Oriental Institute Museum’s Public Education office. She has also developed and taught Egyptology courses at The University of Chicago and Loyola University Chicago.
This article has been viewed 264,490 times.
Learn more...
Adobe Photoshop Elements is a stripped-down version of Adobe Photoshop that lets you make quick and simple edits to your images. The process of making a drop shadow in Elements is similar to what you’d do in the full version of Photoshop, but the steps are a little bit different. In this article, we’ll explain how to add a drop shadow effect using the Styles menu in the latest version of Photoshop Elements.
Things You Should Know
- Use Expert mode to add a drop shadow effect to a selected layer in Photoshop Elements.
- Open the Styles panel to find and apply a variety of drop shadow effects.
- If you don't see the Styles panel, click the Effects button and select Layer Styles instead.
Steps
-
1Open the Expert tab at the top of the screen. Once you’ve opened your project in Elements, go to the top center part of the screen and select Expert. This will give you access to the Layers and Styles buttons.
-
2Select the Layers button at the bottom of the screen. On the lower right side of the Elements window, look for the Layers button and click on it. It looks like two squares stacked on top of each other.
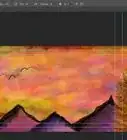
- While you can apply drop shadow effects to the background layer, they may not be visible. You’ll need to create a layer that is smaller than the document window (for example, some text or a shape in its own layer) in order to see the effect.
- To create a new layer, open the Layer menu at the top of the screen, then select New and Layer….
- You can also make your image pop by removing the background, then applying the drop shadow effect to the cut-out image.
Advertisement -
3Click on the layer you want to apply the drop shadow to. In the Layers panel on the right side of the document window, select the layer you want to modify. The background of the selected layer tab will turn dark blue.
-
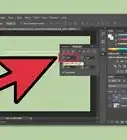
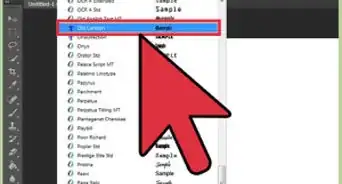
4Select the Styles button from the bottom of the screen. At the bottom right side of the Elements window, click the Styles button. It looks like three overlapping rectangles.
- In some versions of Photoshop Elements, you will need to click the Effects button instead, then choose Layer Styles from the Effects category menu.[1]
-
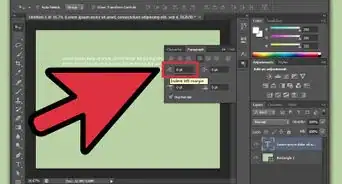
5Choose Drop Shadows from the dropdown menu. At the top of the Styles panel on the right side of the window, click the dropdown menu and select Drop Shadows. This will open a grid displaying the different drop shadow effects.
-
6Click the type of drop shadow you want to apply. Click one of the drop shadow effects on the grid to apply it to the layer. You can also click the effect and drag it onto the image to add it to the currently selected layer.
- In some versions of Photoshop Elements, you might need to double-click the effect instead of clicking it once.[2]
- If you don’t like the results, undo the effect with Control+Z (in Windows) or ⌘ Command+Z (on a Mac).
-
7Adjust the effect using the Style Settings menu. Once you’ve chosen a drop shadow style, you can adjust things like the size of the shadow, the distance of the shadow from the object you applied it to, and the opacity of the shadow. To do this:
- Select the shadow effect you want to modify and click the Settings button at the top of the Styles panel.
- Apply your changes and click either OK (to accept the changes), Reset (to revert to the original style), or Cancel (to close the Style Settings pop-up without making any changes).
- You can also access the Style Settings menu by going to the Layers panel and double-clicking the fx icon next to the layer where you applied the drop shadow effect.


References
About This Article