This article was co-authored by wikiHow Staff. Our trained team of editors and researchers validate articles for accuracy and comprehensiveness. wikiHow's Content Management Team carefully monitors the work from our editorial staff to ensure that each article is backed by trusted research and meets our high quality standards.
There are 9 references cited in this article, which can be found at the bottom of the page.
The wikiHow Video Team also followed the article's instructions and verified that they work.
This article has been viewed 228,552 times.
Learn more...
Adobe After Effects is a software program that allows its users to create animation and other special effects for graphics-related projects. Graphic designers use it to imbue their projects with layer-based animation. After Effects is part of the Adobe family of software and is compatible with other Adobe software.
Steps
Creating a New Composition and Importing Files
-
1Make and set up a new composition. Projects in Adobe After Effects are called compositions, or comps. At the Welcome screen, locate and click on the “New Composition” button in the right column. If you already have the program open, you may either click on the “Composition” tab and select “New Composition” or use the keyboard shortcut Ctrl+N. Every time you create a new composition, a “Composition Settings” window will appear on your screen.
- Don't know what resolution to choose? Locate “Preset” and click on the drop-down menu. The menu is divided up into four sections, respectively: web settings, standard definition broadcast settings (NTSC and PAL), HD settings (the most commonly used), and film settings. Select "UHD 8K 23.976", which is four times the resolution of 1080p HD with 23.976 frames per second. It's always a good idea to create effects in 8K for future-proofing.
- In the second row, locate “Start Timecode” and “Duration.” Leave the “Start Timecode” at 0. “Duration” refers to the total length of the project, from start to end. Set the “Duration” to the required length for your composition.[1] [2]
-
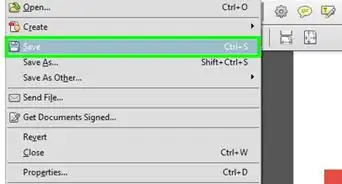
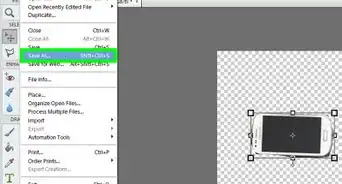
2Save your composition. Before you begin to work on the composition, you should always name and save the project. Click on the “File” tab at the top of the screen. When you select “Save,” a “Save As” window will appear. At the top of the window, type in the name of your composition. Select a location to save this file to and click the “Save” button at the bottom of the screen. The saved composition will appear in the “Project” tab to the left of the screen.
- While you may save this file in any location, it is recommended that you save your composition near your “Footage” file. This file is located within the “Exercise Files” folder.
Advertisement -
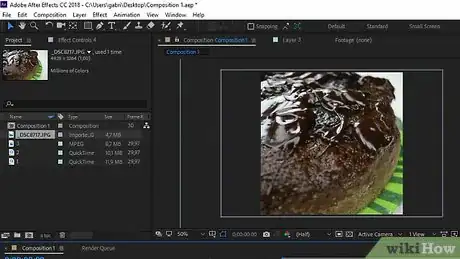
3Import files into Adobe After Effects. In order to create a composition, you need material to manipulate and animate. Select File>Import>File or double click on the “Project” tab. Select all of the files you wish to import and hit “Open.” The imported files will appear in the “Project” tab. Alternative methods include:
Building a Composition with Layers
-
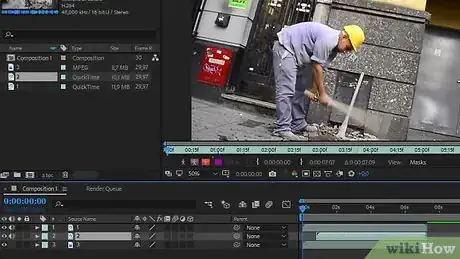
1Add files to your composition. A composition is a composite graphic, or a composite of layers. Each individual layer of your composition is made up of a file. All of the layers combined form a composite graphic. There are several ways to add a file to your composition.
- You may drag and drop files from the “Project” tab into the “Timeline” tab (located at the bottom right of the window), the “Composition” window (located to the right of the “Project” tab), or the “Layer” tab (located directly below the “Project” tab.)
-
2Organize and edit the layers. Once the files appear in the “Layer” tab, you may begin to manipulate the files. From this tab, you may alter the order of the files and edit the appearance of a file.
- To adjust the hierarchy of the layers, drag a file up or down the list. The order of the files will alter the appearance of the composition (see the “Composition” window.) Files at the top of the layer list will appear over files at the bottom of the layer list.
- To alter the appearance of a file, click on the sideways triangle next to the layer's number. This will open up a “Transform” menu. From this menu, you may alter the following properties: anchor point, position, scale, rotation, and/or opacity.[5]
-
3Generate a timeline for your composite graphic. The “Timeline” function allows you to animate the graphic—it controls when each layer is or is not visible. The “Timeline” is located to the right of the “Layer” list. Each layer has it own life bar within the timeline, which you can trim, extend, or group with other layers as desired.
-
4Trim your layers. Select a layer from the list. Move your cursor over the line dividing the list and the timeline so that a double arrow appears. Click and drag the double arrow across the timeline to produce a translucent grey box (this indicates that a clip is trimmed.) Stop once you reach the moment you would like the layer to appear.
- The red line with the yellow tab indicates your current time. You can use this line to help you automatically trim layers. Select the layer you wish to trim. Drag the red line to your desired starting or ending point for the layer. Strike “Command + [“; to automatically trim a layer to the right of the red line, strike “Command ].”
-
5Transform your 2D layers. When you work within the “Composition” window, you may manually position, or transform, the layers. Select a layer from the list. Move your cursor over the “Composition” window and zoom, or scroll, out. A set of handles will appear around the composition. This indicates the the layer may be transformed, or positioned.
- To shrink or expand the layer, click on the handle, press ⇧ Shift, and drag your cursor towards the inside or outside of the window.
- To rotate an element, press Ctrl+W. This will activate the rotation tool.
- To move a layer on a 2-D plane, click on the element you want to move and drag it to its new position.
-
6Create 3D layers. To create a 3D layer, return to the “Layer” tab. The column directly under this icon controls the 3D settings for each layer. To activate this feature, check the layer's blank space in this column. Return to the “Composition” window—if you activated the 3D property, a Y, X, and Z handle will appear on the layer's anchor.
-
7Transform your 3D layers. To move a 3D layer, press ⌘ Cmd+W to activate the rotation tool. Hover your cursor over the X or the Y axis. Click on the axis and drag your cursor to the left and right or up and down. The Z axis should always remain at “0.”[6]
-
8Apply the parent function to your layers. The parent function allows you to tie your layers together. One layer, the parent, will drive the actions of another layer, the child. The child layer, can still move independently of the parent.[7] [8]
- Select the child layer (the layer that you want to apply the keyframes to)—this layer will become the child.
- Locate the “Parent” category in the layer tab.
- In the “Parent” column for this layer, locate the curly-q shaped icon in the child's row. Click on the icon and draw a black line from the icon to the “Layer Name” section of parent. Through this process, the child will become tied to the parent.[9] [10]
Adding Animations, Effects, and Presets
-
1Set up keyframes. Keyframes mark exact points in time when changes are to occur to a layer's properties. This function, which is represented by a little stopwatch, allows you to animate your composite graphics.
- Move your red “Current Time Indicator” line to the moment at which you would like to activate a keyframe.
- Select a layer from the “List” tab.
- Expand the layer's “Transform” or “Contents” tab.
- Click on the stopwatch icon next to the property you wish to alter. This will record a keyframe at the current time indicator. A yellow dot or a greater than/less than symbols will appear on the timeline to mark the keyframe.
- To see your keyframes on the timeline, lasso the layers you wish to view and press “U.”
- To move a keyframe, select a keyframe symbol on the timeline by lassoing it and then drag it to its new location. You may also copy and paste keyframes.
-
2Animate keyframes. Keyframes allow you to animate your project. You may alter any of the properties listed under the “Transform” or “Contents” tab. There are two basic forms of animation: with ease or linear. If a layer in animated with ease, the layer will ease into and out of the motion. If a layer is linearly animated, the layer will start and stop moving abruptly and it will also move at the same rate the entire time. Altering a layer's position is an example of linear animation.
- Click on the stopwatch next to “Position.”
- Move the red line to the point at which you would like the layer to be off the screen.
- Click on the layer's anchor point.
- Hold down “Shift” as you drag the layer completely off of the screen. The motion path will appear as a purple dotted line and each related keyframe will appear as a purple square. To preview your animation, scrub the red line over the timeline.
-
3Include effects and presets. Click on "Window" and "Effects and Presets." You will see a list of various animations and effects that are available for application to your project. Simply drag and drop the effect or animation selection onto the layer to which you'd like to apply it. You should see the change immediately.
- Effects include 3D, color correction, and various camera views.
- Transition options include wipe, fade and checkerboard.
- You may remove selections by dragging them off your projects.
Previewing and Rendering Your Composition
-
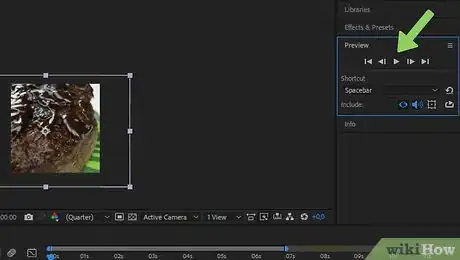
1Preview your project. Select "Windows." From here, click on "Time Controls." A preview pane will pop up where you can select "Play" to see a rough draft of your project. If you wish to see a more finished version, click on "Ram Render Play." If your project is especially long or requires a large amount of memory, adjust the resolution before you preview it. After clicking to play it, the video will run continually until you click on the screen to stop it.
-
2Export your composition to Render Queue. If you need to produce and deliver a high-quality composition, export your project to the Render Queue. The Render Queue is built into Adobe After Effects.
- Click on “File” at the top of the window. Select “Export” followed by “Add to Render Queue.” Instead of “File,” you may click on “Composition” and select “Add to Render Queue.”
- In your Render Queue, locate “Output Module” and click on the linked text to the left of this section. A dialogue box will appear on your screen. From this screen, you can change the video and audio output settings. Click “Ok” when finished.
- In your Render Queue, locate “Output To” and click on the linked text next to the left of this section. Another dialogue box will appear on your screen. The screen you prompt you to select a location to save your rendered composition. Click “Ok” when done.
- Click on “Render” to export the composition.[11]
-
3Export your composition to Adobe Media Encoder. The Adobe Media Encoder will produce a compressed version of your composition. The Media Encoder will also export files that are compatible with specific web platforms. While your project is rendering in the Media Encoder, you may continue to work in Adobe After Effects.
- Click on “File” at the top of the window. Select “Export” followed by “Add to Adobe Media Encoder Queue.” You may also select “Composition” followed by “Add to Adobe Media Encoder Queue” or drag the file directly into the “Adobe Media Encoder Queue” tab.
- Locate the “Preset Browser.” Select the format for your composition. Drag this preset from the browser onto the file in the “Adobe Media Encoder Queue.”
- In the queue, locate “Output To” and click on the linked text next to the left of this section. A dialogue box will appear on your screen and prompt you to select a location to save your rendered composition. Click “Ok” when done.
- Click on the green play button to begin the export.[12]
References
- ↑ https://helpx.adobe.com/after-effects/how-to/aftereffects-create-first-project-cc.html?set=after-effects--fundamentals--essential-tasks
- ↑ https://helpx.adobe.com/after-effects/how-to/aftereffects-workflow-terminology.html?set=after-effects--fundamentals--aftereffects-workspace
- ↑ https://www.surfacedstudio.com/tutorials/after-effects/adobe-after-effects-for-beginners/page/3
- ↑ http://cgi.tutsplus.com/tutorials/after-effects-for-beginners-getting-started--ae-195
- ↑ https://helpx.adobe.com/after-effects/how-to/aftereffects-build-compositions-layers-cc.html?set=after-effects--fundamentals--essential-tasks
- ↑ https://helpx.adobe.com/after-effects/how-to/aftereffects-transforming-layers-cc.html?set=after-effects--fundamentals--essential-tasks
- ↑ https://helpx.adobe.com/after-effects/how-to/aftereffects-add-adjust-keyframes-cc.html
- ↑ https://helpx.adobe.com/after-effects/how-to/aftereffects-understanding-animation-cc.html?set=after-effects--fundamentals--animate-masks
- ↑ https://helpx.adobe.com/after-effects/how-to/aftereffects-add-adjust-keyframes-cc.html
- ↑ https://helpx.adobe.com/after-effects/how-to/aftereffects-understanding-animation-cc.html?set=after-effects--fundamentals--animate-masks
- ↑ https://helpx.adobe.com/after-effects/how-to/render-video.html?set=after-effects--fundamentals--essential-tasks
- ↑ https://helpx.adobe.com/after-effects/how-to/render-video.html?set=after-effects--fundamentals--essential-tasks
Community Q&A
-
QuestionWhat can you do with Adobe After Effects?
 Community AnswerAdobe After Effects allows users to create layer-based animation projects. This projects may be incorporated into videos, websites, and other digital platforms.
About This Article
1. Press Ctrl + N to create a new composition.
2. Click File and select Save As to save.
3. Click File and select Import to import media.
4. Drag media files from Project to Timeline or Layers.
5. Drag layers around to organize them.
6. Use Keyframes to mark times for property changes.
7. Click Window and select Effects and Presets for effects.
8. Export the composition to the Render Queue.
9. Export to the Adobe Media Encoder when finished.
