wikiHow is a “wiki,” similar to Wikipedia, which means that many of our articles are co-written by multiple authors. To create this article, 35 people, some anonymous, worked to edit and improve it over time.
The wikiHow Video Team also followed the article's instructions and verified that they work.
This article has been viewed 586,951 times.
Learn more...
A protractor is a handy tool used to measure and draw angles. Generally, semi-circular in shape, protractors are also available in full-circle, 360-degree versions. If one look at the object has you completely confused, never fear; learning to use the tool is simple. By understanding how the parts of a protractor are used together and following a few easy steps, you will be an angle expert in no time.
Steps
Measuring an Angle with a Protractor
-
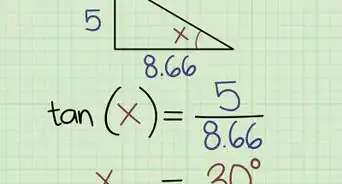
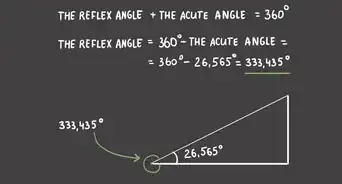
1Approximate the measure of your angle. Angles can be classified in three ways: acute, obtuse, and right. Acute angles are narrow (less than 90 degrees), obtuse angles are wide (greater than 90 degrees), and right angles are exactly 90 degrees (two lines perpendicular to each other). You can easily identify by eye, the category of angle you are trying to measure. Doing this step first helps you identify which scale to use on the protractor.
- At a glance, we can tell this angle is acute because it is less than 90 degrees.
-
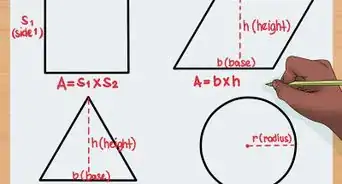
2Place the origin over the center point, or vertex, of the angle you want to measure.[1] The small hole in the middle of the base of the protractor is the origin. Align the vertex of the angle with the center of the cross in the origin.Advertisement
-
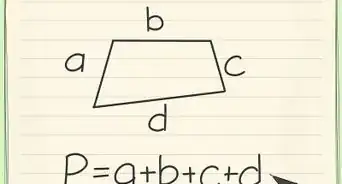
3Rotate the protractor to align one leg of the angle with the baseline. Maintain the vertex of the angle in the origin and gently rotate the protractor so that one of the legs of the angle falls on the baseline of the protractor.[2]
- The baseline is parallel to the edge, but is not the flat edge of the protractor. It is aligned with the center of the origin and the line projects to the start of the scale on either side.
-
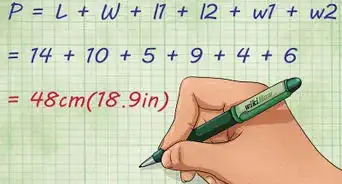
4Follow the opposite leg of the angle up to the measurements on the protractor's arc. If the line does not pass through the protractor’s arc, extend the angle's line until it does. Alternatively, you can align the edge of a piece of paper with the angle’s leg to pass beyond the edge of the protractor, continuing the line of the angle. The number the line passes through is the angle's measurement in degrees.
- In the above example, the angle measure is 30 degrees. We know to use the smaller scale because we determined that our angle was less than 90 degrees in the first step. If the angle was obtuse, we would use the scale that indicated an angle larger than 90 degrees.
- Initially, the measurement scale may seem confusing. Most protractors have two opposing ruler grids, one on the inner side of the arc and one on the outer. This makes the tool handy for measuring angles originating from either direction.


Drawing an Angle with a Protractor
-
1Draw a straight line. The line is your reference line and the first leg of your angle. It will be used to determine the position at which you draw the second leg of the angle. It's generally easiest to draw the straight line in a horizontal position on the paper.
- You can use the flat edge of your protractor to draw this line.
- The length of the line doesn’t matter.
-
2Place the origin of the protractor at one end of the line. This point will be your angle's vertex. Mark the paper where the vertex is placed.[3]
- You don’t have to place the point at the edge of the line. It can be placed anywhere on the line, but is easier just to use the end of the line.
-
3Find the degree of the angle you wish to draw on the protractor's appropriate scale. Align your reference line with the protractor's baseline and mark the paper at the degree of measurement. If you are drawing an acute angle (less than 90 degrees), use the scale with the smaller numbers. For obtuse angles (greater than 90 degrees), use the scale with larger numbers.
- Remember, the baseline is parallel to the edge, but is not the flat edge of the protractor. It is aligned with the center of the origin and the line projects to the start of the scale on either side.
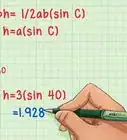
- In the above example, the angle is 40 degrees.
-
4Draw the second leg to complete the angle. Using a ruler, the flat edge of your protractor or another straight edge, connect the vertex with the marked degree, drawing the second leg. This second leg completes your angle. To verify you’ve drawn the angle accurately, use the protractor to measure it.
Community Q&A
-
QuestionWhen do I use the outer scale of the protractor?
 Community AnswerThe inner scale is for angles that open to the right and the outer scale of the protractor is used to measure angles that open to the left .
 -
QuestionHow can I tell whether I need to use a larger or smaller protractor?
 Community AnswerThe angle on a protractor will always be the same.You may find it easier to have a small protractor when only drawing a small line from the angle you are measuring.
 -
QuestionWhy does the protractor have readings on both sides?
 Community AnswerSo you can read angles form different directions. It's kind of like opposite/mirror images.
Things You'll Need
- pencil/pen
- paper
- protractor
- ruler (optional)

References
About This Article
You can use a protractor to measure and draw angles. To measure angles with a protractor, first place the center point along the bottom edge of the protractor over the vertex of the angle you're measuring. Line up the bottom edge of the protractor with one leg of the angle. Follow the other leg of the angle up to the protractor’s arc to see what number it intersects with and find the degree of the angle. If the angle is facing to the right, use the bottom row of numbers on the protractor. If the angle is facing left, use the top row of numbers. To draw an angle with a protractor, first place the center point along the bottom edge of the protractor where you want the vertex of the angle to be. Draw a small dot in the hole on the protractor to mark the vertex. Then, line the bottom edge of the protractor up with the vertex and draw a straight line along it. Now, find the hash mark on the protractor that corresponds with the angle you want to draw, and draw a small dot outside of it. Rotate the protractor and line the bottom edge up between the vertex and the small dot. Finally, use the bottom edge of the protractor as a straight edge to draw a line between the two points. Keep reading the article if you want to learn how to draw angles with your protractor!