This article was co-authored by Boris Polissky and by wikiHow staff writer, Johnathan Fuentes. Boris Polissky is a Professional Photographer and the Owner of SF City Hall Photo and Boris Polissky Photography based in the San Francisco Bay Area. Boris specializes in wedding, portrait, and family photography focused on bringing out real emotion and connection in his photos. He holds a Bachelor’s degree in Social Science from San Jose State University. Boris is known for capturing moments that bring out the uniqueness in all his clients.
There are 31 references cited in this article, which can be found at the bottom of the page.
wikiHow marks an article as reader-approved once it receives enough positive feedback. This article has 19 testimonials from our readers, earning it our reader-approved status.
This article has been viewed 2,237,317 times.
If you’re emailing a JPEG or uploading one to a website, you’ll want to know how to resize it to fit your needs. But what if you don’t know how? Look no further. We’ve put together a total guide for resizing JPEGs—whether you use Windows, Mac, a mobile device, or a web browser like Google Chrome. We’ll cover everything from tweaking image resolution to shrinking the file size so your images load faster and take up less space on your computer. Keep reading to learn how to resize JPEGs the easy way.
Things You Should Know
- Use a browser to upload your JPEG to a resizing website. Most sites let you adjust resolution, crop your images, and adjust compression to minimize the file size.
- In Windows, open your JPEG using Paint, click “Select All,” and adjust the height and width by percentage or pixel length. Then select “Save As” and choose “JPEG.”
- On Macs, open your JPEG in Preview, click “Tools” and “Adjust Size.” Adjust the height and width by percent or pixel length, click “OK,” and click “Save.”
Steps
Using an Image Resizing Website
-
1Visit an image resizing website like PicResize.com. Many sites will let you quickly upload and resize any image file, including JPEG files. Some allow you to resize multiple images at once. Search "resize jpeg" to find a bunch of different options. Resizing using a website is easier to do on a desktop computer than on a mobile device.[1] Other popular options websites for resizing images include:
-
2Upload the JPG file you want to resize. Most resizing sites allow you to upload virtually any type of image file. Click the "Choose File," "Upload image," or "Browse" button to find the image file on your computer that you want to resize.[2]
- If the image you want to resize is on another website, download it to your computer first. Then upload it to the resizing website.
Advertisement -
3Use the site’s resizing controls to change the size of the image. Each website has a different set of controls to adjust the image size. Usually, you’ll see buttons or sliders for adjusting height and width, cropping the image, and undoing your changes.[3]
- Depending on the website, you can enter the exact dimensions you want the resized image to be, or adjust the image size by a specific percentage.
- Making your image smaller will decrease the file size. The image quality will also decrease, but this won’t be obvious unless you zoom in.
- Making an image larger will increase the file size. It will also result in a noticeably lower-quality picture.
-
4Select your compression (if available). Some resizing websites allow you to set a compression level. Higher compression will result in a smaller file size, but will also lead to a decrease in image quality. Look for a quality slider or drop-down menu to change the final quality.[4]
- Not all resizing websites allow you to adjust image quality.
-
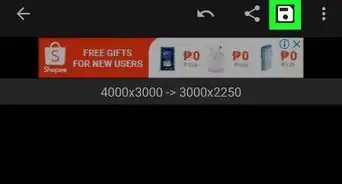
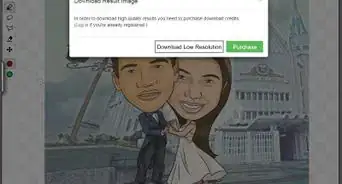
5Download the resized image. Once you've set your size and quality settings, you can resize and download the image. Click the "Resize" button to load the new image. You'll likely be shown a preview of the changes before the image file is downloaded to your computer.[5]
- When downloading a resized image, save it with a different name to avoid overwriting the original. This will allow you to go back to the original image and make changes again as needed.


Using Paint in Windows
-
1Make a copy of the image file. Before resizing your image in Paint, make a copy of the file so that you don't lose the original. This will allow you to do the process again later if you aren't happy with the results.[6]
- To make a copy of the image file, right-click on it and select "Copy." Right-click a blank area in the same folder and select "Paste" to create a copy of the image.
-
2
-
3
-
4Use the "Resize" fields to change the size of the image.[11] You can choose to resize by percentage or by pixels. If you select "Pixels," you can enter the exact size that you want the resized image to be. You can enter percentages larger than "100" to make the image bigger than the original.[12]
- By default, Paint will maintain the original aspect ratio, and entering a value in one field will automatically change the value in the other. This keeps the image from stretching or squishing during the resize. You can uncheck "Maintain aspect ratio" if you want to be able to define both the Horizontal and Vertical fields independently.
- Making an image larger than the original will result in a blocky final image.
-
5Click "OK" to see your resized image. Once you click "OK," your image will be resized according to the values you entered. There is no preview available, so you'll need to apply the changes to see them.[13]
- If you aren't happy with the outcome, press Ctrl+Z to undo the resize changes you made. You can also click the "Undo" button at the very top of the window next.
-
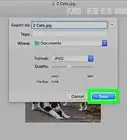
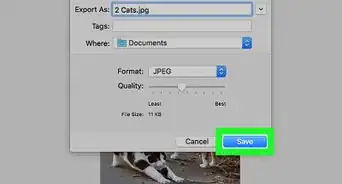
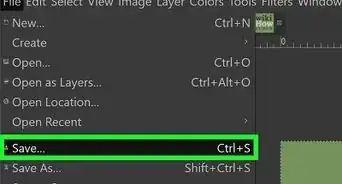
6Save your resized image. Once you're satisfied with the new size, you can save the changes to the file. Select "Save" from the File tab.[14]
- You can also click “Save As” to create a new file and choose where to save it. Make sure to select “JPEG” as the format when using “Save As.”


Using Preview in Mac OS X
-
1Make a copy of your image file. It's always a good idea to create a backup of your original image file before making changes to its size. This will allow you to revert to the original in case something goes wrong or you don't like the end result. Select the image file, press ⌘ Command+C, and then press ⌘ Command+V to make a copy in the same location.[15]
-
2Open the image in the Preview application. Usually, this will open by default when you double-click the file. If the image opens in something else, you can right-click the file and select "Open With" and then "Preview."[16]
-
3Click the Tools menu and select "Adjust Size." This will open a new window that will allow you to resize the image.[17]
-
4Click the drop-down menu to select the units you want to use. You can select "Pixels," "Percentage," and other units for scaling the image. Select "Pixels" to dictate the exact size of the resized image, or select “Percentage” to resize it by a specific proportion.[18]
- For example, resizing your image to “50%” will decrease it to half its original size, while “200%” will double its size.
-
5Enter the new width or height that you want the image to be. The two fields are linked, and changing one will change the other to keep the image proportions correct. This will prevent stretching or squishing of the image. If you want to freely resize both fields, uncheck "Scale proportionally" to unlink the two.[19]
- Making the image smaller will reduce the file size. It will also decrease the image quality, but this won’t be obvious unless you zoom in.
- Making the image bigger will increase the file size. The image quality will decrease noticeably, so don’t enlarge it too much unless you’re comfortable with a blocky/blurry image.
-
6Check out the new file size. You'll be able to see what the new file size will be at the bottom of the window before you apply your changes. This is useful if you're resizing the image to fit the file size limitations of email or other online services.[20]
-
7Click "OK" to apply the changes. The image will be resized according to the settings you entered. If you aren't happy with the results, press ⌘ Command+Z to undo the changes and revert to the original size.[21]
-
8Save your file. If you are happy with the new size, you can save your changes to the file. Click the "File" menu and select "save" to save your changes.[22]


Using an iPhone, iPad, or iPod Touch
-
1Install an app that allows you to resize images. There is no built-in way to resize a picture on iOS devices, but there are a variety of apps that can perform the task for you. You can download these apps from your iOS device's App Store.[23] Some of the more popular apps include:
-
2Open the app and select the photo you want to resize. You'll likely be prompted to give the app access to your photos. This is necessary for the app to be able to browse the photos stored on your device. Find the photo you want to resize and tap it to open it.[24]
-
3Select the "Resize" menu. Most apps have various tools you can choose from, including resizing. Tap the "Resize" button to begin resizing the image.[25]
-
4Enter a new size for the image. Different apps will have different interfaces, but in most cases, you can select from a variety of preset sizes or you can enter a specific resolution. The width and height will automatically change together so that the original proportions are maintained.[26]
- If you don't mind if the image gets stretched or squished, you can tap the chainlink or padlock button to enter different values into each field.
-
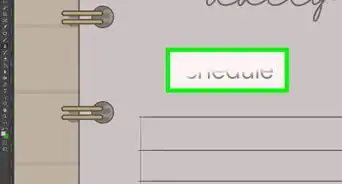
5Save your resized image to your camera roll. After resizing the image, tap the "Save" or “Download” button to save it to your camera roll. You'll be able to find it in your Photos app like you would any other image on your iOS device.[27]


Using an Android Device
-
1Download an app that can resize pictures. Android devices do not come with an app for resizing images, but there are countless third-party apps available that can do so. You can download these apps from the Google Play Store. Some of the most popular image resizing apps include:[28]
-
2Open the downloaded app and give it access to your photos. When you launch the app for the first time, you may be prompted to give the app access to your stored photos. This is essential so that the app can load photos stored on your device.[29]
-
3Open the photo you want to resize. Use the app to navigate to the photo that you want to resize. The process will vary depending on the app, but generally, you can tap the "Select photo" button on the app's main menu to open your device's stored photos.[30]
-
4Select the resize tool. After opening the image, you'll likely need to select the "Resize" tool in the app. Again, the process will vary for this depending on the app you are using.[31]
-
5Select the size you want to make the image. You'll be shown the original size in both pixels and file size. Depending on the app, you may be able to select from preset image sizes, or enter a specific size. When entering a custom size, you can just enter one value and the other value will scale accordingly.[32]
-
6Save your resized image. Depending on the app, the resized image may be saved automatically, or you may need to manually tap the "Save" button. The original image will not be changed.[33]
- Each app will store its resized images in a different location. Generally, you'll be able to find the pictures by opening your Pictures folder and then opening the folder named after the app.


Community Q&A
-
QuestionWhat is the difference between file size and image size?
 wikiHow Staff EditorThis answer was written by one of our trained team of researchers who validated it for accuracy and comprehensiveness.
Staff AnswerwikiHow Staff EditorStaff AnswerImage size refers to the image's height and width. File size refers to how much space the image takes up on your computer (or email inbox). For example, an image might size be 1920 pixels wide by 1080 pixels high, and the file size might be 2 MB. -
QuestionIf I create a database with 2,000 images of different sizes, can I run the whole database through a resizing program and change every image to the same size, all in one go?wikiHow Staff EditorThis answer was written by one of our trained team of researchers who validated it for accuracy and comprehensiveness.
Staff AnswerwikiHow Staff EditorStaff AnswerYes, some websites and programs let you resize batches of images. Try Picresize.com for a free option, or Adobe Photoshop for a paid program with lots of features. -
QuestionHow do I set normal images to 64x64 pixel size?wikiHow Staff EditorThis answer was written by one of our trained team of researchers who validated it for accuracy and comprehensiveness.
Staff AnswerwikiHow Staff EditorStaff AnswerIn most cases, the website or app you use to resize your image will allow you choose a height and width for your resized image. But since 64x64 is square-shaped, you may need to crop your photo into a square first so that the smaller, resized image doesn't look distorted.
Warnings
- It’s best to only resize a JPEG to a smaller size.⧼thumbs_response⧽
- Your JPEG will lose quality if you resize it to a larger size.⧼thumbs_response⧽
- If you make a JPEG larger, you’ll stretch the pixels and the photo will appear blurry and low quality.⧼thumbs_response⧽


References
- ↑ https://youtu.be/eSc88LU25I4?t=0
- ↑ https://youtu.be/eSc88LU25I4?t=10
- ↑ https://youtu.be/eSc88LU25I4?t=41
- ↑ https://youtu.be/eSc88LU25I4?t=120
- ↑ https://youtu.be/eSc88LU25I4?t=145
- ↑ https://www.computerhope.com/issues/ch000766.htm
- ↑ Boris Polissky. Professional Photographer. Expert Interview. 20 January 2021.
- ↑ https://youtu.be/eAwVxa2iyz4?t=28
- ↑ Boris Polissky. Professional Photographer. Expert Interview. 20 January 2021.
- ↑ https://youtu.be/eAwVxa2iyz4?t=62
- ↑ Boris Polissky. Professional Photographer. Expert Interview. 20 January 2021.
- ↑ https://youtu.be/eAwVxa2iyz4?t=71
- ↑ https://youtu.be/eAwVxa2iyz4?t=117
- ↑ https://youtu.be/eAwVxa2iyz4?t=131
- ↑ https://youtu.be/bvIpclDluh8?t=35
- ↑ https://youtu.be/bvIpclDluh8?t=43
- ↑ https://youtu.be/bvIpclDluh8?t=47
- ↑ https://youtu.be/bvIpclDluh8?t=57
- ↑ https://youtu.be/bvIpclDluh8?t=70
- ↑ https://youtu.be/bvIpclDluh8?t=82
- ↑ https://youtu.be/bvIpclDluh8?t=94
- ↑ http://www.howtogeek.com/201638/use-your-macs-preview-app-to-crop-resize-rotate-and-edit-images/
- ↑ https://youtu.be/64YR0kgX2wM?t=53
- ↑ https://youtu.be/64YR0kgX2wM?t=65
- ↑ https://youtu.be/64YR0kgX2wM?t=84
- ↑ https://youtu.be/64YR0kgX2wM?t=86
- ↑ https://youtu.be/64YR0kgX2wM?t=94
- ↑ https://youtu.be/5MFT_Mll3FI?t=34
- ↑ https://youtu.be/5MFT_Mll3FI?t=38
- ↑ https://youtu.be/5MFT_Mll3FI?t=73
- ↑ https://youtu.be/5MFT_Mll3FI?t=81
- ↑ https://youtu.be/5MFT_Mll3FI?t=90
- ↑ https://youtu.be/5MFT_Mll3FI?t=88
About This Article

1. Visit an image resizing website.
2. Upload the image.
3. Select your desired size.
4. Select compression (if available).
5. Download the resized image.