This article was co-authored by wikiHow staff writer, Nicole Levine, MFA. Nicole Levine is a Technology Writer and Editor for wikiHow. She has more than 20 years of experience creating technical documentation and leading support teams at major web hosting and software companies. Nicole also holds an MFA in Creative Writing from Portland State University and teaches composition, fiction-writing, and zine-making at various institutions.
The wikiHow Tech Team also followed the article's instructions and verified that they work.
This article has been viewed 186,487 times.
Learn more...
If you've been using Instagram lately, you've likely noticed blurred-out posts marked as "Sensitive Content." This usually means that someone has reported the post (or that the algorithm thinks it's a sensitive subject) but the content doesn't violate Instagram's policies. Instead of removing posts like this, Instagram marks them as sensitive and gives users the option to click through to the actual post. Although you can't apply a "Sensitive Content" option to your own posts, there are ways you can share potentially-upsetting material in a similarly-considerate way. This wikiHow shows you how to use a warning image to share sensitive photos or videos on Instagram without upsetting your followers.
Steps
Creating a Sensitive Content Warning Image
-
1Open Instagram on your phone or tablet. Although you could just type something like "this post contains sensitive content" in your post's caption, it's likely that nobody will see it until they've already seen the photo or video. One way to allow followers to choose whether they want to see something or not is to create a slideshow-type post, with the first image(s) in the post displaying a warning. Then, viewers can decide whether they want to swipe left to see the sensitive content.
- Keep in mind that even if you're sharing content behind a warning, you'll still need to abide by Instagram's community guidelines.
-
2Tap the profile icon. It's the outline of a person's head and shoulders at the bottom-right corner. An easy way to create your warning image is to use the Instagram Story editor, so that's what we'll be doing.
- You can use a different image-making app if you'd like, but it's pretty simple to do in the Story editor.
Advertisement -
3Tap the +. It's in the upper-right corner of the app.
-
4Tap STORY on the menu. This opens the Story editor.
-
5Tap Aa. This allows you to start entering text.
-
6Enter your text. For example, you could create an image that says "Sensitive Content—swipe left to see it," or "Trigger Warning," followed by a clean/safe description of the content you're sharing. To start typing, tap TAP TO TYPE.
- After typing your text, you'll see some formatting options at the top. Tap the colorful circle at the top to choose a text color. You can adjust the alignment using the icon with several horizontal lines, or change the look of the text by tapping the A surrounded by stars.
- To increase the text size, drag the left slider up. To decrease it, drag the slider down.
-
7Tap Next. This saves your text and displays a preview.
-
8Adjust your image. Now you can adjust the size of the text even further by placing two fingers over the text and pushing outward (to increase it) or inward (to make it smaller). You can also tap the circle at the top to change the background color, add drawings, stickers, etc.
- If you want to change the content of your text after making edits, just tap it to open it in the editor. Make your changes, and then tap NEXT.
- You can tap the sticker icon at the top to insert GIFs and other features, but avoid adding music—you'll need to save the warning image to your phone or tablet, and Instagram won't let you do that if a song is included.
- Using bright colors can really make your warning stand out on the feed.
-
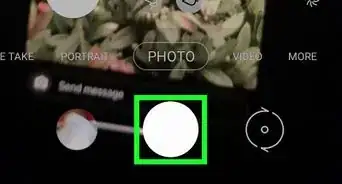
9Tap the Download button to save your image to your phone or tablet. It's the arrow pointing downward at the top of the screen. Once your image is saved, you can tap the X at the top-left to close the editor, and then tap X at the top-right to return to your feed.
- You can make multiple images that say different things and download them all to your phone. You can share up to 10 photos and videos in a single gallery post, so add as many warning images as you need—this gives people time to really make the conscious decision to see your sensitive content.


Posting Your Sensitive Content
-
1Create an Instagram post. Now that you have a warning image, you can create a gallery post. Start by opening the Instagram app and tapping the + at the top of the screen.
- If you're on the profile tab rather than the home tab, you'll see a menu when tapping this option. Select Post from the menu, if so.
-
2Tap the two overlapping squares below the preview image. This gives you the option to share more than one image and/or video in a single post. After tapping this option, small circles will appear at the top corners of each photo in your gallery.
-
3Tap the images you want to share in the order you want them to appear. As you tap images, a number will appear at each image's corner. This number determines the order they'll be shown. You'll definitely want the warning image to be number one (and any other warning images should follow that one). After adding the warning images, add the sensitive content you want to share.
-
4Tap Next. It's at the top-right corner.
-
5Add filters/edits and tap Next. If you want, you can add any of Instagram's filters to the selected images/videos. Choosing a filter from the bottom will apply it to all images in the gallery you're sharing, but you can double-tap an individual photo to change its filter alone.
-
6Enter a caption. The caption is another great place to add a warning about the sensitive content you're sharing. You can type some thoughts about why sharing this sensitive content is important to you, and why people should (or shouldn't) swipe left to view it.
-
7Tap Share to share your post. Once your post is live, you'll see it in action. Swiping left across the first image will proceed to the next one, and so on.


References
About This Article

1. Create a "sensitive content warning" image in the Story editor.
2. Save the image to your phone or tablet.
3. Create a new Instagram post.
4. Tap the Gallery option (two overlapping squares).
5. Tap the warning image(s) first, followed by the sensitive one(s).
6. Share the post.