This article was co-authored by wikiHow staff writer, Nicole Levine, MFA. Nicole Levine is a Technology Writer and Editor for wikiHow. She has more than 20 years of experience creating technical documentation and leading support teams at major web hosting and software companies. Nicole also holds an MFA in Creative Writing from Portland State University and teaches composition, fiction-writing, and zine-making at various institutions.
Learn more...
If you've downloaded a Serum preset bank from the web, adding it to Serum is easy. Most Serum banks are available as ZIP files, which contain audio files in the .fxp format. To add your new bank to Serum, you'll just need to extract the files, move them into the Serum Presets folder, and then rescan your folders in Serum. Once you rescan the presets, they'll be ready to play in your DAW. Installing presets in Serum only takes a few minutes, and we'll walk you through the process on Windows and Mac!
Things You Should Know
- To open your presets folder, click "Menu" in Serum, select "Show Serum Presets Folder," then double-click "Presets."
- Copy the folder containing the Serum bank to the Presets folder, or copy individual presets into the categorized subfolders.
- After installing, click "Menu" in Serum and choose "Rescan Folders on Disk."
Steps
Adding Quickly in Serum
-
1Unzip the presets. When you download a Serum preset bank, it'll usually come as a ZIP file. To unzip the file on a Mac, just double-click the file. On Windows, right-click the file, select Extract All, and then click Extract.
- If the file ends with .RAR, which is common when you download banks as torrents, you'll need to use a third-party program to extract the files. For Windows, you can download 7-Zip from https://www.7-zip.org. On a Mac, install The Unarchiver from the App Store. You can then double-click the RAR file and click Extract, and then OK to decompress the package.
-
2Open Serum and click Menu. You'll see Menu at the top of the Serum window.[1]Advertisement
-
3Click Show Serum Presets Folder. It's toward the bottom of the menu. This opens the Serum folder in File Explorer (Windows) or Finder (Mac).
- The default location to install Serum presets on Windows is C:\Users\yourusername\Documents\Xfer\Serum Presets\Presets
- On a Mac, the default location is Library/Audio/Presets/Xfer Records/Serum Presets/Presets.
-
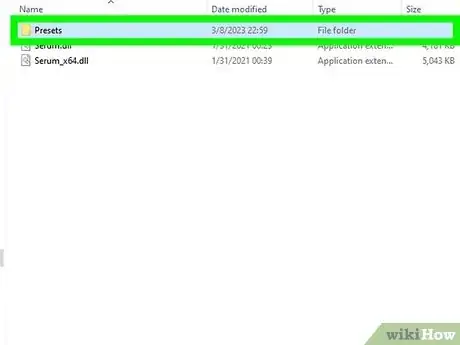
4Double-click the Presets folder. Here you'll find your existing presets, organized into folders. This is where you'll install the banks you've downloaded.
- When you browse presets in Serum, they're separated into menus named after the folders you see here.
- For example, all the lead sounds are in the Leads folder, and sound effects are in the FX folder.
- You can add new folders to the Presets folder and call them anything you'd like. Any folders you add will become menu items in the Serum presets menu.
-
5Drag your new Serum bank into the Preset folder. In your extracted files, you'll have a new folder that contains your preset files—the files all end with .fxp. You have two options for moving them into the presets folder, depending on how you want to organize your banks:
- One is to simply drag the folder with the presets into the Presets folder. This creates a new folder with the name of the bank. If you want the bank name to appear in your preset menu, do this.
- The other option is to drag different types of presets into existing folders, or even create new folders. For example, you can drag bass sounds into the Bass or Bass (Hard) folder, and arpeggios into the Seq (sequences) folder.
- Serum preset files usually have names that describe the sound. For example, bass patches start with BA, arpeggios start with ARP, etc.
-
6Click the Serum menu and select Rescan Folders on Disk. This tells Serum to rescan the preset folder and add any new banks to the preset menu.
- Now, when you click the preset menu at the top of Serum, you'll see your new preset bank. Select a sound and test it out with your MIDI controller!


