This article was co-authored by wikiHow staff writer, Jack Lloyd. Jack Lloyd is a Technology Writer and Editor for wikiHow. He has over two years of experience writing and editing technology-related articles. He is technology enthusiast and an English teacher.
The wikiHow Tech Team also followed the article's instructions and verified that they work.
This article has been viewed 921,723 times.
Learn more...
This wikiHow teaches you how to unlock your Android if you don't know the lock screen passcode or pattern. There are a few ways to do this, ranging from using Find My Device to unlock your Android to factory resetting your Android. Keep in mind that you will need to know your Google account's email address and password in order to log back into your Android if you factory reset it.
Steps
Using Find My Device
-
1Open the Find My Device website. Go to https://www.google.com/android/find in your computer's web browser.
- If you have a Samsung phone or tablet, you'll need to use Samsung's website instead.
-
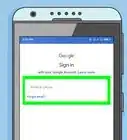
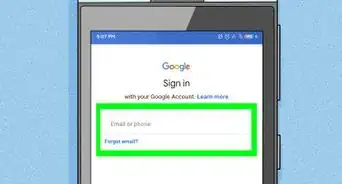
2Log into your Google account. When prompted, enter your Gmail address, click NEXT, enter your password, and click NEXT.
- If you don't know your Google account's password, you'll need to recover it before proceeding.
Advertisement -
3Select your Android. If your Android isn't currently selected upon opening Find My Device, click it in the left-hand menu.
-
4Click Lock. It's on the left side of the page, just below your Android's name. Doing so will open a pop-up window.
-
5Enter a new password. Type a new password into the top text field, then repeat the password in the following text field.
-
6Click Lock. It's at the bottom of the page. This will replace your Android's lock screen password with your new password.
-
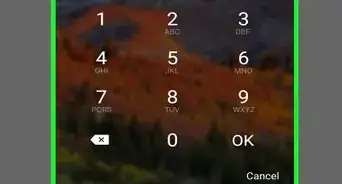
7Unlock your Android with the new password. Open your Android, then type in the password you just set. Doing so should prompt your Android to unlock.[1]


Using Samsung's Find My Mobile Tool
-
1Understand when this method will work. If you have a Samsung Galaxy (or other Samsung Android) which you've registered with Samsung, you will be able to use Samsung's version of Find My Device to unlock your Android.
- If you don't have a Samsung Android or you haven't registered your Android with Samsung, you can't use this method.
-
2Open Samsung's "Find My Mobile" site. Go to https://findmymobile.samsung.com/ in your computer's web browser.
-
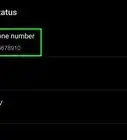
3Sign into your Samsung account. If prompted to sign in, click SIGN IN, then enter your email (or phone number) and password and click SIGN IN.
-
4Click Unlock my Device. It's on the left side of the page.[2]
- If you have more than one Samsung Galaxy item, you may have to select the correct one by clicking the item name in the top-left corner of the page and then selecting the correct one in the drop-down menu.
-
5Re-enter your Samsung password if prompted. If asked, you'll need to type in your Samsung account password again. This should unlock your Samsung Galaxy, though you may need to wait for a few seconds before the item recognizes the unlock.
- After the screen is unlocked, you should be able to set a new password from the Settings menu.


Using a Factory Reset
-
1Know what this method entails. Factory resetting your Android will remove all settings—including your lock screen password—along with any contact and app information from your Android.
- Unfortunately, if your data isn't backed up, you won't be able to recover the information deleted by the factory reset.
-
2Find your Android's "Recovery" combination. Every Android has its own combination of buttons which must be pressed in order to open the recovery menu; checking your Android's manual or online documentation should help you find this combination.
- For example, Samsung users will typically use the Power, Home, and one of the Volume buttons to access the recovery menu.
-
3Power down your Android. Press and hold the Power button, then tap Power off when prompted. This will cause your Android to shut down.
-
4Press and hold the "Recovery" combination. Holding down your Android's recovery keys will prompt your Android to begin booting into the recovery console.
- If you see a "No command" error message appear on-screen, keep holding the recovery combination for another 15 to 20 seconds.
-
5Select Recovery mode. Once the recovery menu appears, use the Volume Down button to scroll down to the Recovery mode option, then press the Power button to select it.
- If you don't see Recovery mode, skip this step.
- See the next step if you're instead met with a "No command" screen.
-
6Bypass the "No command" screen. If you're on a Pixel Android, press and hold the Power and Volume Up buttons at the same time until the recovery screen opens.[3]
-
7Select Wipe data / factory reset. Scroll down to highlight this option, then press the Power button.
-
8Select Yes -- delete all user data. It's in the middle of the screen. Doing so will prompt your Android to begin factory resetting.
-
9Wait for your Android to finish wiping. Your Android should take under 10 minutes to completely erase.
-
10Set up your Android. Once your Android finishes restarting, you can set it up as though it were a new phone or tablet.
- This will usually include selecting a language and a Wi-Fi network.
-
11Sign into your Google account. When prompted, enter the email address and the password for the Google account with which you were previously signed into your Android.
- If you don't know the password for your Google account, use a computer to recover it before proceeding.
-
12Complete your Android setup. After logging into your Google account, you can proceed with setting up the rest of your Android.


Using a Custom Recovery
-
1Know when to use this method. If you have a custom recovery such as CWM or TWRP already installed on your Android, you may be able to use the custom recovery's file manager to delete the files which maintain the Android lock screen, thus removing the password in the process.
- You cannot use this method if your Android doesn't already have a custom recovery installed.
-
2Turn off your Android. Press and hold the Power button, then tap Power off in the pop-up menu.
-
3Press and hold the "Recovery" combination. This button combination will vary from Android to Android, but will usually involve holding down some combination of the Power button, the Home button, and/or the Volume button(s).
- Check your phone's documentation for the proper recovery combination if you don't know it.f
-
4Open the Mount menu. You'll find this on the main custom recovery page.
-
5Enable all locations. Check the box next to any folder location on your Android.
- Do not enable the "Mount system partition read-only" option if available.
-
6Download and transfer the AROMA file manager. Tap the "Back" button, then do the following on a computer:
- Click the AROMA download link.
- Wait for the ZIP folder to download.
- Connect your Android to your computer via a USB cable.
- If you're on a Mac, you'll first need to install Android File Transfer.
- Place the ZIP folder in your Android's "Download" folder.
-
7Install AROMA file manager. This file manager will allow you to delete system files:
- Open the Install menu.
- Open the Download folder.
- Select the AROMA file manager's ZIP folder.
- Swipe the "Install" slider right or select the Install option, then wait for a confirmation.
-
8Navigate to the lock screen files' location. To do so:
- Open the data folder.
- Open the system folder.
- Scroll down to view the system files below the list of folders.
-
9Delete the lock screen files. Any files starting with "gatekeeper", "locksettings", and/or "lockscreen" pertain to your Android's lock screen, and thus must be deleted:
- Long-press a file name to select it.
- Repeat with other lock screen file names.
- Tap the Menu button.
- Tap Delete
- Confirm your choice if prompted.
-
10Reboot your Android. Return to the main custom recovery screen, then select the Reboot option. Once your Android finishes rebooting, you should be able to open your Android without needing to enter a password.[4]


Removing a Third-Party Lock Screen
-
1Understand when to use this method. If you know your Android's regular passcode but can't unlock due to a third-party lock screen app, you can use Safe Mode to delete the lock screen app.
- Some apps will install malware apps which password-protect the lock screen. Using Safe Mode will allow you to delete these apps.
- Keep in mind that you'll need to know your Android's regular lock screen combination or passcode in order to complete this method.
-
2Press and hold your Android's "Power" button. It's usually on the right side of the Android's housing. A menu will appear.
-
3Long-press Power off. Doing so will prompt another pop-up menu to appear after a few seconds.
- On a Samsung Galaxy, you'll instead tap Restart, then hold down the Volume Down button while the Android reboots. You can skip the next two steps.
-
4Check the "Reboot" box. It should be at the top of the menu.
-
5Tap OK. It's at the bottom of the menu. Doing so will prompt your Android to begin restarting.
-
6Wait for your Android to reboot. Once your Android finishes rebooting, you should see "Safe mode" in the bottom-left corner of the screen.
- For Samsung Galaxy Androids, remember to hold down the Volume Down button while rebooting to open Safe Mode.
-
7Unlock your Android. Your third-party lock screen app won't load, so you'll just need to know your Android's usual lock screen passcode or password.
-
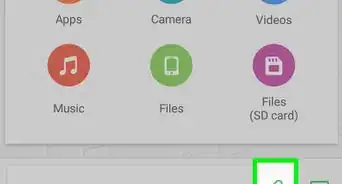
8
-
9Tap Apps. It's near the middle of the screen.
-
10Select your third-party lock screen app. Scroll through the list of apps on your Android until you find the app which was locking your screen, then tap the app in question.
-
11Tap UNINSTALL. It should be near the top of the screen.
-
12Tap OK when prompted. This will prompt the app to uninstall without requiring a passcode.
- You can restart your Android back into the normal mode by holding down the Power button and tapping Restart (or tapping Power off and then pressing the Power button again).


Community Q&A
-
QuestionWhat do I do if I can't access my Google account or my password has been changed?
 Community AnswerYou'll need to go through the Google account recovery process. You can fill out the form on Google's recovery options page. If Google is able to verify your identity, you will be able to reset your Google password and log back into your device.
 -
QuestionIs it possible to unlock an Android using a computer?Community AnswerYou can turn off the screen lock using ADB if you have previously connected your Android to your computer and allowed it to work with ADB. You cannot unlock your phone using a PC if you have not previously done this.
-
QuestionHow can I factory reset a locked phone?
 Community AnswerIf you can't access the phone, you can try a factory reset by putting the device into Recovery Mode. Turn off the phone and then press and hold the Power and Volume Up buttons. This will launch Recovery Mode, which you can use to factory reset the device.


References
About This Article
1. Go to https://www.google.com/android/find?u=0 on a computer.
2. Sign in.
3. Click your Android.
4. Click Lock.
5. Enter a new password.
6. Click Lock.
7. Unlock your Android with the new password.