This article was co-authored by Abraham Schwartz. Abraham Schwartz is a handyman and the owner of Fixin’ To Do, a home improvement service in Austin, Texas. Abraham specializes in both small to medium residential and commercial sized jobs, ranging from TV mounting to furniture assembly to home automation setup. Prior to starting Fixin’ To Do, Abraham worked for over 10 years as a handyman for third party services and had a lifetime of learning how to improve houses. He holds both his TSBPE Plumbing Examiners and Electrical Apprentice (TX) Licenses. In 2018 and 2019, Fixin’ To do was rated as a Top Pro by Thumbtack.
There are 7 references cited in this article, which can be found at the bottom of the page.
This article has been viewed 117,371 times.
Bending acrylic is something you might do if you are building a case or enclosure for an object, for example. There are different methods for doing this, and each helps you to easily bend acrylic. Just be sure that you have the necessary tools and supplies for your chosen method, and you will be on your way to mastering this craftsman skill.
Steps
Bending Acrylic with a Heat Gun
-
1Gather the supplies you need in order to bend the acrylic with a heat gun.[1]
- Sheet of acrylic large enough for your needs
- A heat gun, which is an electrical tool that heats and softens a variety of materials
- Scrap wood
- Cutting tools, such as a Dremel saw, circular saw, table saw, and/or razor knife[2]
- A vise and clamps
- Chinagraph pencil, also known as a grease pencil, or permanent marker
- Acrylic glue and an applicator
-
2Determine the dimensions of what you are creating with the bent acrylic. If you are creating an enclosure, then you need to do the math to determine its size and where you need to bend it to make your desired shape.[3]
- You may need tools such as a ruler or other measuring stick, a square, a compass, or a protractor to find these dimensions.
- Once you have calculated your dimensions, mark them up on the acrylic so that you know where to cut. A China graph pencil or permanent marker works well, but the marker will not be able to be removed.
- If you want any holes in your acrylic enclosure, it is better to drill or cut them into it before bending, as this process is easier while the acrylic is still flat.
Advertisement -
3Set your acrylic between two pieces of scrap wood, one of which is your jig, and clamp it all together using the vise. Cut the jig to help you bend the acrylic to the correct calculations, if necessary.[4]
- This is where you can use the circular or table saw, if you are cutting a jig. A jig is a box or frame meant for holding a material and guiding a machine tool to the material.[5] The jig will be cut at a particular height and its edge at a particular angle, based on your calculations, so that you bend the acrylic correctly.
- Make sure you have a spare piece of scrap wood to help you with the heat bending process. You will use it to push on the acrylic while it is heated.
-
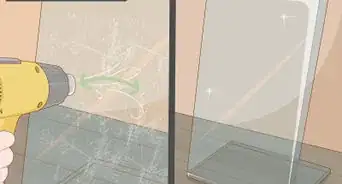
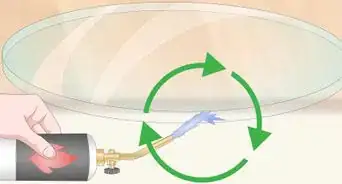
4Prepare your heat gun for bending the acrylic. Heating is a slow process in order to make sure that you get a straight bend in the acrylic.[6]
- Use the spare piece of flat scrap wood to push the acrylic back and down while you aim the heat gun at the acrylic. Make your pressure on the acrylic as even as possible while you push.
- Move the heat gun slowly side-to-side while you push back and down on the acrylic.
- Note that the acrylic will likely bend slowly at first. Take your time and be patient, bending the acrylic gently so it doesn't crack.[7]
- If the acrylic is thin enough, you may be able to use a blow dryer if you don't have a heat gun.[8]
-
5Repeat the heating process if you have additional bends to make in the sheet of acrylic. This will be necessary if you are making an enclosure out of the acrylic, for example, but it will not be necessary in every situation. If you have no further bends to make, then move on to the next step, or you may be done with your project at this time.
- It will be helpful to allow each bend to completely cool before going on to the next bend so that you do not lose the initial bend.
-
6Trace the sides of your newly bent piece of acrylic in order to make the side pieces. Lay the bent acrylic on its side on a new piece of flat acrylic and trace the sides using a permanent marker or Chinagraph pencil. Cut the side pieces out using a Dremel saw or razor knife when you are done tracing.[9]
- It is important to trace each side of the bent acrylic. Do not assume that both sides are the exact same shape.
-
7Set the bent acrylic piece and the cut sides together with acrylic glue and the applicator. This can be a tricky process.


Bending Acrylic with a Strip Heater
-
1Gather the materials that you need in order to bend a piece of acrylic with a strip heater.
- A strip heater, which is a tool that has a heating element along the length of it and rests on which to lay the material you want to heat so that they are not directly on the intense heating element[12]
- Sheet of acrylic that is large enough for your needs
- Chinagraph pencil, also known as a grease pencil, or permanent marker
- A jig, which is a box or frame meant for holding a material and guiding a machine tool to the material[13]
- Scrap wood
- Cutting tools, such as a Dremel saw, circular saw, table saw, and/or razor knife
- Clamps
- Acrylic glue and an applicator
-
2Calculate the dimensions of your craft or enclosure, if necessary. Cut down the sheet of acrylic to the size or shape that you need for your project using a Dremel saw or razor knife.
- It may be helpful to overestimate your dimensions, since you will be heating and bending the acrylic. Heating may cause a slight change in where the bend lies and how it fits into other pieces.
-
3Mark the location of the fold on the acrylic with the Chinagraph pencil or permanent marker. This is where you will heat the acrylic on the strip heater.[14]
- Make sure that your line exactly follows the shape you desire. If you want a straight line, make sure it is perfectly straight. If you need it to be angled, then make sure the line runs at the correct angle. The line will still appear on the acrylic after it is heated, when you need to bend it.
- The Chinagraph pencil markings can be removed later. Remember that permanent marker will not come off.
-
4Cut and assemble your jig to the correct shape and dimensions you need using scrap wood. You will put the heated acrylic in the jig to help it form to the right shape.
- Use the circular or table saw for this process. You may need to use wood glue or nails to assemble your jig into the shape you need, depending on how you plan to bend the acrylic. For example, you might adhere two pieces of scrap wood together at a 90-degree angle along their long sides if you want your acrylic bent in that shape. If you need a more acute or obtuse angle, then you will likely need to cut the edges of your scrap wood at slight angles instead of perfectly straight across.
- Set the jig aside until you need it. Be sure to leave it close by and easily accessible.
- Have a piece of scrap wood nearby, as well, for helping to form the shape of the bent acrylic in the jig.
-
5Set the sheet of acrylic across the rests on the strip heater and turn it on. Be sure that the marked line is above the heating element.[15]
- Turn the sheet of acrylic over on the heating element every 30-60 seconds in order to avoid damaging it. Wear gloves as you do this to avoid burning your hands.
- Only keep the acrylic on the strip heater long enough for it to become flexible, at which point it is ready for you to bend.
- It may be helpful to clamp the acrylic in place while it is being heated so that only the marked area is heated and the sheet of acrylic does not move.[16]
-
6Remove the heated, flexible acrylic from the strip heater and move it to the jig. Remember to wear gloves so that you do not burn your hands.
- Bend the acrylic to match the angle of the jig. Then, set the acrylic into the jig so that it will form to that angle as it cools.
- Set the flat piece of scrap wood on top of the acrylic to keep it in place in the jig while it cools, so that it forms to the correct angle. You could also use clamps, if you have your jig set up on a table surface with room to apply the clamps.
- Do not remove the acrylic from the jig until it has cooled, or it might lose its new shape.
-
7Repeat the heating process as necessary for any other bends in the sheet of acrylic. If you have no other bends to make in the acrylic, then move onto the last step, or you might be done with your project.
- Remember to wait until the initial bend in the acrylic has completely cooled before attempting another bend in the same sheet of acrylic. Moving it while it is still warm and flexible will cause it to lose the bend.
-
8Trace the sides of your bent acrylic in order to create side pieces for an enclosure. You will need to trace them onto an additional piece of flat acrylic.
- Remember to trace both sides of your newly bent acrylic, as they may not be the exact same shape and size.
- Cut out the side pieces using a Dremel saw or a razor knife. Take care not to crack the acrylic, which may cause you to have to start over.
- Fit the side pieces into the bent acrylic to create your enclosure. Secure the sides with acrylic glue and an applicator, and use clamps to hold them in place to set for several minutes.


Expert Q&A
Did you know you can get expert answers for this article?
Unlock expert answers by supporting wikiHow
-
QuestionHow do you bend acrylic?
 Abraham SchwartzAbraham Schwartz is a handyman and the owner of Fixin’ To Do, a home improvement service in Austin, Texas. Abraham specializes in both small to medium residential and commercial sized jobs, ranging from TV mounting to furniture assembly to home automation setup. Prior to starting Fixin’ To Do, Abraham worked for over 10 years as a handyman for third party services and had a lifetime of learning how to improve houses. He holds both his TSBPE Plumbing Examiners and Electrical Apprentice (TX) Licenses. In 2018 and 2019, Fixin’ To do was rated as a Top Pro by Thumbtack.
HandymanWarm up the acrylic with a heat gun or blow dryer so it becomes pliable. Then, gently bend it, going slowly so it doesn't crack.
Support wikiHow by unlocking this expert answer.
Warnings


References
- ↑ http://makezine.com/2013/02/06/workshop-wednesday-heat-bending-acrylic-enclosures/
- ↑ http://hackaday.com/2013/02/07/heating-bending-and-gluing-to-make-acrylic-enclosures/
- ↑ http://makezine.com/2013/02/06/workshop-wednesday-heat-bending-acrylic-enclosures/
- ↑ http://makezine.com/2013/02/06/workshop-wednesday-heat-bending-acrylic-enclosures/
- ↑ http://dictionary.reference.com/browse/jig
- ↑ http://makezine.com/2013/02/06/workshop-wednesday-heat-bending-acrylic-enclosures/
- ↑ Abraham Schwartz. Handyman. Expert Interview. 28 August 2020.
- ↑ Abraham Schwartz. Handyman. Expert Interview. 28 August 2020.
- ↑ http://makezine.com/2013/02/06/workshop-wednesday-heat-bending-acrylic-enclosures/
- ↑ http://hackaday.com/2013/02/07/heating-bending-and-gluing-to-make-acrylic-enclosures/
- ↑ http://makezine.com/2013/02/06/workshop-wednesday-heat-bending-acrylic-enclosures/
- ↑ http://www.technologystudent.com/joints/desk17.htm
- ↑ http://dictionary.reference.com/browse/jig
- ↑ http://www.technologystudent.com/joints/desk17.htm
- ↑ http://www.technologystudent.com/joints/desk17.htm
- ↑ http://www.plaskolite.com/Fabrication/Acrylic/Forming
- ↑ http://www.plaskolite.com/Fabrication/Acrylic/Forming
- ↑ Abraham Schwartz. Handyman. Expert Interview. 28 August 2020.
- ↑ https://www.naturalhandyman.com/iip/infxtra/infacrylic.html
About This Article

Before you bend acrylic, set it between 2 pieces of scrap wood and clamp them together with a vice. Then, aim a heat gun at the point on the acrylic you want to bend. As the acrylic heats up, move the heat gun from side to side and steadily push on it with a piece of scrap wood to help it bend. If you need to make further bends, let the first bend cool before continuing so you don't lose it. To make side pieces, trace the sides of your newly-bent acrylic onto a flat piece and cut them out with a saw. For tips on how to bend acrylic with a strip heater and how to determine dimensions when bending acrylic, read on!